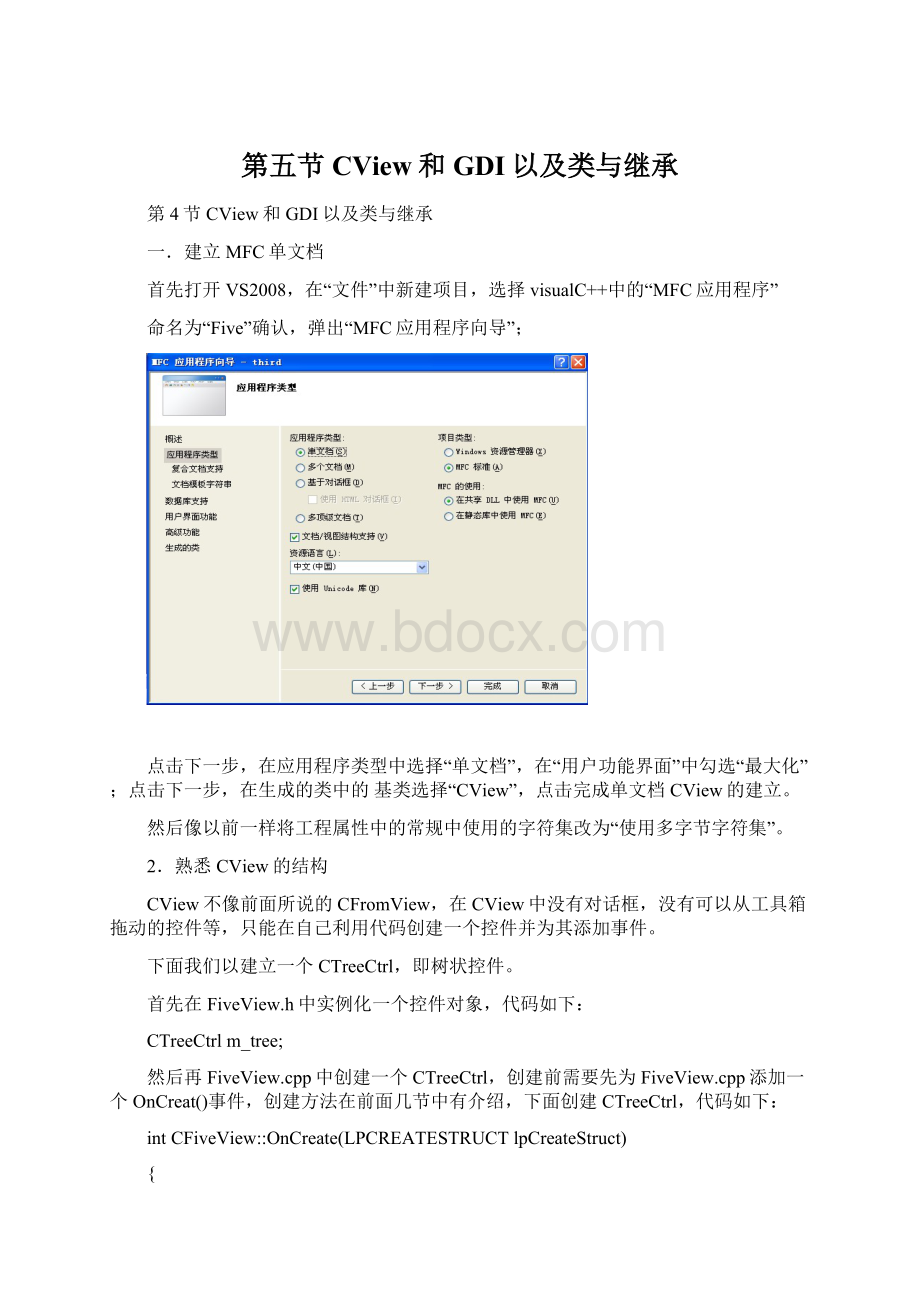
第五节 CView和GDI以及类与继承Word格式文档下载.docx
《第五节 CView和GDI以及类与继承Word格式文档下载.docx》由会员分享,可在线阅读,更多相关《第五节 CView和GDI以及类与继承Word格式文档下载.docx(14页珍藏版)》请在冰豆网上搜索。

return0;
}
如果直接写上面的程序会报出错误,因为没有IDC_TREECTRL,其中IDC代表资源文件。
因此我们需要现在resources.h中声明此ID,代码如下:
#defineIDC_TREECTRL130
不能与resources.h中的其他重复。
另外我需要介绍下m_tree.Creat方法中的相关内容,代表了创建的CTreeCtrl拥有的样式,
而后面的m_tree.ModifyStyle()的作用是对CTreeCtrl的样式进行增加或删除,其定义为:
BOOLModifyStyle(DWORDdwRemove,DWORDdwAdd,UINTnFlags=0);
dwRemove是进行删除的项,若没有,设为0;
dwAdd是进行添加的项,同样,没有则设为0。
上面的功能就是移除已经定义了的TVS_CHECKBOXES。
其中的CRect(0,0,0,0)代表建立一个确定坐标的矩形。
当改变窗体大小时,树状控件也随其变化,并充满窗体。
首先为FiveView.cpp添加一个OnSize()事件,写下如下代码:
if(m_tree.m_hWnd)
m_tree.SetWindowPos(NULL,0,0,cx,cy,SWP_NOZORDER);
在属性为FiveView.cpp添加一个OnInitialUpdate()方法,通过此方法为树状控件添加节点,代码如下:
voidCFiveView:
OnInitialUpdate()
CView:
OnInitialUpdate();
HTREEITEMm_node=m_tree.InsertItem("
根节点"
TVI_ROOT);
m_tree.InsertItem("
第一层节点"
m_node);
根节点2"
运行效果如图:
3.基于CView的GDI绘图
新建一个工程,命名为“Five_GDI”,方法与上面一样。
找到Five_GDIView.cpp中的OnDraw()方法,其中的CDC就是进行绘图的类,
1)下面在指定坐标上输出文字,代码如下:
voidCFive_GDIView:
OnDraw(CDC*pDC)
CFive_GDIDoc*pDoc=GetDocument();
ASSERT_VALID(pDoc);
if(!
pDoc)
return;
pDC->
TextOut(100,100,"
Hello,World!
"
);
}效果如图
2)
在窗口中画线,代码如下:
pDC->
MoveTo(100,200);
LineTo(500,600);
效果如图
3)在窗口画矩形和椭圆
Rectangle(100,100,200,200);
Ellipse(400,200,500,400);
4)画红色边框的矩形
CPenpPen,*oldPen;
pPen.CreatePen(1,2,RGB(255,0,0));
oldPen=pDC->
SelectObject(&
pPen);
Rectangle(100,100,200,300);
SelectObject(oldPen);
pPen.DeleteObject();
5)画内部填充颜色的矩形框
CBrushpBrush,*oldBrush;
pBrush.CreateSolidBrush(RGB(0,225,0));
oldBrush=pDC->
pBrush);
SelectObject(oldBrush);
pBrush.DeleteObject();
其中外框属于CPen类,而内部为CBrush类
注:
在将新画笔使用完成后,需要还原为默认颜色,否则画笔颜色会被更改。
另外使用完成后要删除对象,否则可能会引起内存泄露。
6)
创建没有边框的内有填充的矩形
oldPen=(CPen*)pDC->
SelectStockObject(NULL_PEN);
pBrush.CreateSolidBrush(RGB(255,0,0));
Rectangle(100,200,200,400);
其中外框选择NULL_PEN,因此不需要为其设定颜色。
7)创建只有边框没有内部填充的矩形
CPenpPen,*oldPen;
pPen.CreatePen(1,2,RGB(255,0,0));
oldBrush=(CBrush*)pDC->
SelectStockObject(NULL_BRUSH);
此情况与6)情况相同。
8)关于用户坐标与窗口坐标的转换
CRectwinrt;
GetWindowRect(winrt);
ScreenToClient(winrt);
CRectrt;
GetClientRect(rt);
在应用中要注意我们所使用的坐标系统,并成功进行转换。
4.利用类与继承画矩形和椭圆
首先在工程的包含.h文件目录下建立一个文件夹,命名为“include”;
然后在VS05中“解决方案资源管理器”中的工程中添加一个类,选择“C++类”,类名为:
RectPainter,.h文件中输入include\Rectpainter.h,确定。
然后再添加两个筛选器,分别命名为:
include.cpp和include.h。
然后将生成的Rectpainter.cpp和Rectpainter.h分别拖入其中。
如图:
1)类:
在Rectpainter.h中声明类的方法和属性,代码如下:
classRectPainter
public:
RectPainter(void);
virtual~RectPainter(void);
voidSetRect(doubleleft,doubletop,doubleright,doublebottom);
inlinevoidSetBackColor(COLORREFcr,COLORREFcb)
{
backColor=cr;
backColor2=cb;
}
voidDraw(CDC*pDC);
protected:
DOUBLEl,t,r,b;
COLORREFbackColor;
COLORREFbackColor2;
};
然后在Rectpainter.cpp中实现上面的方法:
RectPainter:
RectPainter(void)
~RectPainter(void)
voidRectPainter:
SetRect(doubleleft,doubletop,doubleright,doublebottom)
l=left;
t=top;
r=right;
b=bottom;
Draw(CDC*pDC)
pPen.CreatePen(0,2,backColor);
pBrush.CreateSolidBrush(backColor2);
Rectangle(l,t,r,b);
上面我们完成了Rectpainter类的建立,下面我们来实例化该类并应用
在Five_GDI2View.h实例化,并添加头文件,代码如下:
#include"
include\RectPainter.h"
.........
RectpainterpPainter;
然后在OnCreat事件中写下如下代码
intCFive_GDI2View:
............
pPainter.SetRect(100,100,200,200);
pPainter.SetBackColor(RGB(255,0,0),RGB(0,255,0));
.............
最后绘制图像,即在OnDraw事件中添加代码:
voidCFive_GDI2View:
OnDraw(CDC*pDC)//注意把原有的/**/去掉
pPainter.Draw(pDC);
2)继承:
新建一个工程命名为Five_GDI1,建立方法与上面一致。
在Rectpainter.h中声明类的方法和属性,
classCGeometryPainter
CGeometryPainter()
};
virtual~CGeometryPainter()
voidSetRect(doubleleft,doubletop,doubleright,doublebuttom);
voidSetBackColor(COLORREFcr)
virtualvoidDraw(CDC*pDC)=0;
classCRectPainter:
publicCGeometryPainter
CRectPainter();
virtual~CRectPainter();
classCEllipsesPainter:
CEllipsesPainter();
virtual~CEllipsesPainter();
其中CGeometryPainter为基类,而CRectPainter和CEllipsesPainter都继承与它,由于其中的Draw方法具有不同,所以需要在CGeometryPainter将其设为虚方法;
virtualvoidDraw(CDC*pDC)=0;
而CGeometryPainter则为抽象类,不能进行实例化,如果要实例需要用到指针,后面将要使用。
voidCGeometryPainter:
SetRect(doubleleft,doubletop,doubleright,doublebuttom)
b=buttom;
CRectPainter:
CRectPainter(void)
~CRectPainter(void)
voidCRectPainter:
pBrush.CreateSolidBrush(backColor);
CEllipsesPainter:
CEllipsesPainter(void)
~CEllipsesPainter(void)
voidCEllipsesPainter:
Draw(CDC*pDC)
Ellipse(l,t,r,b);
CArray<
CGeometryPainter*,CGeometryPainter*>
pGeoPainters;
这儿我们使用数组用来存放各个图形。
CGeometryPainter*pGeoPainter;
//这就是上面所说的抽象类的实例
for(inti=0;
i<
6;
i++)
if(i%2==0)
{
pGeoPainter=newCRectPainter();
pGeoPainter->
SetRect(100+i*100,100+i*100,200+i*100,200+i*100);
SetBackColor(RGB(255,0,0));
}
else
pGeoPainter=newCEllipsesPainter();
SetRect(100+i*100,100+i*100,200+i*100,250+i*100);
SetBackColor(RGB(0,255,0));
pGeoPainters.Add(pGeoPainter);
在此创建图形,最后在OnDraw事件中绘制完成,代码如下:
voidCFive_GDI1View:
CFive_GDI1Doc*pDoc=GetDocument();
intSize=pGeoPainters.GetSize();
for(intk=0;
k<
Size;
k++)
pGeoPainters[k]->
Draw(pDC);