How to install InTouch Server Appplication.docx
《How to install InTouch Server Appplication.docx》由会员分享,可在线阅读,更多相关《How to install InTouch Server Appplication.docx(59页珍藏版)》请在冰豆网上搜索。
HowtoinstallInTouchServerAppplication
Howtoinstall:
InTouchApplicationServerthefirsttime.
Warning:
Useadministratorlogon.
Don’tforgettodefinescreenareaas1280by1024pixels.
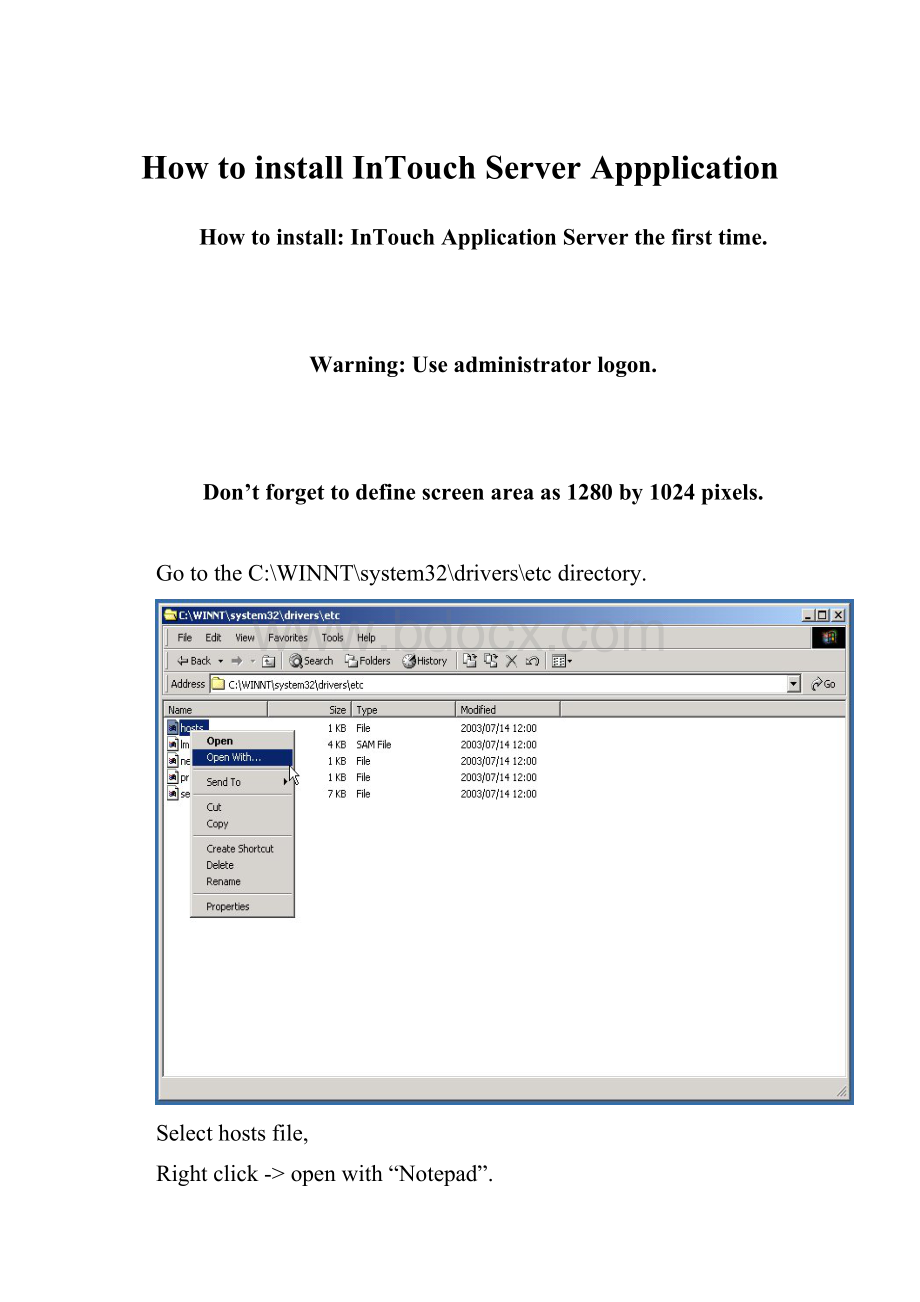
GototheC:
\WINNT\system32\drivers\etcdirectory.
Selecthostsfile,
Rightclick->openwith“Notepad”.
Enteraddress“192.168.1.50”andname”EJ01”,
Enteraddress“192.168.1.51”andname”LJ01”,
Enteraddress“192.168.1.52”andname”CJ01”,
Enteraddress“192.168.1.53”andname”CJ02”,
Enteraddress“192.168.1.54”andname”CJ03”,
Enteraddress“192.168.1.55”andname”LJ02”,
Enteraddress“192.168.1.56”andname”XJ01”,
Filemenu->Save,
Filemenu->Exit.
Becareful,beforecontinuing,besurethat:
-pingEJ01isOK(HPC),
-pingLJ01isOK(HPC),
-pingCJ01isOK(HPC),
-pingCJ02isOK(HPC),
-pingCJ03isOK(HPC),
-pingLJ02isOK(HPC),
-pingXJ01isOK(HPC),
-pingTHAPL_PC1isOK(clientPC),
-pingTHAPL_PC2isOK(clientPC),
-pingTHAPL_PC3isOK(clientPC),
-pingTHAPL_PC4isOK(clientPC),
-pingTHAPL_PC5isOK(clientPC),
-pingTHAPL_PC6isOK(clientPCSkin),
-pingTHAPL_PC7isOK(developmentPC).
GototheD:
\TISCO_HAPLdirectory.
Selectmaj_serveur.cmdfile,
Rightclick->Createshortcutondesktop,
Doubleclickon“Shortcuttomaj_serveur.cmd”toupdateapplicationserver.
Pressanykeytoexitwindow.
StartingHPCSRVthefirsttime.
Doubleclickon“ShortcuttoHPCSRV”tostartHPCSRV.
Filemenu->ImportfromHMI…
SelectD:
\TISCO_HAPL\InTouch_Serverdirectory,
SelectDB.CSVfile,andclickon“Open”button.
Selectdevice“CJ01”,
Rightclick->Properties,
EnterIPAddress“192.168.1.52”,andclickon“OK”button.
Selectgroup“CENT”,
Rightclick->Properties.
EnterUpdateperiod(ms):
“500”,
SelectProtocol:
“ResourceDB”,
Clickon“FromFlash”button,
Clickon“OK”button.
Ifwarningmessageclickon“Yes”buttontotakenewvalueinaccount.
Selectgroup“CENTD”,
Rightclick->Properties.
EnterUpdateperiod(ms):
“1000”,
SelectProtocol:
“FUFA”,
Clickon“Yes”buttontodefineaDEFsegment,
EnterLinkedto:
“CENT”,
Clickon“FromFlash”button,
Clickon“OK”button.
Ifwarningmessageclickon“Yes”buttontotakenewvalueinaccount.
Selectgroup“CENTF”,
Rightclick->Properties.
EnterUpdateperiod(ms):
“1000”,
SelectProtocol:
“FUFA”,
Clickon“NO”button,
EnterLinkedto:
“CENT”
Clickon“FromFlash”button,
Clickon“OK”button.
Selectdevice“CJ02”,
Rightclick->Properties,
EnterIPAddress“192.168.1.53”,andclickon“OK”button.
Selectgroup“SKIN”,
Rightclick->Properties.
EnterUpdateperiod(ms):
“500”,
SelectProtocol:
“ResourceDB”,
Clickon“FromFlash”button,
Clickon“OK”button.
Ifwarningmessageclickon“Yes”buttontotakenewvalueinaccount.
Selectgroup“SKIND”,
Rightclick->Properties.
EnterUpdateperiod(ms):
“1000”,
SelectProtocol:
“FUFA”,
Clickon“Yes”buttontodefineaDEFsegment,
EnterLinkedto:
“SKIN”,
Clickon“FromFlash”button,
Clickon“OK”button.
Ifwarningmessageclickon“Yes”buttontotakenewvalueinaccount.
Selectgroup“SKINF”,
Rightclick->Properties.
EnterUpdateperiod(ms):
“1000”,
SelectProtocol:
“FUFA”,
Clickon“NO”button,
EnterLinkedto:
“SKIN”
Clickon“FromFlash”button,
Clickon“OK”button.
Selectdevice“CJ03”,
Rightclick->Properties,
EnterIPAddress“192.168.1.54”,andclickon“OK”button.
Selectgroup“PICK”,
Rightclick->Properties.
EnterUpdateperiod(ms):
“500”,
SelectProtocol:
“ResourceDB”,
Clickon“FromFlash”button,
Clickon“OK”button.
Ifwarningmessageclickon“Yes”buttontotakenewvalueinaccount.
Selectgroup“PICKD”,
Rightclick->Properties.
EnterUpdateperiod(ms):
“1000”,
SelectProtocol:
“FUFA”,
Clickon“Yes”buttontodefineaDEFsegment,
EnterLinkedto:
“PICK”,
Clickon“FromFlash”button,
Clickon“OK”button.
Ifwarningmessageclickon“Yes”buttontotakenewvalueinaccount.
Selectgroup“PICKF”,
Rightclick->Properties.
EnterUpdateperiod(ms):
“1000”,
SelectProtocol:
“FUFA”,
Clickon“NO”button,
EnterLinkedto:
“PICK”
Clickon“FromFlash”button,
Clickon“OK”button.
Selectdevice“EJ01”,
Rightclick->Properties,
EnterIPAddress“192.168.1.50”,andclickon“OK”button.
Selectgroup“ENT”,
Rightclick->Properties.
EnterUpdateperiod(ms):
“500”,
SelectProtocol:
“ResourceDB”,
Clickon“FromFlash”button,
Clickon“OK”button.
Ifwarningmessageclickon“Yes”buttontotakenewvalueinaccount.
Selectgroup“ENTD”,
Rightclick->Properties.
EnterUpdateperiod(ms):
“1000”,
SelectProtocol:
“FUFA”,
Clickon“Yes”buttontodefineaDEFsegment,
EnterLinkedto:
“ENT”,
Clickon“FromFlash”button,
Clickon“OK”button.
Ifwarningmessageclickon“Yes”buttontotakenewvalueinaccount.
Selectgroup“ENTF”,
Rightclick->Properties.
EnterUpdateperiod(ms):
“1000”,
SelectProtocol:
“FUFA”,
Clickon“NO”button,
EnterLinkedto:
“ENT”
Clickon“FromFlash”button,
Clickon“OK”button.
Selectdevice“LJ01”,
Rightclick->Properties,
EnterIPAddress“192.168.1.51”,andclickon“OK”button.
Selectgroup“AUXI”,
Rightclick->Properties.
EnterUpdateperiod(ms):
“500”,
SelectProtocol:
“ResourceDB”,
Clickon“FromFlash”button,
Clickon“OK”button.
Ifwarningmessageclickon“Yes”buttontotakenewvalueinaccount.
Selectgroup“AUXID”,
Rightclick->Properties.
EnterUpdateperiod(ms):
“1000”,
SelectProtocol:
“FUFA”,
Clickon“Yes”buttontodefineaDEFsegment,
EnterLinkedto:
“AUXI”,
Clickon“FromFlash”button,
Clickon“OK”button.
Ifwarningmessageclickon“Yes”buttontotakenewvalueinaccount.
Selectgroup“AUXIF”,
Rightclick->Properties.
EnterUpdateperiod(ms):
“1000”,
SelectProtocol:
“FUFA”,
Clickon“NO”button,
EnterLinkedto:
“AUXI”
Clickon“FromFlash”button,
Clickon“OK”button.
Selectdevice“LJ02”,
Rightclick->Properties,
EnterIPAddress“192.168.1.55”,andclickon“OK”button.
Selectgroup“TK”,
Rightclick->Properties.
EnterUpdateperiod(ms):
“500”,
SelectProtocol:
“ResourceDB”,
Clickon“FromFlash”button,
Clickon“OK”button.
Ifwarningmessageclickon“Yes”buttontotakenewvalueinaccount.
Selectgroup“TKD”,
Rightclick->Properties.
EnterUpdateperiod(ms):
“1000”,
SelectProtocol:
“FUFA”,
Clickon“Yes”buttontodefineaDEFsegment,
EnterLinkedto:
“TK”,
Clickon“FromFlash”button,
Clickon“OK”button.
Ifwarningmessageclickon“Yes”buttontotakenewvalueinaccount.
Selectdevice“XJ01”,
Rightclick->Properties,
EnterIPAddress“192.168.1.56”,andclickon“OK”button.
Selectgroup“EXT”,
Rightclick->Properties.
EnterUpdateperiod(ms):
“500”,
SelectProtocol:
“ResourceDB”,
Clickon“FromFlash”button,
Clickon“OK”button.
Ifwarningmessageclickon“Yes”buttontotakenewvalueinaccount.
Selectgroup“EXTD”,
Rightclick->Properties.
EnterUpdateperiod(ms):
“1000”,
SelectProtocol:
“FUFA”,
Clickon“Yes”buttontodefineaDEFsegment,
EnterLinkedto:
“EXT”,
Clickon“FromFlash”button,
Clickon“OK”button.
Ifwarningmessageclickon“Yes”buttontotakenewvalueinaccount.
Selectgroup“EXTF”,
Rightclick->Properties.
EnterUpdateperiod(ms):
“1000”,
SelectProtocol:
“FUFA”,
Clickon“NO”button,
EnterLinkedto:
“EXT”
Clickon“FromFlash”button,
Clickon“OK”button.
Ifwarningmessageclickon“Yes”buttontotakenewvalueinaccount.
Filemenu->Save.
Filemenu->ExporttoHMI…
EnterFilename:
PourOpcLink,andclickon“Open”file.
StartingOPCLINKthefirsttime.
Doubleclickon“ShortcuttoOPClink”tostartOPCLink.
Filemenu->Open.
Select“D:
\TISCO_HAPL\Hpcsrv\export\PourOpcLink.cfg”fileandclickon“Open”button.
StartingINTOUCHthefirsttime.
Doubleclickon“ShortcuttoINTOUCH”tostartInTouch.
Clickon“Next”button.
Selectdirectory“D:
\TISCO_HAPL\InTouch_Server”bybrowsing,andclickon“OK”button.
Clickon“Finish”button.
Selectapplicationname“TiscoHAPLServer”,andclickon“viewer”tostartintouch.
StartingLOGGERHISTORICthefirsttime.
Select“Start->Programs->Wonderware->InTouch->AlarmDBLoggerManager”.
Clickon“Setting”button.
SelectServerName“(local)”,
EnterUserName“sa”withoutPassword,
Select“Detailed”,andclickon“Create”button.
Clickon“Yes”button.
Clickon“OK”button.
Clickon“TestConnection”button.
Clickon“OK”buttonifsuccessconnection.
Clickon“Next”button.
EnterFromPriority“1”ToPriority“998”,andclickon“Next”button.
BydefaulteverythingisOK,andclickon“Finish”button.
Clickon“Start”button.
StartingPURGEHISTORICthefirsttime.
Select“Start->Programs->Wonderware->InTouch->AlarmDBPurge-Archive”.
Select“Database”item.
SelectServerName“(local)”,
EnterUserName“sa”withoutPassword,andclickon“TestConnection”button.
Clickon“OK”button.
Clickon“Apply”button,andselect“General”item.
Select“DetailedMode”,“8”DaysOnline,
EnterArchiveFolderPath“D:
\TISCO_HAPL\History\Archives”bybrowsing,
EnterLogFilePath“D:
\TISCO_HAPL\History\LogFiles”bybrowsing,
Clickon“Apply”button,andselect“Purge/Archive”item.
Select“Daily”,Time“00:
00”,
Clickon“Apply”button.
Clickon“TestNow”tovalidateconfiguration.
Clickon“Activate”buttontostartdatabasepurge.
WARNING:
Neverclosethiswindow.Youcanonlyminimizewindow.
GotoC:
\WINNT.
Selectwin.ini,
Rightclick->OpenWith…->Notepad.
Insertin[InTouch]area:
AlarmDBPurgeArchiveActivated=1
Filemenu->Exi
 升级会员
升级会员 