ps手机产品设计Create a Mobile Phone.docx
《ps手机产品设计Create a Mobile Phone.docx》由会员分享,可在线阅读,更多相关《ps手机产品设计Create a Mobile Phone.docx(27页珍藏版)》请在冰豆网上搜索。
ps手机产品设计CreateaMobilePhone
ps手机产品设计CreateaMobilePhone
这是一篇关于国外的手机产品设计的教程。
其实我觉得这个跟做一个复杂图标是一样的。
里面很多效果的设计方法完全可以应用到图标设计中去。
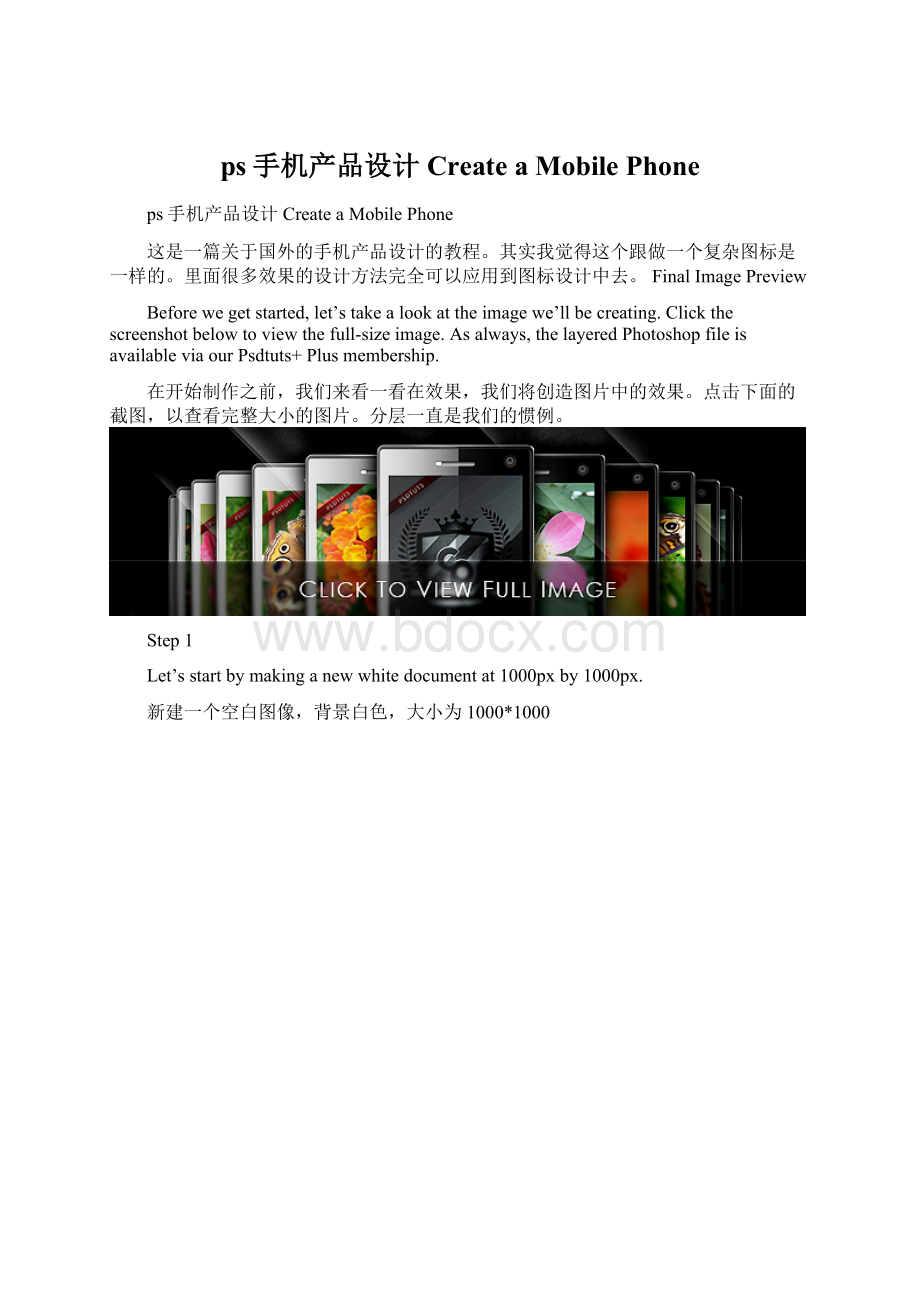
FinalImagePreview
Beforewegetstarted,let’stakealookattheimagewe’llbecreating.Clickthescreenshotbelowtoviewthefull-sizeimage.Asalways,thelayeredPhotoshopfileisavailableviaourPsdtuts+Plusmembership.
在开始制作之前,我们来看一看在效果,我们将创造图片中的效果。
点击下面的截图,以查看完整大小的图片。
分层一直是我们的惯例。
Step1
Let’sstartbymakinganewwhitedocumentat1000pxby1000px.
新建一个空白图像,背景白色,大小为1000*1000
Step2
Nowwe’llmakethebaseofthephone.UsingtheRoundedRectangleTool(U)setto20pixels,makeashapeasshownbelow.
现在,我们将做出该手机的主体。
使用圆角矩形工具(快捷键U),直径设置为20像素,画出一个形状,如下图所示。
Step3
NextusingthesametoolyouneedtoholddowntheAltbuttonbeforeyoustartmakingashape.Thiswillextractfromthefirstshapeyoumade.Also,usetherulersandgridtohelpsettheshapeofthephone.Whenyou’redonenametheshape"Phoneshape1."
您需要按住Alt的按钮,注意用上一步所用到的工具绘制。
这将从第一个形状所提取的。
此外,使用标尺和网格来帮助定位电话的形状。
当您完成时,请将形状重命名为"电话形状1"。
Step4
Nextyouneedtoduplicatethislayer,fillthecopywith#5b5b5b,andnameit"Phoneshape2."
Step5
EntertheBlendingOptionsbydouble-clickinginthe"Phoneshape2"layerandenterthesettingsshownbelow.Youcanexperiment,butIpersonallylikethosesettings.
Step6
Makeanewlayerandnameit"light."ThenCtrl+Clickonthe"Phoneshape2"layerthumbnailtomakeaselection.ThenusingtheRectangularMarqueeTool(M),takeoutsomeoftheselection.
详见附件...............Step19
Makeanewcircle,butthistimemakeitalittlesmaller.Whenyoustartmakingthecirclestartfromthemiddleoftheothercircle,holddowntheAlt+Shiftbuttonsanddrag.Thiswillhelpyoumakethecircleperfectandintherightposition.
Step20
Again,changetheBlendingOptionSettingstomatchthoseshownbelow.
Step21
Makeanewlayerabovethecircles.Callit"Shine1."UsingtheGradientTool(G)settoRadialGradientandtowhite,clickanddragasIdid.
Step22
Nowyou’llneedtomaskthelighttoshowonlyintothebutton.NextsetthelayertoLinearLightwith34%Opacity.
Step23
Makeanewlayerandnameit"Shine2."MakeaselectionasIdidusingtheEllipticalMarqueeTool(M).Fillthelayerwithwhite,maskitsothatitwillbevisibleonlyonthebutton,andsetittoSoftLightwith70%Opacity.
Step24
UsingthePenTool(P),makeapath.SettheBrushto2pixelswithaHardnessof100%.GrabthePenTool(P)andmakeaStroke.Again,makesureyoumaketheStroketowhite.
Step34
NextwerecreatethelogousingthePenTool(P),ordesignyourownlogo.
详见附件.................Step43
Nextmakeanotherwhitelayerthatyou’llBlurandchangetheOpacityto5%.
Step44
Makeanotherfolderandnameit"speaker."InherecreateanewshapeusingtheRoundedRectangleTool(U).Makesureit’ssetto10pixels.
Step45
InserttheBlendingOptionsshownbelowintothelayer.
Step49
Themobileisalmostfinished.Whatwe’lldonowismakeanicetexture.Makeanewlayerandnameit"Noise."Withinthislayer,makeanewlayerandfillitwithwhite.GotoFilter>Noise>AddNoiseandusethesettingsshownbelow.Also,settheimagetoMultiplywitha20%Opacity.
Intheend,you’llneedtomakeaselectionofonlytheexteriorpartofthephoneandmaskthenoise.Thisissoitwillbevisibleonlyonthispart.
电话已差不多被完成了.现在我们要做的是创造一个漂亮的材质,创建一个新图层,命名为"Noise".在这层里面(这里我觉得应该是图层夹),创建一个新图层,并填充为白色,应用滤镜>杂色>添加杂色并使用如下的图层样式,另设置图层混合模式为叠加(Multiply我不知道是不是叠加-_-#),并设置透明度为20%.
最后,你需要创建一个只有电话外部的选区并遮住杂点(就是做好选区然后加个蒙板),那么它将只显示该部分.
Step50
RepeatStep49,butthistimeyou’llmakeitforadifferentpartofthephone.Followtheimagesbelowtounderstandhowtomaketheselection.
Step51
Thelaststepisallaboutaddingsomemorelightsonthephone.Followtheimagesbelowandyou’llunderstand.ForthenextshapeschangetheOpacityto10%andlower.
FinishingthePhone
Addsomepersonalbrandingtothephone.IaddedmylogoandasmallPsdtuts+banner.
Step52
Nowthatwehavefinishedthemobilephoneweneedtomakeaniceandattractivebackground.Thispartwillbeallaboutmakingagreatadvertisementfortheproduct.
Firstyou’llneedtomoveyourphonetoabiggerdocument(Mysizeis2215×1510)andfillthedocumentwithblack.
Step53
Nextweduplicatethisphonetwelvetimesandarrangethemonebehindeachother.Also,keepinmindthatastheobjectsarefurtherawaytheygetsmaller.Thisistheruleofperspectivethatyouneedtokeepinmind.Also,asyoucanseeIhavechangedtheimageinsideeachphone.IfoundtheimagesoveratSXC.
Step54
Forallthephonesyoujustcreated,youneedtoaddashadow.UsethesettingsbelowfortheBlendingOptions.
Step55
Nowyouneedtoaddashadowforthefirstphonetoo.Let’suseadifferenttechnique.Makeablackshapethatissimilartothephone.
Step56
Movetheshapeinthebackofthephone.Youdothisbymovingthelayeryoujustcreatedbeneaththe"phone"layer.IntotheBlendingOptionsyouneedtousethesettingsshownbelow.
Step57
Nextwe’llmakethereflectionforeachphone.Youdothisbyfirstduplicatingallthephonesandmovingthemupsidedown.
Step58
Nowdon’tsimplysetthemalltoalowOpacity.InthiscaseyouneedtochangesomesettingsintheBlendingOptions.Thethingisthateachreflectionwillhavedifferentsettings.
SettheColorOverlaytoblackonallofthem.NextyouneedtolowertheOpacityforeachone.Youwillstartwiththetwosmallestphones(80%).Thencontinuewiththerestofthem70%,60%,andmaketherest50%.
....................详见附件
 升级会员
升级会员 