Vuex 20 源码分析上.docx
《Vuex 20 源码分析上.docx》由会员分享,可在线阅读,更多相关《Vuex 20 源码分析上.docx(17页珍藏版)》请在冰豆网上搜索。
Vuex20源码分析上
Vuex2.0源码分析(上)
既然Vue.js2.0已经正式发布了,我们也要紧跟步伐,和大家聊一聊Vuex2.0。
本文并不打算讲官网已有的内容,而会通过源码分析的方式,让同学们从另外一个角度认识和理解Vuex2.0。
当我们用Vue.js开发一个中到大型的单页应用时,经常会遇到如下问题:
∙如何让多个Vue组件共享状态
∙Vue组件间如何通讯
通常,在项目不是很复杂的时候,我们会利用全局事件总线(globaleventbus)解决,但是随着复杂度的提升,这些代码将变的难以维护。
因此,我们需要一种更加好用的解决方案,于是,Vuex诞生了。
本文并不是Vuex的科普文章,对于还不了解Vuex的同学,建议先移步 Vuex官方文档;看英文文档吃力的同学,可以看 Vuex的中文文档。
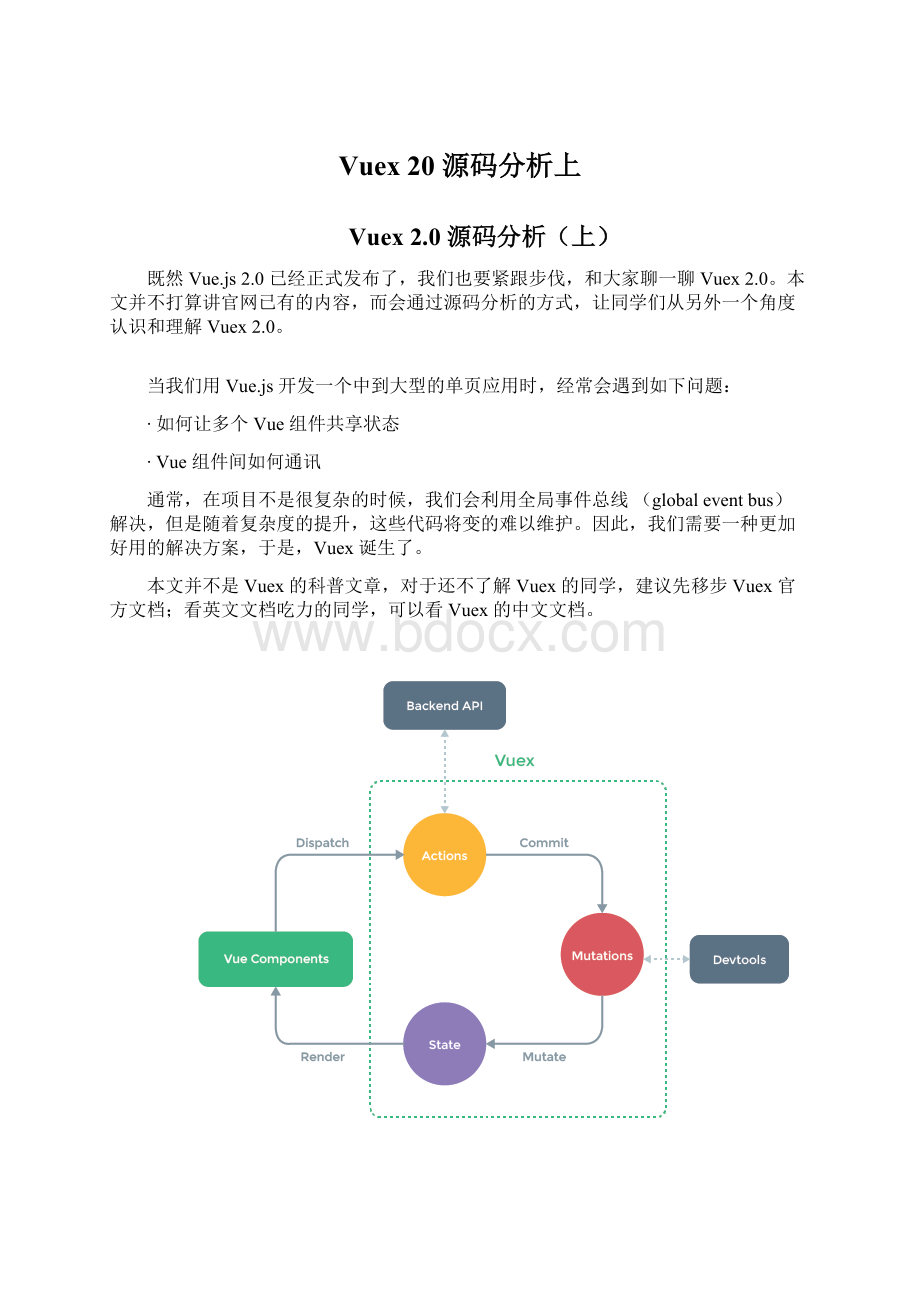
Vuex的设计思想受到了Flux,Redux和TheElmArchitecture的启发,它的实现又十分巧妙,和Vue.js配合相得益彰,下面就让我们一起来看它的实现吧。
目录结构
Vuex的源码托管在 github,我们首先通过git把代码clone到本地,选一款适合自己的IDE打开源码,展开src目录,如下图所示:
src目录下的文件并不多,包含几个js文件和plugins目录,plugins目录里面包含2个Vuex的内置插件,整个源码加起来不过500-600行,可谓非常轻巧的一个库。
麻雀虽小,五脏俱全,我们先直观的感受一下源码的结构,接下来看一下其中的实现细节。
源码分析
本文的源码分析过程不会是自上而下的给代码加注释,我更倾向于是从Vuex提供的API和我们的使用方法等维度去分析。
Vuex的源码是基于es6的语法编写的,对于不了解es6的同学,建议还是先学习一下es6。
从入口开始
看源码一般是从入口开始,Vuex源码的入口是src/index.js,先来打开这个文件。
我们首先看这个库的export,在index.js代码最后。
exportdefault{
Store,
install,
mapState,
mapMutations,
mapGetters,
mapActions}
这里可以一目了然地看到Vuex对外暴露的API。
其中,Store是Vuex提供的状态存储类,通常我们使用Vuex就是通过创建Store的实例,稍后我们会详细介绍。
接着是install方法,这个方法通常是我们编写第三方Vue插件的“套路”,先来看一下“套路”代码:
functioninstall(_Vue){
if(Vue){
console.error(
'[vuex]alreadyinstalled.Vue.use(Vuex)shouldbecalledonlyonce.'
)
return
}
Vue=_Vue
applyMixin(Vue)}
//autoinstallindistmodeif(typeofwindow!
=='undefined'&&window.Vue){
install(window.Vue)}
我们实现了一个install方法,这个方法当我们全局引用Vue,也就是window上有Vue对象的时候,会手动调用install方法,并传入Vue的引用;当Vue通过npm安装到项目中的时候,我们在代码中引入第三方Vue插件通常会编写如下代码:
importVuefrom'vue'importVuexfrom'vuex'...Vue.use(Vuex)
当我们执行Vue.use(Vuex)这句代码的时候,实际上就是调用了install的方法并传入Vue的引用。
install方法顾名思义,现在让我们来看看它的实现。
它接受了一个参数_Vue,函数体首先判断Vue,这个变量的定义在index.js文件的开头部分:
letVue//bindoninstall
对Vue的判断主要是保证install方法只执行一次,这里把install方法的参数_Vue对象赋值给Vue变量,这样我们就可以在index.js文件的其它地方使用Vue这个变量了。
install方法的最后调用了applyMixin方法,我们顺便来看一下这个方法的实现,在src/mixin.js文件里定义:
exportdefaultfunction(Vue){
constversion=Number(Vue.version.split('.')[0])
if(version>=2){
constusesInit=Vue.config._lifecycleHooks.indexOf('init')>-1
Vue.mixin(usesInit?
{init:
vuexInit}:
{beforeCreate:
vuexInit})
}else{
//overrideinitandinjectvuexinitprocedure
//for1.xbackwardscompatibility.
const_init=Vue.prototype._init
Vue.prototype._init=function(options={}){
options.init=options.init
?
[vuexInit].concat(options.init)
:
vuexInit
_init.call(this,options)
}
}
/**
*Vuexinithook,injectedintoeachinstancesinithookslist.
*/
functionvuexInit(){
constoptions=this.$options
//storeinjection
if(options.store){
this.$store=options.store
}elseif(options.parent&&options.parent.$store){
this.$store=options.parent.$store
}
}
}
这段代码的作用就是在Vue的生命周期中的初始化(1.0版本是init,2.0版本是beforeCreated)钩子前插入一段Vuex初始化代码。
这里做的事情很简单——给Vue的实例注入一个 $store 的属性,这也就是为什么我们在Vue的组件中可以通过 this.$store.xxx 访问到Vuex的各种数据和状态。
认识Store构造函数
我们在使用Vuex的时候,通常会实例化Store类,然后传入一个对象,包括我们定义好的actions、getters、mutations、state等,甚至当我们有多个子模块的时候,我们可以添加一个modules对象。
那么实例化的时候,到底做了哪些事情呢?
带着这个疑问,让我们回到index.js文件,重点看一下Store类的定义。
Store类定义的代码略长,我不会一下就贴上所有代码,我们来拆解分析它,首先看一下构造函数的实现:
classStore{
constructor(options={}){
assert(Vue,`mustcallVue.use(Vuex)beforecreatingastoreinstance.`)
assert(typeofPromise!
=='undefined',`vuexrequiresaPromisepolyfillinthisbrowser.`)
const{
state={},
plugins=[],
strict=false
}=options
//storeinternalstate
this._options=options
this._committing=false
this._actions=Object.create(null)
this._mutations=Object.create(null)
this._wrappedGetters=Object.create(null)
this._runtimeModules=Object.create(null)
this._subscribers=[]
this._watcherVM=newVue()
//bindcommitanddispatchtoself
conststore=this
const{dispatch,commit}=this
this.dispatch=functionboundDispatch(type,payload){
returndispatch.call(store,type,payload)
}
mit=functionboundCommit(type,payload,options){
returncommit.call(store,type,payload,options)
}
//strictmode
this.strict=strict
//initrootmodule.
//thisalsorecursivelyregistersallsub-modules
//andcollectsallmodulegettersinsidethis._wrappedGetters
installModule(this,state,[],options)
//initializethestorevm,whichisresponsibleforthereactivity
//(alsoregisters_wrappedGettersascomputedproperties)
resetStoreVM(this,state)
//applyplugins
plugins.concat(devtoolPlugin).forEach(plugin=>plugin(this))
}
...
}
构造函数的一开始就用了“断言函数”,来判断是否满足一些条件。
assert(Vue,`mustcallVue.use(Vuex)beforecreatingastoreinstance.`)
这行代码的目的是确保Vue的存在,也就是在我们实例化Store之前,必须要保证之前的install方法已经执行了。
assert(typeofPromise!
=='undefined',`vuexrequiresaPromisepolyfillinthisbrowser.`)
这行代码的目的是为了确保Promsie可以使用的,因为Vuex的源码是依赖Promise的。
Promise是es6提供新的API,由于现在的浏览器并不是都支持es6语法的,所以通常我们会用babel编译我们的代码,如果想使用Promise这个特性,我们需要在package.json中添加对babel-polyfill的依赖并在代码的入口加上 import'babel-polyfill' 这段代码。
再来看看assert这个函数,它并不是浏览器原生支持的,它的实现在src/util.js里,代码如下:
exportfunctionassert(condition,msg){
if(!
condition)thrownewError(`[vuex]${msg}`)}
非常简单,对condition判断,如果不不为真,则抛出异常。
这个函数虽然简单,但这种编程方式值得我们学习。
再来看构造函数接下来的代码:
const{
state={},
plugins=[],
strict=false}=options
这里就是利用es6的结构赋值拿到options里的state,plugins和strict。
state表示rootState,plugins表示应用的插件、strict表示是否开启严格模式。
接着往下看:
//storeinternalstatethis._options=optionsthis._committing=falsethis._actions=Object.create(null)this._mutations=Object.create(null)this._wrappedGetters=Object.create(null)this._runtimeModules=Object.create(null)this._subscribers=[]this._watcherVM=newVue()
这里主要是创建一些内部的属性:
this._options 存储参数options。
this._committing 标志一个提交状态,作用是保证对Vuex中state的修改只能在mutation的回调函数中,而不能在外部随意修改state。
this._actions 用来存储用户定义的所有的actions。
this._mutations 用来存储用户定义所有的mutatins。
this._wrappedGetters 用来存储用户定义的所有getters。
this._runtimeModules 用来存储所有的运行时的modules。
this._subscribers 用来存储所有对mutation变化的订阅者。
this._watcherVM 是一个Vue对象的实例,主要是利用Vue实例方法$watch来观测变化的。
继续往下看:
//bindcommitanddispatchtoselfconststore=thisconst{dispatch,commit}=thisthis.dispatch=functionboundDispatch(type,payload){
returndispatch.call(store,type,payload)}mit=functionboundCommit(type,payload,options){
returncommit.call(store,type,payload,options)}
//strictmodethis.strict=strict
这里的代码也不难理解,把Store类的dispatch和commit的方法的this指针指向当前store的实例上,dispatch和commit的实现我们稍后会分析。
this.strict表示是否开启严格模式,在严格模式下会观测所有的state的变化,建议在开发环境时开启严格模式,线上环境要关闭严格模式,否则会有一定的性能开销。
Vuex的初始化核心
installModule
我们接着往下看:
//initrootmodule.//thisalsorecursivelyregistersallsub-modules//andcollectsallmodulegettersinsidethis._wrappedGetters
installModule(this,state,[],options)
//initializethestorevm,whichisresponsibleforthereactivity//(alsoregisters_wrappedGettersascomputedproperties)
resetStoreVM(this,state)
//applyplugins
plugins.concat(devtoolPlugin).forEach(plugin=>plugin(this))
这段代码是Vuex的初始化的核心,其中,installModule方法是把我们通过options传入的各种属性模块注册和安装;resetStoreVM方法是初始化store._vm,观测state和getters的变化;最后是应用传入的插件。
下面,我们先来看一下installModule的实现:
functioninstallModule(store,rootState,path,module,hot){
constisRoot=!
path.length
const{
state,
actions,
mutations,
getters,
modules
}=module
//setstate
if(!
isRoot&&!
hot){
constparentState=getNestedState(rootState,path.slice(0,-1))
constmoduleName=path[path.length-1]
store._withCommit(()=>{
Vue.set(parentState,moduleName,state||{})
})
}
if(mutations){
Object.keys(mutations).forEach(key=>{
registerMutation(store,key,mutations[key],path)
})
}
if(actions){
Object.keys(actions).forEach(key=>{
registerAction(store,key,actions[key],path)
})
}
if(getters){
wrapGetters(store,getters,path)
}
if(modules){
Object.keys(modules).forEach(key=>{
installModule(store,rootState,path.concat(key),modules[key],hot)
})
}
}
installModule函数可接收5个参数,store、rootState、path、module、hot,store表示当前Store实例,rootState表示根state,path表示当前嵌套模块的路径数组,module表示当前安装的模块,hot当动态改变modules或者热更新的时候为true。
先来看这部分代码:
constisRoot=!
path.length
const{
state,
actions,
mutations,
getters,
modules
}=module
代码首先通过path数组的长度判断是否为根。
我们在构造函数调用的时候是 installModule(this,state,[],options),所以这里isRoot为true。
module为传入的options,我们拿到了module下的state、actions、mutations、getters以及嵌套的modules。
接着看下面的代码:
//setstateif(!
isRoot&&!
hot){
constparentState=getNestedState(rootState,path.slice(0,-1))
constmoduleName=path[path.length-1]
store._withCommit(()=>{
Vue.set(parentState,moduleName,state||{})
})}
这里判断当不为根且非热更新的情况,然后设置级联状态,这里乍一看不好理解,我们先放一放,稍后来回顾。
再往下看代码:
if(mutations){
Object.keys(mutations).forEach(key=>{
registerMutation(store,key,mutations[key],path)
})}
if(actions){
Object.keys(actions).forEach(key=>{
registerAction(store,key,actions[key],path)
})}
if(getters){
wrapGetters(store,getters,path)}
这里分别是对mutations、actions、getters进行注册,如果我们实例化Store的时候通过options传入这些对象,那么会分别进行注册,我稍后再去介绍注册的具体实现。
那么到这,如果Vuex没有module,这个installModule方法可以说已经做完了。
但是Vuex巧妙了设计了module这个概念,因为Vuex本身是单一状态树,应用的所有状态都包含在一个大对象内,随着我们应用规模的不断增长,这个Store变得非常臃肿。
为了解决这个问题,Vuex允许我们把store分module(模块)。
每一个模块包含各自的state、mutations、actions和getters,甚至是嵌套模块。
所以,接下来还有一行代码:
if(modules){
Object.keys(modules).forEach(key=>{
installModule(store,rootState,path.concat(key),modules[key],hot)
})}
这里通过遍历modules,递归调用installModule去安装子模块。
这里传入了store、rootState、path.concat(key)、和modules[key],和刚才不同的是,path不为空,module对应为子模块,那么我们回到刚才那段代码:
//setstateif(!
isRoot&&!
hot){
constparentState=getNestedState(rootState,path.slice(0,-1))
constmoduleName=path[path.length-1]
store._withCommit(()=>{
Vue.set(parentState,module
 升级会员
升级会员 