OSPF与NAT综合实验.docx
《OSPF与NAT综合实验.docx》由会员分享,可在线阅读,更多相关《OSPF与NAT综合实验.docx(10页珍藏版)》请在冰豆网上搜索。
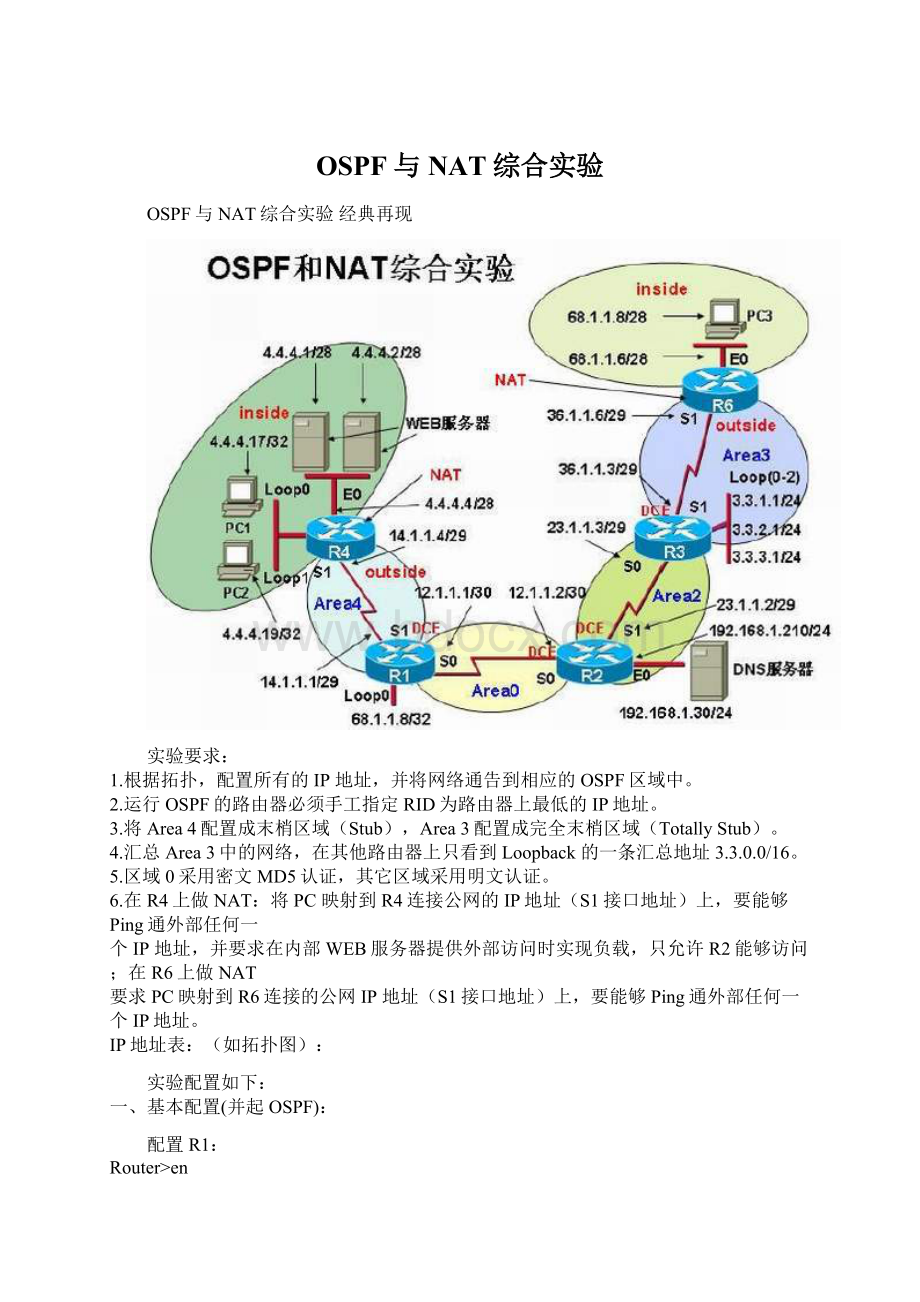
OSPF与NAT综合实验
OSPF与NAT综合实验经典再现
实验要求:
1.根据拓扑,配置所有的IP地址,并将网络通告到相应的OSPF区域中。
2.运行OSPF的路由器必须手工指定RID为路由器上最低的IP地址。
3.将Area4配置成末梢区域(Stub),Area3配置成完全末梢区域(TotallyStub)。
4.汇总Area3中的网络,在其他路由器上只看到Loopback的一条汇总地址3.3.0.0/16。
5.区域0采用密文MD5认证,其它区域采用明文认证。
6.在R4上做NAT:
将PC映射到R4连接公网的IP地址(S1接口地址)上,要能够Ping通外部任何一
个IP地址,并要求在内部WEB服务器提供外部访问时实现负载,只允许R2能够访问;在R6上做NAT
要求PC映射到R6连接的公网IP地址(S1接口地址)上,要能够Ping通外部任何一个IP地址。
IP地址表:
(如拓扑图):
实验配置如下:
一、基本配置(并起OSPF):
配置R1:
Router>en
Router#conft
Router(config)#hoR1
R1(config)#intS1
R1(config-if)#ipadd14.1.1.1255.255.255.248
R1(config-if)#noshut
R1(config-if)#clockrate64000
R1(config-if)#intS0
R1(config-if)#ipadd12.1.1.1255.255.255.252
R1(config-if)#noshut
R1(config-if)#routerospf11
R1(config-router)#net12.1.1.10.0.0.3area0
R1(config-router)#net14.1.1.10.0.0.7area4
R1(config-router)#intloop0
R1(config-if)#ipadd68.1.1.8255.255.255.255
R1(config-if)#end
R1#shrun
配置R2:
Router>en
Router#conft
Router(config)#hoR2
R1(config)#intS1
R2(config-if)#ipadd23.1.1.2255.255.255.248
R2(config-if)#noshut
R2(config-if)#clockrate64000
R2(config-if)#intS0
R2(config-if)#ipadd12.1.1.2255.255.255.252
R2(config-if)#noshut
R2(config-if)#clockrate64000
R2(config-if)#routerospf22
R2(config-router)#net12.1.1.20.0.0.3area0
R2(config-router)#net23.1.1.20.0.0.7area2
R2(config-router)#intE0
R2(config-if)#ipadd192.168.1.210255.255.255.0
R2(config-if)#noshut
R2(config-if)#end
R2#shrun
配置R3:
Router>en
Router#conft
Router(config)#hoR3
R3(config)#intS1
R3(config-if)#ipadd36.1.1.3255.255.255.248
R3(config-if)#noshut
R3(config-if)#clockrate64000
R3(config-if)#intS0
R3(config-if)#ipadd23.1.1.3255.255.255.248
R3(config-if)#noshut
R3(config-router)#intloop0
R3(config-if)#ipadd3.3.1.1255.255.255.0
R3(config-router)#intloop1
R3(config-if)#ipadd3.3.2.1255.255.255.0
R3(config-router)#intloop2
R3(config-if)#ipadd3.3.3.1255.255.255.0
R3(config-if)#routerospf33
R3(config-router)#net23.1.1.30.0.0.7area2
R3(config-router)#net36.1.1.30.0.0.7area3
R3(config-router)#net3.3.1.10.0.0.255area3
R3(config-router)#net3.3.2.10.0.0.255area3
R3(config-router)#net3.3.3.10.0.0.255area3
R3(config-router)#end
R3#shrun
配置R4:
Router>en
Router#conft
Router(config)#hoR4
R4(config)#intS1
R4(config-if)#ipadd14.1.1.4255.255.255.248
R4(config-if)#noshut
R4(config-if)#intE0
R4(config-if)#ipadd4.4.4.4255.255.255.240
R4(config-if)#noshut
R4(config-if)#intloop0
R4(config-if)#ipadd4.4.4.17255.255.255.255
R4(config-router)#intloop1
R4(config-if)#ipadd4.4.4.19255.255.255.255
R4(config-if)#routerospf44
R4(config-router)#net14.1.1.40.0.0.7area4
R4(config-router)#end
R4#shrun
配置R6:
Router>en
Router#conft
Router(config)#hoR6
R6(config)#intS1
R6(config-if)#ipadd36.1.1.6255.255.255.248
R6(config-if)#noshut
R6(config-if)#intE0
R6(config-if)#ipadd68.1.1.6255.255.255.240
R6(config-if)#noshut
R6(config-if)#routerospf66
R6(config-router)#net36.1.1.60.0.0.7area4
R6(config-router)#end
R6#shrun
配置R7――模拟WEB服务器A:
Router>en
Router#conft
Router(config)#hoWebA
WebA(config)#noiprouting//关闭路由功能,以模拟PC
WebA(config)#intE0
WebA(config-if)#ipadd4.4.4.1255.255.255.240
WebA(config-if)#noshut
WebA(config-if)#exit
WebA(config)#ipdefault-gateway4.4.4.4//设置默认网关到R4的E0口,通过E0口转发信息
WebB(config)#linevty04
WebB(config-line)#passspoto
WebB(config-line)#login
WebB(config-line)#line05
WebB(config-line)#nologin
WebB(config-line)#passspoto
WebB(config-line)#end
WebA#shrun
配置R8――模拟WEB服务器B:
Router>en
Router#conft
Router(config)#hoWebB
WebB(config)#noiprouting//关闭路由功能,以模拟PC
WebB(config)#intE0
WebB(config-if)#ipadd4.4.4.2255.255.255.240
WebB(config-if)#noshut
WebB(config-if)#exit
WebB(config)#ipdefault-gateway4.4.4.4//设置默认网关到R4的E0口,通过E0口转发信息
WebB(config)#linevty04
WebB(config-line)#passspoto
WebB(config-line)#login
WebB(config-line)#line05
WebB(config-line)#nologin
WebB(config-line)#passspoto
WebB(config-line)#end
WebB#shrun
配置R88――模拟pc3:
Router>en
Router#conft
Router(config)#hopc3
pc3(config)#noiprouting//关闭路由功能,以模拟PC
pc3(config)#intE0
pc3config-if)#ipadd68.1.1.8255.255.255.240
pc3(config-if)#noshut
pc3(config-if)#exit
pc3(config)#ipdefault-gateway68.1.1.6//设置默认网关到R6的E0口,通过E0口转发信息
pc3(config-line)#end
pc3#shrun
二、修改所有路由器的RID为路由器的最小IP:
R1#conft
R1(conft)#routerospf11
R1(config-router)#router-id12.1.1.1//修改R1路由器的RID为最小IP地址
R1(config-router)#end
R1#clearipospfpro//清除当前的OSPF进程信息,刷新以使得修改的RID起作用,
此时R1路由器RID为修改后的值
R2#conft
R2(conft)#routerospf22
R2(config-router)#router-id12.1.1.2//修改R2路由器的RID为最小IP地址
R2(config-router)#end
R2#clearipospfpro//清除当前的OSPF进程信息,刷新以使得修改的RID起作用,
此时R2路由器RID为修改后的值
R3#conft
R3(conft)#routerospf33
R3(config-router)#router-id3.3.1.1//修改R3路由器的RID为最小IP地址
R3(config-router)#end
R3#clearipospfpro//清除当前的OSPF进程信息,刷新以使得修改的RID起作用,
此时R3路由器RID为修改后的值
R4#conft
R4(conft)#routerospf33
R4(config-router)#router-id4.4.4.1//修改R4路由器的RID为最小IP地址
R4(config-router)#end
R4#clearipospfpro//清除当前的OSPF进程信息,刷新以使得修改的RID起作用,
此时R4路由器RID为修改后的值
R6#conft
R6(conft)#routerospf33
R6(config-router)#router-id36.1.1.6//修改R6路由器的RID为最小IP地址
R6(config-router)#end
R6#clearipospfpro//清除当前的OSPF进程信息,刷新以使得修改的RID起作用,
此时R6路由器RID为修改后的值
三、配置V-LINK让OSPF各区域能互相学习到(共享)信息:
R2#shiproute
R2#conft
R2(config)#routerospf22
R2(config-router)#area2virtual-link3.3.1.1//配置V-LINK,Area2作为中转区域,使得Area3能
与Area0互相通信,学习到其它区域的信息,使其能与其它区域互相通信
R2(config-router)#end
R2#shrun
R3#shiproute
R3#conft
R3(config)#routerospf22
R3(config-router)#area2virtual-link12.1.1.2//配置V-LINK,Area2作为中转区域,使得Area3
能与Area0互相通信,学习到其它区域的信息,使其能与其它区域互相通信
R3(config-router)#end
R3#shrun
R3#shiproute//可查看到学习到了所有区域的路由信息
R2#shiproute//可查看到学习到了所有区域的路由信息
四、将Area4配置为末梢区域,Area3配置为完全末梢区域,并在Area3上汇总3.3.0.0/16:
R1#conft
R1(config)#routerospf11
R1(config-router)#area4stub//将区域4配置为末梢区域(拒绝LSA-5外部AS路由的通告)
R4#conft
R4(config)#routerospf44
R4(config-router)#area4stub//将区域4配置为末梢区域(拒绝LSA-5外部AS路由的通告)
R3#conft
R3(config)#routerospf33
R3(config-router)#area3stubno-summary//将区域3配置为完全末梢区域(只接受LSA-1,2本区
域内部路由的通告)
R3(config-router)#area3range3.3.0.0255.255.0.0//将3.3.1.1,3.3.2.1,3.3.3.1汇总成3.3.0.0/16
发布出去
R6#conft
R3(config)#routerospf33
R3(config-router)#area3stubno-summary//将区域3配置为完全末梢区域(只接受LSA-1,2本区
域内部路由的通告)
五、所有区域启用密文MD5认证:
R1#conft
R1(config)#intS1
R1(config-if)#ipospfauthentication-keyspoto4//接口上配置认证密钥
R1(config)#intS0
R1(config-if)#ipospfmessage-digest-key10md5spoto1//接口上配置认证密钥
R1(config-if)#routerospf11
R1(config-router)#area4authentication//在区域4上启用明文认证
R1(config-router)#area0authenticationmessage-digest//在区域0上启用密文认证
R1(config-router)#end
R2#conft
R2(config)#intS1
R2(config-if)#ipospfauthentication-keyspoto2//接口上配置认证密钥
R2(config)#intS0
R2(config-if)#ipospfmessage-digest-key10md5spoto1//接口上配置认证密钥
R2(config-if)#routerospf22
R2(config-router)#area2authentication//在区域2上启用明文认证
R2(config-router)#area0authenticationmessage-digest//在区域0上启用密文认证
R2(config-router)#area2virtual-link3.3.1.1message-digest-key20md5spoto2
//定义V-LINK虚拟链路密文加密密钥
R2(config-router)#area2virtual-link3.3.1.1authentiacationmessage-digest//启用v-link密文加密
R2(config-router)#end
R3#conft
R3(config)#intS1
R3(config-if)#ipospfauthentication-keyspoto3//接口上配置认证密钥
R3(config)#intS0
R3(config-if)#ipospfauthentication-keyspoto2//接口上配置认证密钥
R3(config-if)#routerospf33
R3(config-router)#area2authentication//在区域2上启用明文认证
R3(config-router)#area3authentication//在区域3上启用明文认证
R3(config-router)#area2virtual-link12.1.1.2message-digest-key20md5spoto2
//定义V-LINK虚拟链路密文加密密钥
R2(config-router)#area2virtual-link12.1.1.2authentiacationmessage-digest//启用vlink密文加密
R3(config-router)#end
R4#conft
R4(config)#intS1
R4(config-if)#ipospfauthentication-keyspoto4//接口上配置认证密钥
R4(config-if)#routerospf44
R4(config-router)#area4authentication//在区域4上启用明文认证
R4(config-router)#end
R6#conft
R6(config)#intS1
R6(config-if)#ipospfauthentication-keyspoto3//接口上配置认证密钥
R6(config-if)#routerospf66
R6(config-router)#area3authentication//在区域3上启用明文认证
R6(config-router)#end
R1#shiproute//可查看到所有区域的路由信息(若一个区域的密码没有配
置正确,其区域内的路由器是不能互相通告路由信息)
R2#shiproute
R3#shiproute
R4#shiproute
R6#shiproute
六、在R4上起NAT:
R4#conft
R4(config)#intS1
R4(config-if)#ipnatoutside//声明为外部连接口
R4(config)#intE0
R4(config-if)#ipnatinside//声明为内部连接口
R4(config-if)intloop0
R4(config-if)#ipnatinside//声明为内部连接口
R4(config-if)intloop1
R4(config-if)#ipnatinside//声明为内部连接口
R4(config-if)#exit
R4(config)#ipnatpoolspoto4.4.4.14.4.4.2prefix28typerotary//建立动态IP地址池,并起类型为轮询机制
R4(config)#access-list10permit4.4.4.17//建立一ACL匹配主机
R4(config)#access-list10permit4.4.4.19
R4(config)#access-list20permit14.1.1.4//创建目的轮询的访问列表
R4(config)#access-list110permittcphost12.1.1.2host14.1.1.4eqtelnet//只允许R2TELNET访问R4
R4(config)#access-list110permitospfanyany//允许OSPF包传送
R4(config)#access-list110permiticmpanyany//允许ICMP包传送
R4(config)#intS1
R4(config-if)#ipaccess-group110in//应用访问控制列表
R4(config)#ipnatinsidedestinationlist20poolspoto//应用目的轮询NAT
R4(config)#ipnatinsidesourcelist10interfaces1overload//通过出接口方式实现PAT
R4(config)#end
R4#dubugipnat//打开地址转换信息包显示
R4#//通过在R2上TELNET14.1.1.4地址来查看地址轮询信息;通过R6上的扩展Ping来查看网络地址转换信息
R6#conft
R6(config)#intS1
R6(config-if)#ipnatoutside//声明为外部连接口
R6(config)#intE0
R6(config-if)#ipnatinside//声明为内部连接口
R6(config-if)#exit
R6(config)#ipnatpoolspoto36.1.1.736.1.1.8pre24//建立动态IP地址池
R6(config)#access-list20permit68.1.1.00.0.0.255//建立一ACL匹配内网主机
R6(config)#ipnatinsidesourcelist20poolspotooverload//
 升级会员
升级会员 