Maven搭建spring mvc项目.docx
《Maven搭建spring mvc项目.docx》由会员分享,可在线阅读,更多相关《Maven搭建spring mvc项目.docx(18页珍藏版)》请在冰豆网上搜索。
Maven搭建springmvc项目
Maven搭建springmvc项目
准备工作
1.Eclipse3.7
2.maven
3.Eclipse需要安装maven插件。
url:
maven- http:
//download.eclipse.org/technology/m2e/releases 。
安装maven-3.0.4。
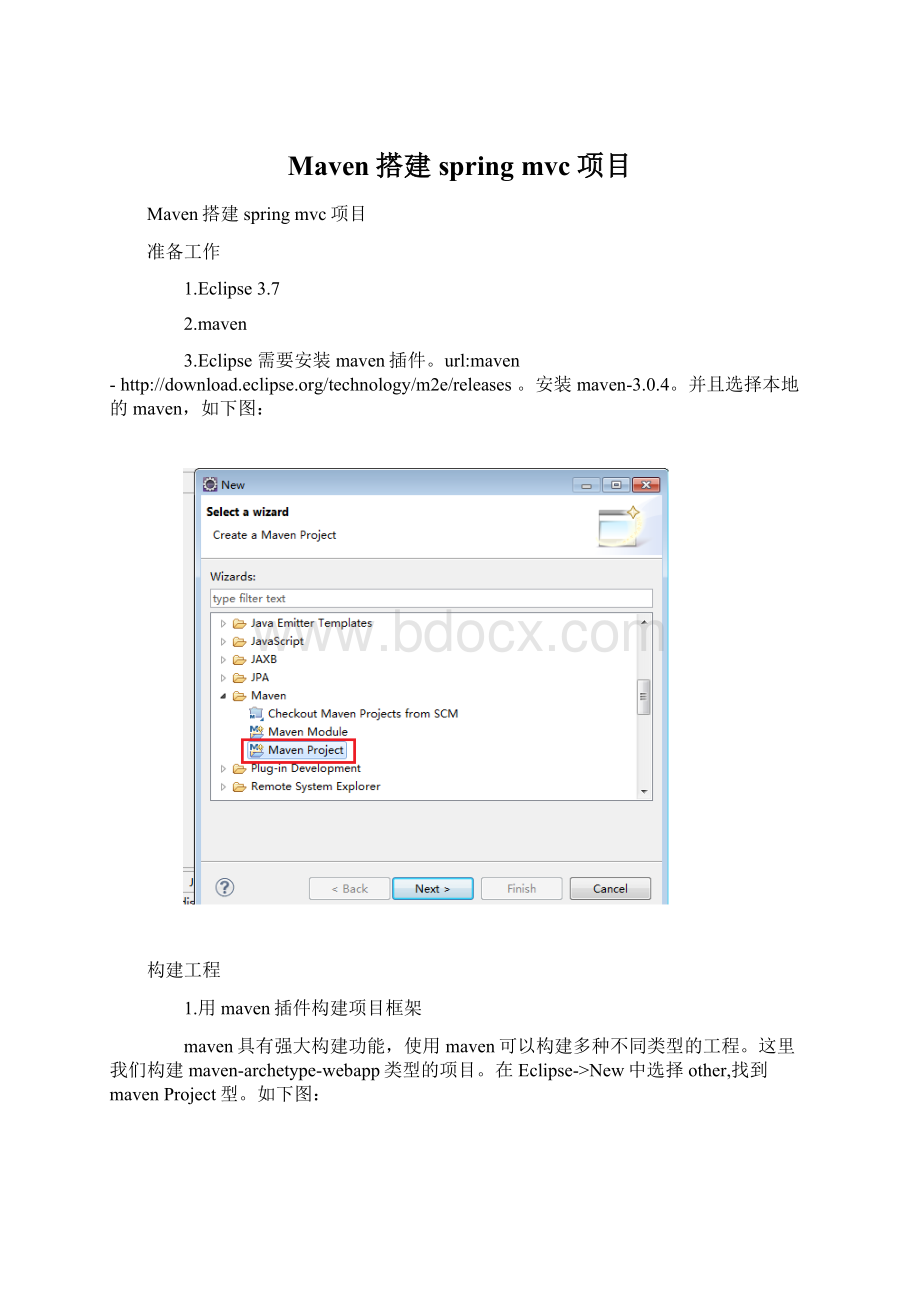
并且选择本地的maven,如下图:
构建工程
1.用maven插件构建项目框架
maven具有强大构建功能,使用maven可以构建多种不同类型的工程。
这里我们构建maven-archetype-webapp类型的项目。
在Eclipse->New中选择other,找到mavenProject型。
如下图:
在选完路径之后,我们选择构建类型,如下图:
接下来,填写工程的GroupId,ArtifactId,如下图:
这里的GroupId就是大项目的id,ArifactId就是该项目的Id。
就像一个大项目中有许多小项目组成一样。
此时,我们的项目已经成型了,样子如下图:
接下来,我们要完善项目的目录,配置。
2.完善项目
首先,完善目录,增加重要的sourceFolder,这个不是简单的Floder,这些文件夹是会参与编译的。
增加src/main/java,src/test/resources,src/test/java目录。
让目录变成标准的maven结构。
如下图:
接下来,改变一些配置:
让工程的JDK用本地的jdk;
让工程的字符集为UTF-8;
改变工程的目录顺序;
这些都完成之后,工程目录应该是如下的样子:
3.将工程变成web工程
此时,我们的工程还不是标准的web工程,可以在eclipse中增加web工程的特性,选择工程的Properties,选ProjectFacets,如下图:
这里,我们选择DynamicWebModule,版本选择2.4,这个版本比较通用。
如下图:
此时,我们看到目录中多了一个WebContent目录,由于使用maven构建,web目录是src/main/webapp,所以我们删除WebContent目录。
接下来,要配置web项目的发布目录,就是DeploymentAssembly,如图:
test目录不要发布,WebContent目录没有了,所以这三项都删掉。
并且增加src/main/webapp目录,和MavenDependenices,完成之后如下图:
于是,我们的工程就完全是一个web工程了。
4.赋予工程的springmvc特性
配置web.xml,使其具有springmvc特性,主要配置两处,一个是ContextLoaderListener,一个是DispatcherServlet。
代码如下:
[java] viewplaincopy
1.xmlns ="
xmlns:
xsi ="http:
//www.w3.org/2001/XMLSchema-instance"
xsi:
schemaLocation ="
>
2.
3.
4. org.springframework.web.context.ContextLoaderListener
5.
6.
7.
8. exam
9. org.springframework.web.servlet.DispatcherServlet
10.
11.
12.
13. exam
14. /
15.
16.
17.
18. index.jsp
19.
20.
配置ContextLoaderListener表示,该工程要以spring的方式启动。
启动时会默认在/WEB-INF目录下查找applicationContext.xml作为spring容器的配置文件,这里可以初始化一些bean,如DataSource和iBATIS的集成。
代码如下:
applicationContext.xml
xmlversion="1.0"encoding="UTF-8"?
>
//www.springframework.org/schema/beans"
xmlns:
xsi="http:
//www.w3.org/2001/XMLSchema-instance"
xmlns:
mvc="http:
//www.springframework.org/schema/mvc"
xmlns:
context="http:
//www.springframework.org/schema/context"
xmlns:
aop="http:
//www.springframework.org/schema/aop"
xmlns:
tx="http:
//www.springframework.org/schema/tx"
xsi:
schemaLocation="
http:
//www.springframework.org/schema/beans
http:
//www.springframework.org/schema/beans/spring-beans-3.0.xsd
http:
//www.springframework.org/schema/mvc
http:
//www.springframework.org/schema/mvc/spring-mvc-3.0.xsd
http:
//www.springframework.org/schema/context
http:
//www.springframework.org/schema/context/spring-context-3.0.xsd
http:
//www.springframework.org/schema/tx
http:
//www.springframework.org/schema/tx/spring-tx-3.0.xsd
http:
//www.springframework.org/schema/aop
http:
//www.springframework.org/schema/aop/spring-aop-3.0.xsd"default-autowire="byName">
--DataSource定义
destroy-method="close">
value="jdbc:
sqlserver:
//172.16.40.5:
1433;DatabaseName=dev_his"/>
-->
--TransactionManager定义
class="org.springframework.jdbc.datasource.DataSourceTransactionManager">
class="org.springframework.transaction.support.TransactionTemplate">
-->
--iBatisSQLmap定义
conf/sql-map-config.xml"/>
-->
配置DispatcherServlet表示,该工程将采用springmvc的方式。
启动时也会默认在/WEB-INF目录下查找XXX-servlet.xml作为配置文件,XXX就是DispatcherServlet的名字,该文件中将配置两项重要的mvc特性:
HandlerMapping,负责为DispatcherServlet这个前端控制器的请求查找Controller;
ViewResolver,负责为DispatcherServlet查找ModelAndView的视图解析器。
代码如下:
exam-servlet.xml:
[html] viewplaincopy
1.
xml version="1.0" encoding="UTF-8"?
>
2.
-- Bean头部 -->
3.//www.springframework.org/schema/beans"
4. xmlns:
xsi="http:
//www.w3.org/2001/XMLSchema-instance" xmlns:
p="http:
//www.springframework.org/schema/p"
5. xmlns:
mvc="http:
//www.springframework.org/schema/mvc" xmlns:
context="http:
//www.springframework.org/schema/context"
6. xmlns:
util="http:
//www.springframework.org/schema/util"
7. xsi:
schemaLocation="http:
//www.springframework.org/schema/beans http:
//www.springframework.org/schema/beans/spring-beans-3.0.xsd
8. http:
//www.springframework.org/schema/context http:
//www.springframework.org/schema/context/spring-context-3.0.xsd
9. http:
//www.springframework.org/schema/mvc http:
//www.springframework.org/schema/mvc/spring-mvc-3.0.xsd
10. http:
//www.springframework.org/schema/util http:
//www.springframework.org/schema/util/spring-util-3.0.xsd">
11.
12.
-- 防止jsp等静态资源被拦截 -->
13. default-servlet-handler/>
14.
-- 激活@Controller模式 -->
15. annotation-driven />
16.
-- 对包中的所有类进行扫描,以完成Bean创建和自动依赖注入的功能 需要更改 -->
17. component-scan base-package="cc.monggo.web.controller" />
18.
19. 20. class="org.springframework.web.servlet.mvc.annotation.AnnotationMethodHandlerAdapter" />
21.
22. 23. class="org.springframework.web.servlet.view.InternalResourceViewResolver">
24.
25. /WEB-INF/jsp/
26.
27.
28. .jsp
29.
30.
31.
5.让maven自动配置jar包
在用maven生成框架时,就生成了pop.xml,这就是maven的配置文件。
我们要引入spring-web,servlet等特性的包。
代码如下:
[html] viewplaincopy
1.//maven.apache.org/POM/4.0.0" xmlns:
xsi="http:
//www.w3.org/2001/XMLSchema-instance"
2. xsi:
schemaLocation="http:
//maven.apache.org/POM/4.0.0 http:
//maven.apache.org/maven-v4_0_0.xsd">
3. 4.0.0
4. exam
5. exam_3
6. war
7. 0.0.1-SNAPSHOT
8. exam_3 Maven Webapp
9. http:
//maven.apache.org
10.
11.
12. junit
13. junit
14. 3.8.1
15. test
16.
17.
18.
19. org.springframework
20. spring-web
21. 3.0.5.RELEASE
22.
23.
24.
25. org.springframework
26. spring-webmvc
27. 3.0.5.RELEASE
28.
29.
30.
31. org.apache.geronimo.specs
32. geronimo-servlet_2.5_spec
33. 1.2
34.
35.
36.
37.
38. exam_3
39.
40.
maven就是这么简单,一旦保存,maven就会自动下载pop.xml的jar包。
此时可以看到目录中MavenDependencies下生成了jar包。
更多的jar包可以在maven中心库下载:
。
做个测试
说了一大堆,只有运行起来才有意思,下面写个简单的测试。
先写Controller。
编写两个类,LoginControler.java,LoginForm.java。
代码如下:
LoginController.java
1packagecc.monggo.web.controller;
2
3
4importjavax.servlet.http.HttpServletRequest;
5importjavax.servlet.http.HttpServletResponse;
6
7importorg.springframework.stereotype.Controller;
8importorg.springframework.web.bind.annotation.RequestMapping;
9importorg.springframework.web.servlet.ModelAndView;
10
11importcc.monggo.domain.LoginForm;
12//注解方式(不需要在上下文中配置bean)
13@Controller
14publicclassLoginController{
1516publicModelAndViewlogin(HttpServletRequestrequest,HttpServletResponseresponse,LoginFormcommand){
17Stringusername=command.getUsername();
18ModelAndViewmv=newModelAndView("/index/index","command","LOGINSUCCESS,"+username);
19returnmv;
20}
21}
LoginForm.java
1packagecc.monggo.domain;
2
3
4publicclassLoginForm{
5privateStringusername;
6privateStringpassword;
7publicStringgetUsername(){
8returnusername;
9}
10publicvoidsetUsername(Stringusername){
11this.username=username;
12}
13publicStringgetPassword(){
14returnpassword;
15}
16publicvoidsetPassword(Stringpassword){
17this.password=password;
18}
19}
再增加一些jsp,首页的index.jsp,主要是做跳转,代码如下:
index.jsp
1<%2request.getRequestDispatcher("/WEB-INF/jsp/login/login.jsp").forward(request,response
 升级会员
升级会员 