笔记Word下载.docx
《笔记Word下载.docx》由会员分享,可在线阅读,更多相关《笔记Word下载.docx(18页珍藏版)》请在冰豆网上搜索。
//我们现在使用spring来完成上面的任务
//1.得到spring的applicationContext对象(容器对象)
ApplicationContextac=newClassPathXmlApplicationContext("
applicationContext.xml"
UserServiceus=(UserService)ac.getBean("
us.sayHello();
5.细节讨论?
传统的方法和使用spring的方法
使用spring,没有new对象,我们把创建对象的任务交给spring框架
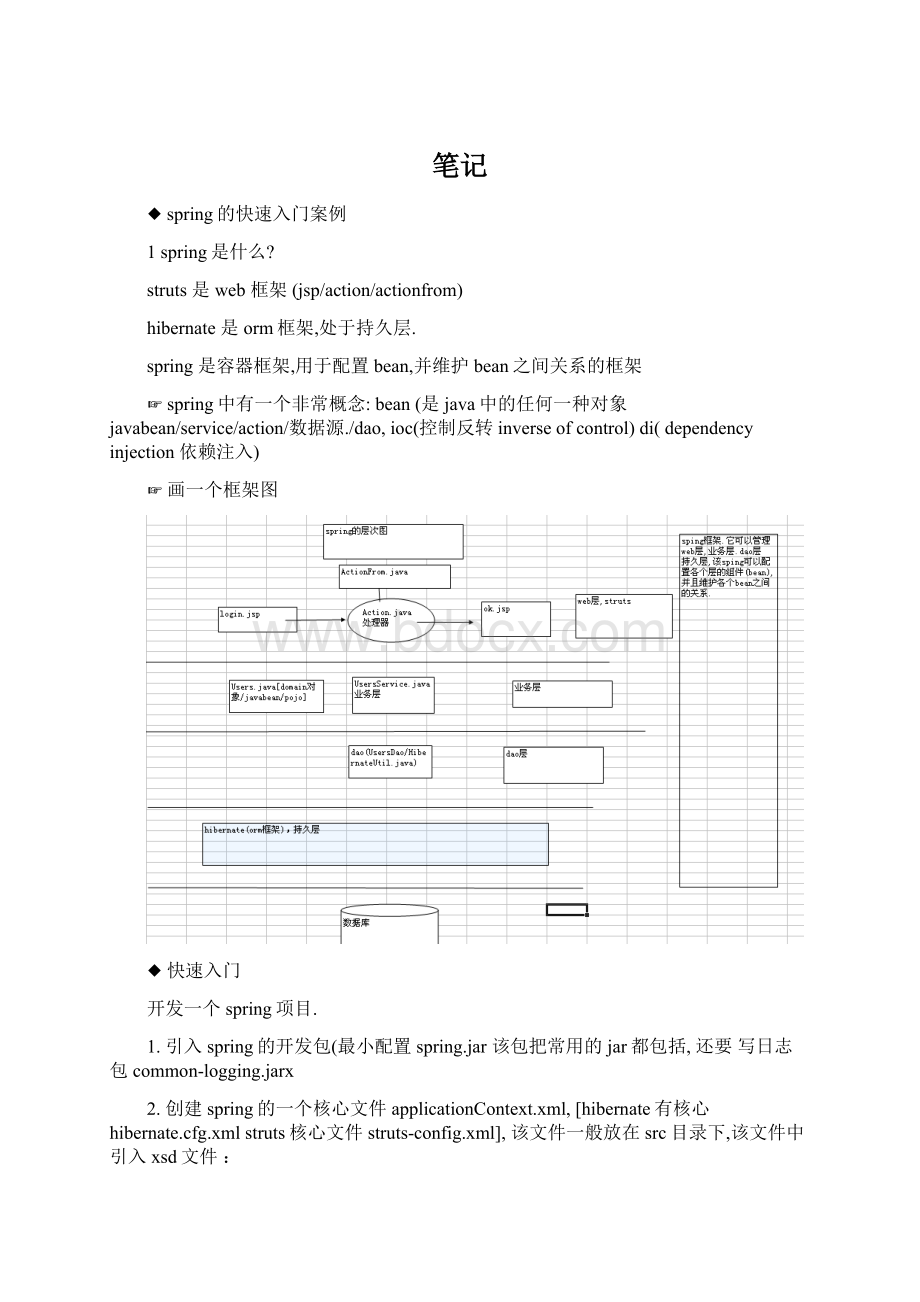
spring的运行原理图:
5.3我们再看spring
对上面案例总结:
spring实际上是一个容器框架,可以配置各种bean(action/service/domain/dao),并且可以维护bean与bean的关系,当我们需要使用某个bean的时候,我们可以getBean(id),使用即可.
ioc是什么?
答:
ioc(inverseofcontroll)控制反转:
所谓控制反转就是把创建对象(bean),和维护对象(bean)的关系的权利从程序中转移到spring的容器(applicationContext.xml),而程序本身不再维护.
DI是什么?
答:
di(dependencyinjection)依赖注入:
实际上di和ioc是同一个概念,spring设计者认为di更准确表示spring核心技术
☞学习框架,最重要的就是学习各个配置.
把Applicationcontext做成一个单例的.
上机练习:
把我写的代码走一遍.
◆spring开发提倡接口编程,配合di技术可以层与层的解耦
举例说明:
现在我们体验一下spring的di配合接口编程的,完成一个字母大小写转换的案例:
思路:
1.创建一个接口ChangeLetter
2.两个类实现接口
3.把对象配置到spring容器中
4.使用
通过上面的案例,我们可以初步体会到di配合接口编程,的确可以减少层(web层)和业务层的耦合度.
思考题:
接口
ValidateUser
有一个方法:
check(?
?
)
有两个类
CheckUser1implementsValidateUser
{
check//安装xml验证
}
CheckUser2implementsVallidateUser{
check()//到数据库去验证
◆从ApplicationContex应用上下文容器中获取bean和从bean工厂容器中获取bean
具体案例:
//从ApplicationContext中取bean
ApplicationContextac=newClassPathXmlApplicationContext("
com/hsp/ioc/beans.xml"
//当我们去实例化beans.xml,该文件中配置的bean被实例(该beanscope是singleton)从bean中取出student
//如果我们使用beanfactory去获取bean,当你只是实例化该容器,那么
//容器的bean不被实例化,只有当你去使用getBean某个bean时,才会实时的创建.
BeanFactoryfactory=newXmlBeanFactory(
newClassPathResource("
));
factory.getBean("
student"
结论:
1.如果使用ApplicationContext,则配置的bean如果是singlton不管你用不用,都被实例化.(好处就是可以预先加载,缺点就是耗内存)
2.如果是BeanFactory,则当你获取beanfacotry时候,配置的bean不会被马上实例化,当你使用的时候,才被实例(好处节约内存,缺点就是速度)
3.规定:
一般没有特殊要求,应当使用ApplicatioContext完成(90%)
◆bean的scope的细节
入门案例:
//获取两个student
Students1=(Student)ac.getBean("
Students2=(Student)ac.getBean("
System.out.println(s1+"
"
+s2);
●request
●session
●global-session
是在web开发中才有意义.
◆三种获取ApplicationContext对象引用的方法
1.ClassPathXmlApplicationContext->
通过类路径
2.FileSystemXmlApplicationContext->
通过文件路径
举例:
ApplicationContextac=newFileSystemXmlApplicationContext("
文件路径beans.xml/applicationContext.xml"
3.XmlWebApplicationContext
◆bean的生命周期
为什么总是一个生命周期当做一个重点?
Servlet->
servlet生命周期init()destory()
java对象生命周期.
往往笔试,面试总喜欢问生命周期的问题
1实例化(当我们的程序加载beans.xml文件),把我们的bean(前提是scope=singleton)实例化到内存
2调用set方法设置属性
3如果你实现了bean名字关注接口(BeanNameAware)则,可以通过setBeanName获取id号
4如果你实现了bean工厂关注接口,(BeanFactoryAware),则可以获取BeanFactory
5如果你实现了ApplicationContextAware接口,则调用方法
//该方法传递ApplicationContext
publicvoidsetApplicationContext(ApplicationContextarg0)
throwsBeansException{
//TODOAuto-generatedmethodstub
System.out.println("
setApplicationContext"
+arg0);
}
6如果bean和一个后置处理器关联,则会自动去调用ObjectpostProcessBeforeInitialization方法
7如果你实现InitializingBean接口,则会调用afterPropertiesSet
8如果自己在<
beaninit-method=”init”/>
则可以在bean定义自己的初始化方法.
9如果bean和一个后置处理器关联,则会自动去调用ObjectpostProcessAfterInitialization方法
10使用我们的bean
11.容器关闭
12.可以通过实现DisposableBean接口来调用方法destory
13.可以在<
beandestory-method=”fun1”/>
调用定制的销毁方法
小结:
我们实际开发中往往,没有用的这么的过程,常见的是:
1->
2->
6->
10->
9->
11
把使用每个
bean的时间记录到一个recoder.txt文件,内容是
xxbean.使用时间是:
1999-11-1111:
11:
11
问题:
通过BeanFactory来获取bean对象,bean的生命周期是否和Applicationcontext是一样吗?
不是一样的,bean是工厂中创建的生命周期会简单一些:
◆配置bean的细节
①scope的说明:
☞尽量使用scope=”singleton”,不要使用prototype,因为这样对我们的性能影响较大.
2如何给集合类型注入值.
java中主要的集合有几种:
mapsetlist/数组
Department类:
packagecom.hsp.collection;
importjava.util.List;
importjava.util.Map;
importjava.util.Set;
publicclassDepartment{
privateStringname;
privateString[]empName;
privateList<
Employee>
empList;
privateSet<
empsets;
privateMap<
String,Employee>
empMaps;
publicSet<
getEmpsets(){
returnempsets;
publicvoidsetEmpsets(Set<
empsets){
this.empsets=empsets;
publicString[]getEmpName(){
returnempName;
publicvoidsetEmpName(String[]empName){
this.empName=empName;
publicStringgetName(){
returnname;
publicvoidsetName(Stringname){
this.name=name;
publicList<
getEmpList(){
returnempList;
publicvoidsetEmpList(List<
empList){
this.empList=empList;
publicMap<
String,Employee>
getEmpMaps(){
returnempMaps;
publicvoidsetEmpMaps(Map<
empMaps){
this.empMaps=empMaps;
//Employeel类
publicclassEmployee{
privateintid;
publicintgetId(){
returnid;
publicvoidsetId(intid){
this.id=id;
beans.xml配置文件:
xmlversion="
1.0"
encoding="
utf-8"
beansxmlns="
http:
//www.springframework.org/schema/beans"
xmlns:
xsi="
//www.w3.org/2001/XMLSchema-instance"
context="
//www.springframework.org/schema/context"
tx="
//www.springframework.org/schema/tx"
xsi:
schemaLocation="
//www.springframework.org/schema/beanshttp:
//www.springframework.org/schema/beans/spring-beans-2.5.xsd
http:
//www.springframework.org/schema/contexthttp:
//www.springframework.org/schema/context/spring-context-2.5.xsd
//www.springframework.org/schema/txhttp:
//www.springframework.org/schema/tx/spring-tx-2.5.xsd"
department"
com.hsp.collection.Department"
value="
财务部"
/>
--给数组注入值-->
empName"
list>
小明<
小明小明<
小明小明小明小明<
/list>
--给list注入值list中可以有相当的对象-->
empList"
refbean="
emp2"
/>
emp1"
--给set注入值set不能有相同的对象-->
empsets"
set>
/set>
--给map注入值map只有key不一样,就可以装配value-->
empMaps"
map>
entrykey="
11"
value-ref="
22"
33"
/map>
--给属性集合配置-->
【点http协议referer】
pp"
props>
propkey="
pp1"
abcd<
/prop>
pp2"
hello<
/props>
com.hsp.collection.Employee"
北京"
id"
1"
天津"
2"
/beans>
3内部bean
beanid=”foo”class=”....Foo”>
propertyname=”属性”>
—第一方法引用-->
refbean=’bean对象名’/>
—内部bean-->
bean>
properyt>
4继承配置
publicclassStudent
publicclassGradateextendsStudent
在beans.xml文件中体现配置
--配置一个学生对象-->
com.hsp.inherit.Student"
顺平"
age"
30"
--配置Grdate对象-->
grdate"
parent="
com.hsp.inherit.Gradate"
--如果自己配置属性name,age,则会替换从父对象继承的数据-->
小明"
degree"
学士"
思考:
目前我们都是通过set方式给bean注入值,spring还提供其它的方式注入值,比如通过构造函数注入值!
◆通过构造函数注入值
beans.xml关键代码:
--配置一个雇员对象-->
employee"
com.hsp.constructor.Employee"
--通过构造函数来注入属性值-->
constructor-argindex="
0"
type="
java.lang.String"
大明"
◆自动装配bean的属性值
(1)byName的用法:
--配置一个master对象-->
master"
com.hsp.autowire.Master"
autowire="
byName"
顺平<
--配置dog对象-->
dog"
com.hsp.autowire.Dog"
小黄"
3"
原理图:
(2)byType:
byType:
寻找和属性类型相同的bean,找不到,装不上,找到多个抛异常。
(3)constructor:
constructor"
说明:
查找和bean的构造参数一致的一个或
多个bean,若找不到或找到多个,抛异常。
按照参数的类型装配
(4)autodetect
autodetect"
(3)和
(2)之间选一个方式。
不确定
性的处理与(3)和
(2)一致。
(5)defualt
这个需要在<
beansdefualt-autorwire=“指定”/>
当你在<
beans>
指定了default-atuowrite后,所有的bean的默认的autowire就是指定的装配方法;
如果没有在<
没有defualt-autorwire=“指定”,则默认是
defualt-autorwire=”no”
(6)no:
不自动装配
使用spring的特殊bean,完成分散配置:
beans.xml
说明:
当通过context:
property-placeholder引入属性文件的时候,有多个需要使用,号间隔.
--引入我们的db.properties文件-->
context:
property-placeholderlocation="
classpath:
com/hsp/dispatch/db.properties,classpath:
com/hsp/dispatch/db2.properties"
--配置一DBUtil对象$占位符号-->
dbutil"
com.hsp.dispatch.DBUtil"
${name}"
drivername"
${drivername}"
url"
${url
 升级会员
升级会员 