实验六NPN器件设计与特性模拟实验.docx
《实验六NPN器件设计与特性模拟实验.docx》由会员分享,可在线阅读,更多相关《实验六NPN器件设计与特性模拟实验.docx(28页珍藏版)》请在冰豆网上搜索。
实验六NPN器件设计与特性模拟实验
实验六NPN器件TCAD模拟实验
一、实验调查
掌握NPN器件的特性,转移特性曲线,IV特性曲线,放大倍数等
二、实验目的
1.熟悉SilvacoTCAD的仿真模拟环境;
2、掌握NPN器件设计流程
2.掌握器件特性的仿真流程
3.掌握使用Tonyplot观察仿真仿真结果
三、实验要求
1、实验前必须仔细调查实验调查的内容
2、根据程序完成NPN器件的设计仿真
四、实验指导
器件结构设计步骤:
1、创建一个初始网格结构
2、初始化硅衬底
3、进行Boron离子注入
4、进行Boron扩散
5、淀积多晶硅栅
6、进行Polysilicon掺杂
7、刻蚀多晶硅
8、多晶硅氧化
9、退火
10、进行二次Boron离子注入
11、形成侧氧
12、进行三次Boron离子注入与退火
13、镜像得到完整NPN结构
14、形成发射级和基极接触
15、定义电极
16、保存ATHENA结构文件
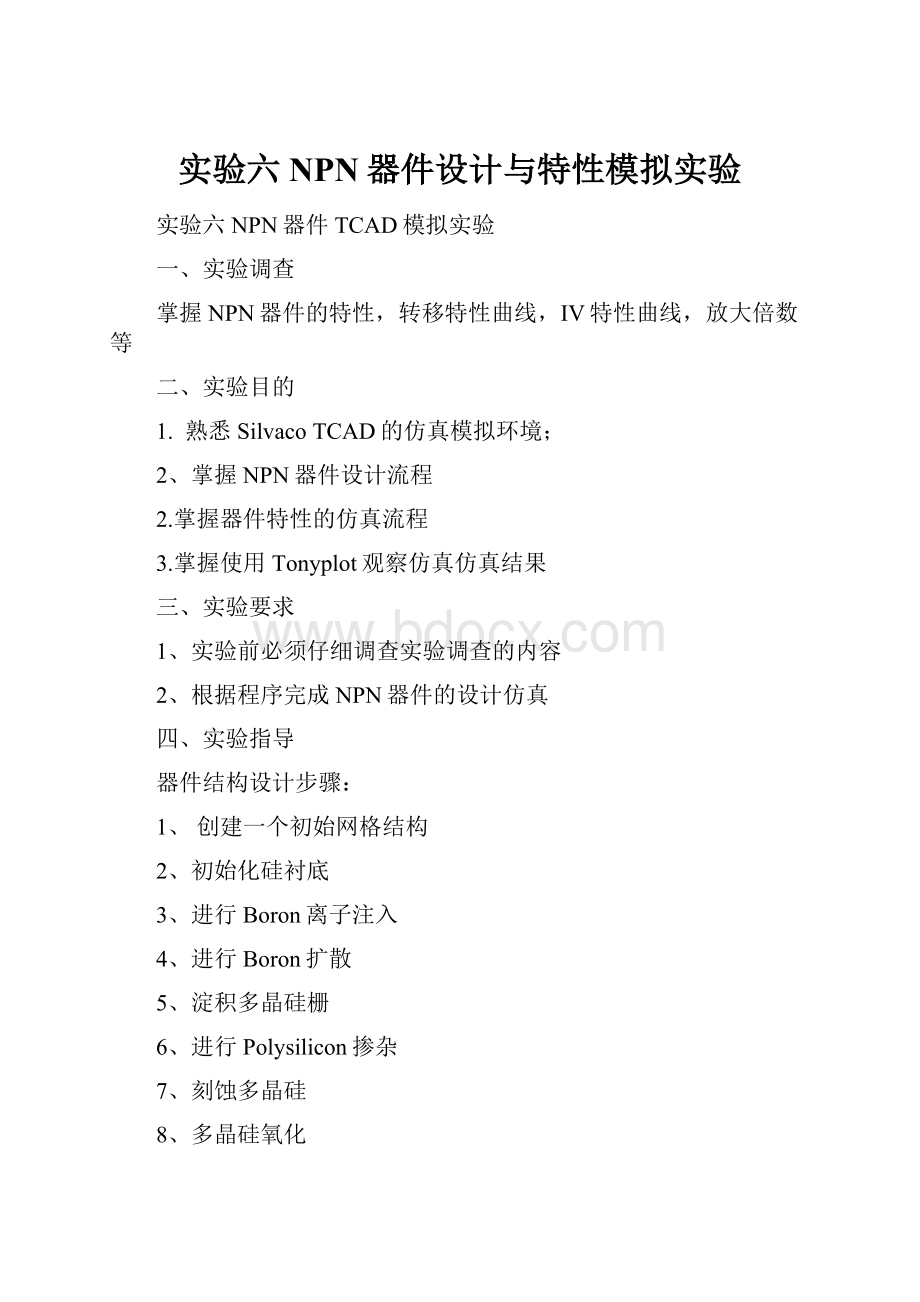
图一NPN三极管
器件仿真步骤:
1、结构说明
2、材料模型说明
3、数学计算方法的说明
4、解析条件说明
5、结果分析
图二NPN三极管转移特性
图三NPN三极管IV特性
五、实验仿真程序
结构仿真程序:
goathena
#PolysiliconEmitterBipolar(NPN)
linexloc=0.00spac=0.03
linexloc=0.2spac=0.02
linexloc=0.24spac=0.015
linexloc=0.3spac=0.015
linexloc=0.8spac=0.15
#
lineyloc=0.00spac=0.01
lineyloc=0.12spac=0.01
lineyloc=0.3spac=0.02
lineyloc=0.5spac=0.06
lineyloc=1spac=0.35
#InitialSiliconStructure
initsiliconc.arsenic=2e16orientation=100
#
structoutfile=init_bjt.str
#ImplantBoron
implantborondose=2.5e13energy=18crystal
#DiffuseBoron
diffustime=60temp=920nitro
#
structoutfile=implant1_bjt.str
#DepositPolysilicon
depositpolysiliconthick=0.3divisions=6
#
structoutfile=poly_bjt.str
#ImplanttoDopePolysilicon
implantarsenicdose=7.5e15energy=50crystal
#
structoutfile=dopepoly_bjt.str
#PatternPolysilicon
etchpolysiliconrightp1.x=0.2
#
structoutfile=etchpoly_bjt.str
#PolysiliconOxidation
methodfermicompress
diffustime=25temp=920dryo2press=1.00
#
structoutfile=polyox_bjt.str
#AnnealingProcess
diffustime=50temp=900nitropress=1.00
#
structoutfile=anneal_bjt.str
#SecondBoronImplantation
implantborondose=2.5e13energy=18crystal
#
structoutfile=implant2_bjt.str
#DepositSpacer
depositoxidethick=0.4divisions=10
#
structoutfile=depositspacer_bjt.str
#etchtheSpacerBack
etchoxidedrythick=0.50
#
structoutfile=etchspacer_bjt.str
#FormingP+BaseRegion
implantborondose=1e15energy=30crystal
#
structoutfile=implant3_bjt.str
#SecondAnnealingProcess
diffustime=60temp=900nitropress=1.00
#
structoutfile=anneal2_bjt.str
#
structmirrorleft
#
structoutfile=full_bjt.str
#PutdownAluminumandEtchtoformtheEmitter/BaseContacts
depositaluminumthick=0.05divisions=2
#
structoutfile=deposit_Al_bjt.str
#etchtheLeftHandSideShadedRegion
etchaluminumstartx=-0.16y=-0.35
etchcontx=-0.16y=0.1
etchcontx=-0.6y=0.1
etchdonex=-0.6y=-0.35
#
structoutfile=etchleft_bjt.str
#etchtheRightHandSideShadedRegion
etchaluminumrightp1.x=0.15
#
structoutfile=etchfight_bjt.str
#
electrodename=emitterx=0.00
#
electrodename=basex=-0.65
#
electrodename=collectorbackside
#
structoutfile=bjt.str
性能仿真程序:
goatlas
#
meshinfile=bjt.str
#
materialnumber=2taun0=5e-06taup0=5e-06
#
modelsaugerconsrhconmobfldmobb.electrons=2b.holes=1evsatmod=0\
hvsatmod=0boltzmanbgnprinttemperature=300
#
contactname=emittern.polysurf.rec
#
methodnewtonitlimit=25trapatrap=0.5maxtrap=4autonrnrcriterion=0.1\
tol.time=0.005dt.min=1e-25
solveinit
solvevcollector=0.025
solvevcollector=0.1
solvename=collectorvcollector=0.25vfinal=2vstep=0.25
solvevbase=0.025
solvevbase=0.1
solvevbase=0.2
logoutf=bjt_0.log
solvename=basevbase=0.3vfinal=1vstep=0.05
tonyplotbjt_0.log
logoff
solveinit
#Rampingbasevoltage
solvevbase=0.025
solvevbase=0.05
solvevbase=0.1vstep=0.1vfinal=0.7name=base
#SwitchtoCurrentBoundaryConditions
contactname=basecurrent
#rampbasecurrentandsavethesolutions
solveibase=1.e-6
saveoutf=bjt_1.strmaster
solveibase=2.e-6
saveoutf=bjt_2.strmaster
solveibase=3.e-6
saveoutf=bjt_3.strmaster
solveibase=4.e-6
saveoutf=bjt_4.strmaster
solveibase=5.e-6
saveoutf=bjt_5.strmaster
#LoadineachinitialguessfileandrampVce
loadinf=bjt_1.strmaster
logoutf=bjt_1.log
solvevcollector=0.0vstep=0.1vfinal=5.0name=collector
loadinf=bjt_2.strmaster
logoutf=bjt_2.log
solvevcollector=0.0vstep=0.1vfinal=5.0name=collector
loadinf=bjt_3.strmaster
logoutf=bjt_3.log
solvevcollector=0.0vstep=0.1vfinal=5.0name=collector
loadinf=bjt_4.strmaster
logoutf=bjt_4.log
solvevcollector=0.0vstep=0.1vfinal=5.0name=collector
loadinf=bjt_5.strmaster
logoutf=bjt_5.log
solvevcollector=0.0vstep=0.1vfinal=5.0name=collector
#PlotFamilyofIc/Vcecurve
tonyplot-overlaybjt_1.logbjt_2.logbjt_3.logbjt_4.log\
bjt_5.log-setbjt_1.set
quit
六、实验任务
1、完成实验指导4和仿真程序5的内容;
修改基区注入离子的浓度
基区离子的浓度
放大倍数
七、实验结果分析与体会
附录:
NPN三极管器件仿真操作
启动Deckbuild,同时调用ATHENA工具包,在终端输入命令deckbuild–an&
实验三:
用ATHENA创建一个多晶硅发射级NPN三极管
1、创建一个初始网格结构
目的,创建一个0.8um*1.0um模拟区域及一个非均匀网格
在工具栏右键点击Commands→选MeshDefine...输入坐标及间距
goathena
#PolysiliconEmitterBipolar(NPN)
linexloc=0.00spac=0.03
linexloc=0.2spac=0.02
linexloc=0.24spac=0.015
linexloc=0.3spac=0.015
linexloc=0.8spac=0.15
#
lineyloc=0.00spac=0.01
lineyloc=0.12spac=0.01
lineyloc=0.3spac=0.02
lineyloc=0.5spac=0.06
lineyloc=1.0spac=0.35
2、初始化硅衬底(如图一)
目的,得到均匀掺杂砷浓度为2×10¹⁶atom/cm3、(100)方向的硅衬底
打开ATHENAMeshInitialize菜单:
右键点击Commands→MeshInitialize。
输入下面选项
Material:
silicon
Orientation:
100
Impurity:
Arsenic
Concentration:
2.0x10¹⁶atom/cm3
Dimensionality:
Auto
Comment:
InitialSiliconStructure
3、进行Boron离子注入(如图二)图一
目的:
本征基区离子注入
选“Commands→Process→Implant...”打开ATHENAImplant菜单,选择或输入以下:
impurity:
Boron
Dose:
2.5×10¹³
Energy:
18
Model:
DaulPearson
Tilt:
7
Rotation:
30
MaterialType:
Crystalline
Comment:
ImplantBoron
图
(二)
4、进行Boron扩散(如图三)
目的:
Boron离子扩散形成区
选“Commands→Process→Diffuse...”打开ATHENADiffuse菜单,选择或输入以下:
Time:
60
Temperature:
920
Ambient:
Nitrogen
GasPressure:
1
Comment:
DiffuseBoron
图三
5、淀积多晶硅栅并保存结构
目的:
淀积形成多晶硅栅薄膜,(如图四)
首先打开ATHENADeposit菜单——依次选“Process→Deposit→Deposit...”即可,选择或输入以下:
Type:
conformal(默认选项)
Material:
Polysilicon
Thickness:
0.3
Totalnumberofgridlayers:
6
Comment:
DepositPolysilicon
图(四)
依次选“Commands→FileI/O→Save”输入文件名
poly_bjt.str
保存结构如图(图五)
图(五)
6、进行Polysilicon掺杂并保存结构(如图六)
目的:
多晶硅发射级掺杂
选“Commands→Process→Implant...”打开ATHENAImplant菜单,选择或输入以下:
impurity:
Arsenic
Dose:
7.5×10¹⁵
Energy:
50
Model:
DaulPearson
Tilt:
7
Rotation:
30
MaterialType:
Crystalline图(六)
Comment:
ImplanttoDopePolysilicon
结构文件保存为dopepoly_bjt.str
7、刻蚀多晶硅并保存结构文件
目的:
刻蚀不需要区域的多晶硅材料(我们将刻蚀x=0.2um以右的区域)如图七
依次选择“Commands→Process→
Etch→Etch...”打开ATHENAEtch菜单,选择输入以下:
EtchMethod:
Geometrical(默认选项)
Geometricaltype:
Right
Material:
Polysilicon
Etchlocation(um):
0.2
Comment:
PatternPolysilicon
结构文件保存为etchpoly_bjt.str
图七
8、多晶硅氧化并保存结构文件
目的:
形成掩蔽层如图八
首先打开ATHENADiffuse菜单:
依次选择“Commands→Process→Diffuse...”即可,选择和输入以下:
Time:
25
Temperature:
920
Ambient:
DryO2
Gaspressure:
1
HCL(uncheck)
DiffusionModels:
Fermi
OxidationModels:
Compressible
Comment:
PolysiliconOxidation
图八
结构文件保存为polyox_bjt.str
9、退火并保存结构文件(图九)
目的:
使Arsenic离子扩散形成发射区
打开ATHENADiffuse菜单,“Commands→Process→Diffuse...”即可,选择或输入以下:
Time:
50
Temperature:
900
Ambient:
Nitrogen
GasPressure:
1
Comment:
AnnealingProcess
图九
结构文件保存为anneal_bjt.str
10、进行二次Boron离子注入(如图10)
目的:
形成本征基区与P+接触的连接区域
选“Commands→Process→Implant...”打开ATHENAImplant菜单,选择或输入以下:
impurity:
Boron
Dose:
2.5×10¹³
Energy:
18
Model:
DaulPearson
Tilt:
7
Rotation:
30
MaterialType:
Crystalline
Comment:
SecondBoronImplantation
结构文件保存为implant2_bjt.str图10
11、形成侧氧
A、淀积侧氧(图11)
目的:
形成侧氧化层
首先打开ATHENADeposit菜单:
依次选择“Commands→Process→Deposit→Deposit...”即可,选择和输入以下:
Material:
Oxide
Thickness:
0.4
Totalnumberofgridlayer:
10
Comment:
DepositSpacer
结构文件保存为depositspacer_bjt.str
图11
B、刻蚀侧氧(图12)
目的:
刻蚀得到侧氧化区域
依次选择“Commands→Process→Etch→Etch...”打开ATHENAEtch菜单,选择输入以下:
Geometricaltype:
Drythickness
Material:
Oxide
Thickness:
0.5
Comment:
EtchtheSpacerBack
结构文件保存为etchspacer_bjt.str
图12
12、进行三次Boron离子注入与退火(如图13,14)
目的:
形成基区接触
A、进行三次Boron离子注入
选“Commands→Process→Implant...”打开ATHENAImplant菜单,选择或输入以下:
impurity:
Boron
Dose:
1.0×10¹⁵
Energy:
30
Model:
DaulPearson
Tilt:
7
Rotation:
30
MaterialType:
Crystalline
Comment:
FormingP+BaseRegion
结构文件保存为implant3_bjt.str
图13
B、第二次退火
打开ATHENADiffuse菜单,“Commands→Process→Diffuse...”即可,选择或输入以下:
Time:
60
Temperature:
900
Ambient:
Nitrogen
GasPressure:
1
Comment:
SecondAnnealingProcess
结构文件保存为anneal2_bjt.str
图14
13、镜像得到完整NPN结构(图15)
目的:
为了得到完整结构,前面得到的只是HalfNPN结构。
依次选“Commands→Structure→Mirror”打开ATHENAMirror菜单.
在弹出的窗口中选Left.
单击WRITE及Cont.
结构文件保存为full_bjt.str
14、形成发射级和基极接触
A、淀积金属AL
首先打开ATHENADeposit菜单:
依次选择“Commands→Process→Deposit→Deposit...”即可,选择和输入以下:
Material:
Aluminum
Thickness:
0.05
Totalnumberofgridlayer:
2
Comment:
DepositAl
结构文件保存为Deposit_Al_bjt.str
B、刻蚀Al
①、刻蚀Al形成基极
依次选择“Commands→Process→Etch→Etch...”打开ATHENAEtch菜单,选择输入以下:
Geometricaltype:
Anyshape
Material:
Aluminum
Arbitrarypoints
etchoxidestartx=-0.16y=-0.35
etchcontx=-0.16y=0.1
etchcontx=-0.6y=0.1
etchdonex=-0.6y=-0.35
Comment:
EtchAl
结构文件保存为etchleft_bjt.str
②、刻蚀Al形成发射级
Geometricaltype:
Right
Material:
Aluminum
Etchlocation:
0.15
结构文件保存为etchright_bjt.str
15、定义电极
依次选“Commands→Structure→Electrode...”打开ATHENAElectrode菜单,选择或输入以下:
ElectrodeType:
SpecifiedPositon
Name:
emitter
XPosition:
0.0
点击WRITE。
重复同样的操作,定义基极、集电极
ElectrodeType:
SpecifiedPositon
Name:
base
XPosition:
-0.65
点击WRITE。
ElectrodeType:
Backside
Name:
collector
点击WRITE。
最后保存结构文件bjt.str
Chapter4:
用ATLAS仿真NPN三极管
使用ATLAS模拟NPN器件,得到三极管的特征曲线
1、Ib=1uA、2uA、3uA、4uA、5uA时Vc-Ic关系曲线。
1、结构说明
2、材料模型说明
3、数学计算方法的说明
4、解析条件说明
5、结果分析
1.添加结构文件
goatlas
#
meshinfile=bjt.str
2、材料模型说明
A、设置载流子的寿命
a、选择Commands→Models→Material
b、选择Re
 升级会员
升级会员 