在Eclipse 中创建Spring的J2SE的应用.docx
《在Eclipse 中创建Spring的J2SE的应用.docx》由会员分享,可在线阅读,更多相关《在Eclipse 中创建Spring的J2SE的应用.docx(14页珍藏版)》请在冰豆网上搜索。
在Eclipse中创建Spring的J2SE的应用
MyEclipse在Eclipse中创建Spring的J2SE的应用
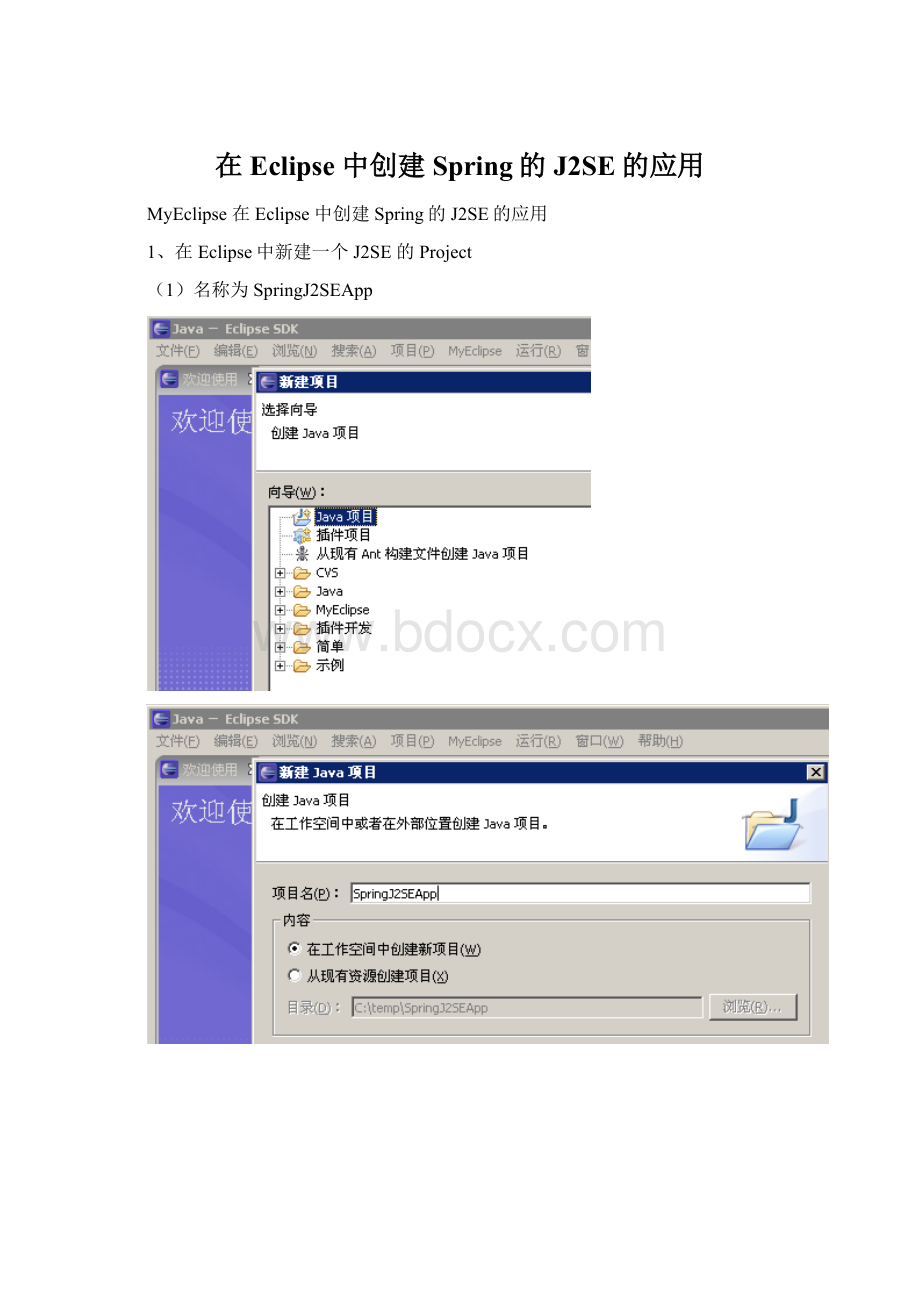
1、在Eclipse中新建一个J2SE的Project
(1)名称为SpringJ2SEApp
2、在该项目中添加一个类,名称为SpringApplication,包名称为springj2seapp
编程该类
packagespringj2seapp;
publicclassSpringApplication
{
publicSpringApplication()
{
System.out.println("OK");
}
publicstaticvoidmain(String[]args)
{
newSpringApplication();
}
}
再执行该类以测试我们所做的事情是否正常
在控制台中将出现下面的提示表示正确地执行了
3、构建基于Spring的IoC容器管理的业务功能类代码
(1)添加一个接口Action,包名称为springj2seapp
该Action接口定义了一个execute方法,在我们示例中,不同的Action实现提供了各自的execute方法,以完成目标逻辑处理的功能。
(2)编程该接口
packagespringj2seapp;
publicinterfaceAction
{
publicStringdoTransfer(StringinputStr);
}
(3)为什么要面向接口编程而不是利用继承
因为,继承是一种强的耦合关系,子类对父类有很大的可见性,即子类可以使用父类的方法阿,字段什么的,所以当父类变化时,势必对子类有影响。
(4)添加对该Action接口的两个实现类----UpperAction类
(5)编程该实现类,UpperAction将其message属性与输入字符串相连接,并返回其大写形式。
packagespringj2seapp;
publicclassUpperActionimplementsAction
{
privateStringmessage;
publicStringgetMessage()
{
returnmessage;
}
publicvoidsetMessage(Stringstring)
{
message=string;
}
publicStringdoTransfer(StringinputStr)
{
return(getMessage()+inputStr).toUpperCase();
}
}
(6)添加对该Action接口的两个实现类----LowerAction类
(7)编程该实现类,LowerAction将其message属性与输入字符串相连接,并返回其小写形式。
packagespringj2seapp;
publicclassLowerActionimplementsAction
{
privateStringmessage;
publicStringgetMessage()
{
returnmessage;
}
publicvoidsetMessage(Stringstring)
{
message=string;
}
publicStringdoTransfer(StringinputStr)
{
return(getMessage()+inputStr).toLowerCase();
}
}
(8)注意:
●面向接口编程是面向对象的核心,因此我们应该尽量要面向抽象编程。
●因为一个组件应该分为两部分:
✓Service---所能够提供功能的声明
✓Implementation---Service的具体实现
这样的好处是:
多实现可以任意切换,防止“everythingdependsoneverything”问题.即具体依赖于具体。
4、配置该应用为满足Spring的要求
(1)添加Spring的库包到本项目中的classpath中
(2)选择所需要的*.Jar包文件,所需要的*.jar包
在其\dist和\lib目录下,包含有所需要的库
●dist/spring.jar
●lib/jakarta-commons/commons-logging.jar
●lib/log4j/log4j-1.2.9.jar
5、Spring配置文件SpringApplication.xml
由于Spring管理对象是依赖于配置文件,因此任何需要交给Spring管理的对象,都必须在配置文件中(文件名任意)注册,这个过程被称为wiring。
(1)请确保配置SpringApplication.xml位于工作路径之下
这种引用方式其配制文件只能相对于工作路径的引用,注意工作路径并不等同于CLASSPATH,Eclipse的默认工作路径为项目根路径,也就是.project文件所在的目录。
(2)内容如下
xmlversion="1.0"encoding="UTF-8"?
>
DOCTYPEbeansPUBLIC"-//SPRING//DTDBEAN//EN""http:
//www.springframework.org/dtd/spring-beans.dtd">
---Applicationcontextdefinitionfor"springapp"DispatcherServlet.-->
SpringQuickStart
HeLLo,UpperAction
HeLLo,LowerAction
(3)注意:
●在此,通过使用bean标签,注册了两个组件对象;然后我们只需要利用Spring框架所提供的接口,加载配置文件,通过指定对象的id,获得该对象。
●在本例中只是为两个组件提供String类型的数据的依赖注入;实际上我们可以注入任何值类型,也可以注入任何类的实例,也可以注入List、Map、Properties。
●配置文件管理了所有的对象和对象间的关系,而对象则只负责执行自己的功能,他们的职责越少,藕合度越低,系统就越容易测试,管理维护也更容易。
6、log4j的配置(log4j.properties)
(1)规则
Spring采用Apachecommon_logging,并结合Apachelog4j作为日志输出组件。
为了在调试过程中能观察到Spring的日志输出,在CLASSPATH中新建log4j.properties配置文件。
(2)产生的方法
可以从samples/petclinic/war/WEB-INF/log4j.properties拷贝一份模板文件到本应用的在项目的根目录下。
(3)设置其log输出的文件目录
#ForJBoss:
AvoidtosetupLog4Joutside$JBOSS_HOME/server/default/deploy/log4j.xml!
#Forallotherservers:
CommentouttheLog4Jlistenerinweb.xmltoactivateLog4J.
log4j.rootLogger=INFO,stdout,logfile
log4j.appender.stdout=org.apache.log4j.ConsoleAppender
log4j.appender.stdout.layout=org.apache.log4j.PatternLayout
log4j.appender.stdout.layout.ConversionPattern=%d%p[%c]-<%m>%n
log4j.appender.logfile=org.apache.log4j.RollingFileAppender
log4j.appender.logfile.File=springapp.log
log4j.appender.logfile.MaxFileSize=512KB
#Keepthreebackupfiles.
log4j.appender.logfile.MaxBackupIndex=3
#Patterntooutput:
datepriority[category]-message
log4j.appender.logfile.layout=org.apache.log4j.PatternLayout
log4j.appender.logfile.layout.ConversionPattern=%d%p[%c]-%m%n
(4)该文件的位置-----在项目的根目录下(与前面的*.xml在同一个目录)
7、添加测试代码
(1)在访问者所在的类中---本例为SpringApplication类,它作为客户端的请求者(服务的请求者)
packagespringj2seapp;
importorg.springframework.context.ApplicationContext;
importorg.springframework.context.support.FileSystemXmlApplicationContext;
publicclassSpringApplication
{
publicSpringApplication()
{
/*
我们根据"SpringApplication.xml"创建了一个ApplicationContext实例,并从此实例中获取我们所需的Action实现。
*/
ApplicationContextctx=newFileSystemXmlApplicationContext("SpringApplication.xml");
ActionupperAction=(Action)ctx.getBean("theUpperAction");
System.out.println(upperAction.doTransfer("SpringJ2SEApplication"));
ActionlowerAction=(Action)ctx.getBean("theLowerAction");
System.out.println(lowerAction.doTransfer("SpringJ2SEApplication"));
}
publicstaticvoidmain(String[]args)
{
newSpringApplication();
}
}
(2)执行该程序
(3)将出现下面的结果
表示正确地中心和加载了对应的业务功能类。
 升级会员
升级会员 