原创AIX61配置PowerHA55完整手册别名方式IP.docx
《原创AIX61配置PowerHA55完整手册别名方式IP.docx》由会员分享,可在线阅读,更多相关《原创AIX61配置PowerHA55完整手册别名方式IP.docx(34页珍藏版)》请在冰豆网上搜索。
原创AIX61配置PowerHA55完整手册别名方式IP
AIX6.1配置PowerHA5.5
准备工作
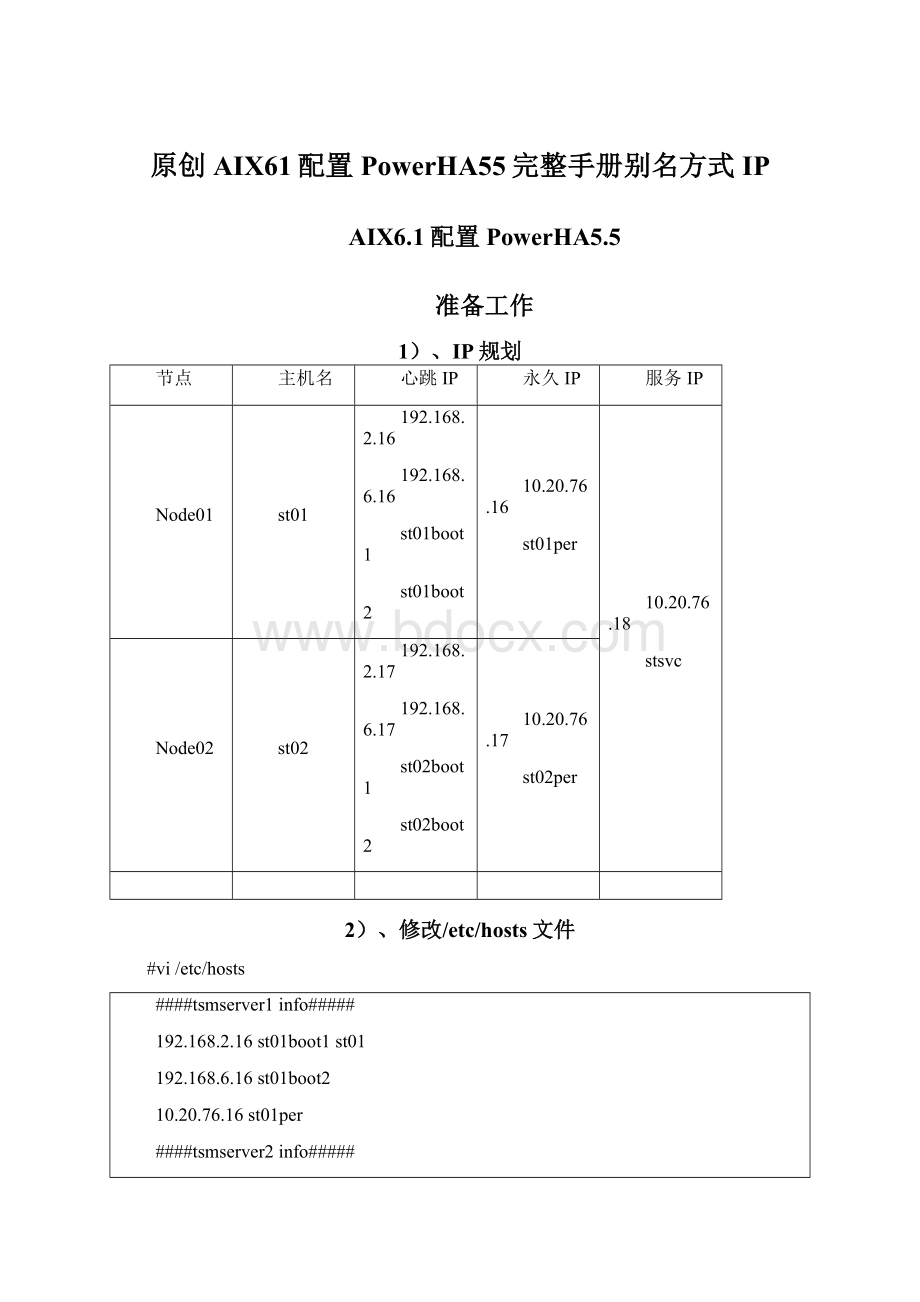
1)、IP规划
节点
主机名
心跳IP
永久IP
服务IP
Node01
st01
192.168.2.16
192.168.6.16
st01boot1
st01boot2
10.20.76.16
st01per
10.20.76.18
stsvc
Node02
st02
192.168.2.17
192.168.6.17
st02boot1
st02boot2
10.20.76.17
st02per
2)、修改/etc/hosts文件
#vi/etc/hosts
####tsmserver1info#####
192.168.2.16st01boot1st01
192.168.6.16st01boot2
10.20.76.16st01per
####tsmserver2info#####
192.168.2.17st02boot1st02
192.168.6.17st02boot2
10.20.76.17st02per
####serviceip#####
10.20.76.18stsvc
注:
分别在两个节点上执行。
3)、配置IP地址:
略
1、扩展拓朴配置
请尽量在生产节点上执行以下操作:
执行命令:
bash-3.2#smittyhacmp
1.1、配置集群
ExtendedConfiguration
—ExtendedTopologyConfiguratio
——ConfigureanHACMPCluster
———Add/Change/ShowanHACMPCluster
图1、创建一个名为tsmserver的集群
图2、集群已创建完成
1.2、配置节点
ExtendedConfiguration
—ExtendedTopologyConfiguratio
——ConfigureHACMPNodes
———AddaNodetotheHACMPCluster
图3、添加节点st01
图4、添加节点st02
1.3、配置网络
ExtendedConfiguration
—ExtendedTopologyConfiguratio
——ConfigureHACMPNetworks
———AddaNetworktotheHACMPCluster
图5、配置网卡类型的网络
图6、配置网络选项
1.4、配置通信设备
ExtendedConfiguration
—ExtendedTopologyConfiguratio
——ConfigureHACMPCommunicationInterfaces/Devices
———AddCommunicationInterfaces/Devices
图7、添加通信接口和设备
图8、选择通信类型为通信接口
图9、选择一个网络
图10、添加st01的通信接口1
图11、添加st01的通信接口2
图12、添加st02的通信接口1
图13、添加st02的通信接口2
1.5、配置永久IP
ExtendedConfiguration
—ExtendedTopologyConfiguratio
——ConfigureHACMPPersistentNodeIPLabel/Addresses
———AddaPersistentNodeIPLabel/Address
图14、选择节点st01
图15、添加节点st01的永久IP
图16、选择节点st02
图17、添加节点st02的IP
2、扩展资源配置
2.1、配置服务IP
ExtendedConfiguration
—ExtendedResourceConfiguration
——HACMPExtendedResourcesConfiguration
———ConfigureHACMPServiceIPLabels/Addresses
————AddaServiceIPLabel/Address
图18、选择一个服务IP类型
图19、网络名称
图20、添加服务IP
2.2、配置资源组
ExtendedConfiguration
—ExtendedResourceConfiguration
——HACMPExtendedResourceGroupConfiguration
———AddaResourceGroup
图21、添加资源组
2.3、资源组配置服务IP
ExtendedConfiguration
—ExtendedResourceConfiguration
——HACMPExtendedResourceGroupConfiguration
———Change/ShowResourcesandAttributesforaResourceGroup
图22、选择需要修改的资源组
图23、为资源组配置服务IP
2.4、同步扩展配置
ExtendedConfiguration
—ExtendedResourceConfiguration(no)
——ExtendedVerificationandSynchronization
图24、同步扩展配置
图25、同步扩展配置完成
图26、同步完成后查看节点st01的网络配置
图27、同步完成后查看节点st02的网络配置
3、启动HACMP服务
SystemManagement(C-SPOC)
—ManageHACMPServices
——StartClusterServices
图28、启动HACMP服务
图29、启动HACMP服务后,在节点st01上已经看到服务IP:
10.20.76.18
4、配置共享存储
4.1、配置并发卷组
SystemManagement(C-SPOC)
—HACMPConcurrentLogicalVolumeManagement
——ConcurrentVolumeGroups
———CreateaConcurrentVolumeGroup
图30、选择需要创建并发卷组的节点名称
图31、选择一个在两个节点上都能看到的一个物理卷
图32、选择卷组类型为Big
图33、创建一个名为tsmvg的并发卷组
4.2、配置共享文件系统
SystemManagement(C-SPOC)
—HACMPLogicalVolumeManagement
——SharedFileSystems
———EnhancedJournaledFileSystems
————AddanEnhancedJournaledFileSystem
图34、选择共享卷组
图35、添加共享文件系统选项
4.3、配置网络
ExtendedConfiguration
—ExtendedTopologyConfiguratio
——ConfigureHACMPNetworks
———AddaNetworktotheHACMPCluster
图36、选择一个网络类型
图37、添加网络
4.4、配置通信设备
ExtendedConfiguration
—ExtendedTopologyConfiguratio
——ConfigureHACMPCommunicationInterfaces/Devices
———AddCommunicationInterfaces/Devices
图38、添加通信接口或设备
图39、添加通信设备
图40、添加一个通信设备至节点st01
注:
重复以上步骤,为st02添加通信设备
图41、添加通信接口和设备
图42、添加通信设备
图43、添加一个通信设备至节点st02
4.5、资源组配置共享存储
ExtendedConfiguration
—ExtendedResourceConfiguration
——HACMPExtendedResourceGroupConfiguration
———Change/ShowResourcesandAttributesforaResourceGroup
图44、资源组配置共享卷组tsmvg
4.6、同步扩展配置
ExtendedConfiguration
—ExtendedResourceConfiguration
——ExtendedVerificationandSynchronization
图45、同步扩展配置
图46、同步完成后,可以看到hdisk31已经分配到tsmvg中,并且状态为concurrent(并发)
5、重新启动HACMP服务
5.1、停止HACMP服务
SystemManagement(C-SPOC)
—ManageHACMPServices
——StopClusterServices
图47、停止HACMP服务
5.2、启动HACMP服务
SystemManagement(C-SPOC)
—ManageHACMPServices
——StartClusterServices
图48、启动HACMP服务
图49、启动服务完成后,可以看到st01上已经挂载了共享的文件系统
 升级会员
升级会员 