ActionScript编程实战项目用户注册验证.docx
《ActionScript编程实战项目用户注册验证.docx》由会员分享,可在线阅读,更多相关《ActionScript编程实战项目用户注册验证.docx(14页珍藏版)》请在冰豆网上搜索。
ActionScript编程实战项目用户注册验证
ActionScript编程实战项目:
用户注册验证
正则表达式在Flash动画中的做主要是验证字符串是否符合特定的规范,因此,其在各种用户提交信息的组件中得到了大量的应用。
例如,各种用户注册和资料填写的动画等。
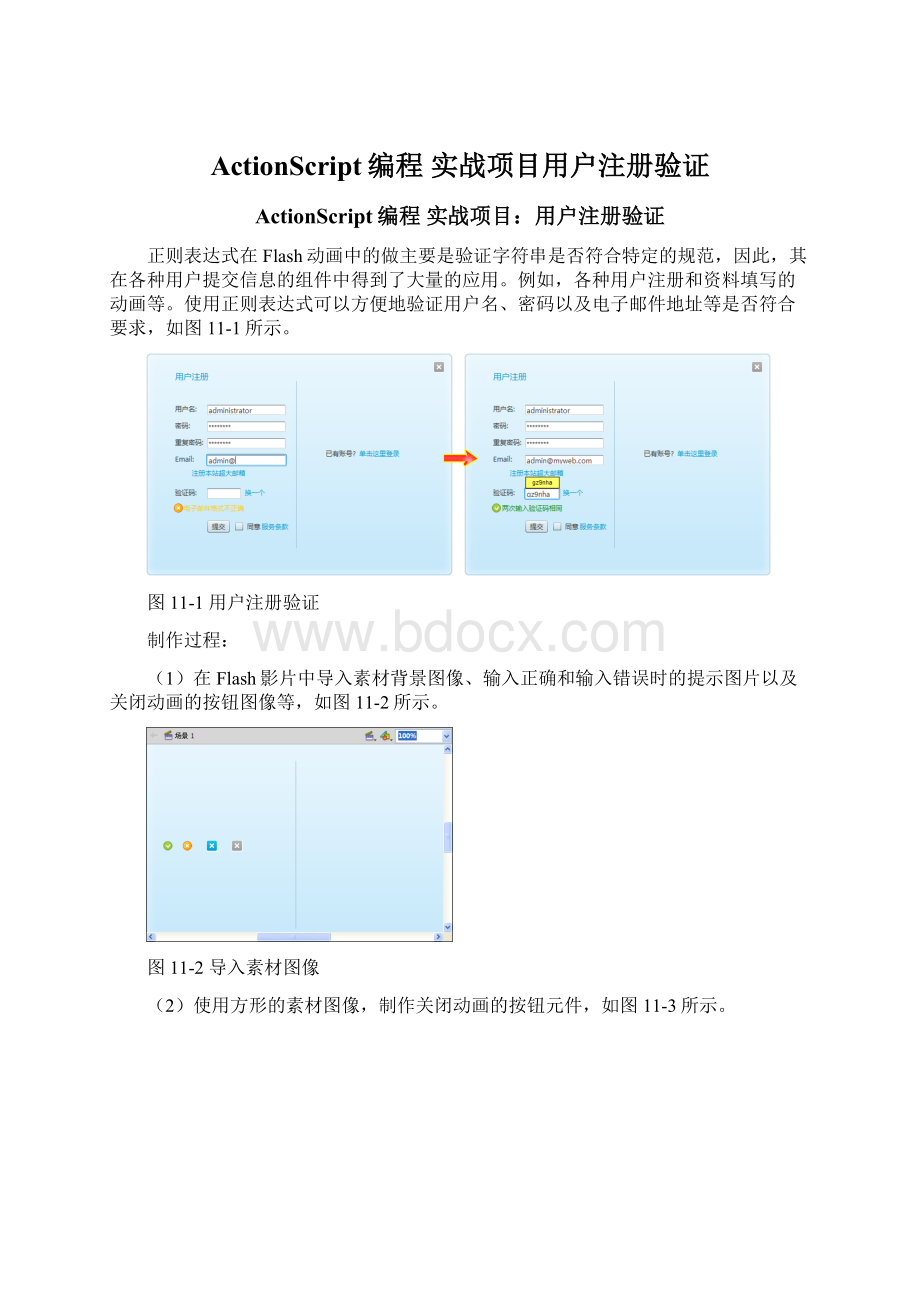
使用正则表达式可以方便地验证用户名、密码以及电子邮件地址等是否符合要求,如图11-1所示。
图11-1用户注册验证
制作过程:
(1)在Flash影片中导入素材背景图像、输入正确和输入错误时的提示图片以及关闭动画的按钮图像等,如图11-2所示。
图11-2导入素材图像
(2)使用方形的素材图像,制作关闭动画的按钮元件,如图11-3所示。
图11-3制作关闭动画的按钮
(3)打开【组件】面板,将Button、CheckBox、Label和TextInput等组件拖动到【库】面板中,然后将素材图像为ActionScript导出,如图11-4所示。
图11-4导入组件
其中,背景图像被导出为BackgroundImage,关闭按钮被导出为CloseBtn,输入正确的提示图像被导出为success,而输入错误的提示图像被导出为error
(4)在Flash影片所在目录创建classes目录,并在该目录中创建checkInput.as文件。
为Flash影片设置文档类为classes.checkInput,然后即可在as文件中创建包和导入外部类,如下所示。
packageclasses{
importflash.display.Sprite;
importflash.display.SimpleButton;
importflash.display.Bitmap;
importflash.display.BitmapData;
importfl.controls.Label;
importfl.controls.Button;
importfl.controls.TextInput;
importfl.controls.CheckBox;
importflash.text.TextFormat;
importflash.events.MouseEvent;
importflash.events.Event;
importflash.display.MovieClip;
}
(5)创建名为checkInput的自定义类,作为影片的文档类,然后实例化影片所使用的各种变量,如下所示。
publicclasscheckInputextendsSprite{
privatevar_backgroundImage:
Bitmap=newBitmap(newBackgroundImage(548,398));
//实例化背景图像
privatevarcloseBtn:
CloseBtn=newCloseBtn();//实例化关闭按钮
privatevarformLabelStyle:
TextFormat=newTextFormat();//实例化影片标题的文本格式
privatevarinputLabelStyle:
TextFormat=newTextFormat();//实例化输入文本的标题文本格式
privatevarerrorLabelStyle:
TextFormat=newTextFormat();//实例化错误提示的文本格式
privatevarsuccessLabelStyle:
TextFormat=newTextFormat();//实例化正确提示的文本格式
privatevarlinkLabelStyle:
TextFormat=newTextFormat();//实例化超链接的文本格式
privatevarformLabel:
Label=newLabel();
//实例化影片标题的组件
privatevaruserNameLabel:
Label=newLabel();//实例化用户名的标题组件
privatevarpassWordLabel:
Label=newLabel();实例化密码的标题组件
privatevarreInputPassWordLabel:
Label=newLabel();//实例化重复密码的标题组件
privatevaremailLabel:
Label=newLabel();
//实例化输入电子邮件的标题组件
privatevarcheckCodeLabel:
Label=newLabel();//实例化输入验证码的标题组件
privatevarregEmailLinkLabel:
Label=newLabel();//实例化注册邮箱的标题组件
privatevaracceptTextLinkLabel:
Label=newLabel();//实例化同意注册条款的标题组件
privatevarchangeCheckCodeLabel:
Label=newLabel();//实例化更换验证码的标题组件
privatevarloginTextLinkLabel:
Label=newLabel();//实例化用户登录的标题组件
privatevaralreadyRegLabel:
Label=newLabel();//实例化已注册用户的标题组件
privatevaruserNameInput:
TextInput=newTextInput();//实例化输入用户名的输入文本域组件
privatevarpassWordInput:
TextInput=newTextInput();//实例化输入密码的输入文本域组件
privatevarreInputPassWordInput:
TextInput=newTextInput();/*实例化重复密码的输入文本域组件*/
privatevaremailInput:
TextInput=newTextInput();//实例化输入电子邮件的输入文本域组件
privatevarcheckCodeInput:
TextInput=newTextInput();//实例化输入验证码的输入文本域组件
privatevarsubmitBtn:
Button=newButton();
//实例化提交按钮的组件
privatevaracceptCheckBox:
CheckBox=newCheckBox();//实例化同意注册的复选框组件
privatevarerrorImage:
Bitmap=newBitmap(newerror(16,16));//实例化提示错误的图像
privatevarsuccessImage:
Bitmap=newBitmap(newsuccess(16,16));//实例化提示正确的图像
privatevarverifyTextLabel:
Label=newLabel();//实例化验证码的标签组件
privatevarcheckCodeSP:
Sprite=newSprite();//实例化绘制的验证码背景
privatevarcheckCode:
Label=newLabel();
//实例化验证码示例的组件
(6)自定义createUserInterface()函数,用于显示各种素材背景图像,如下所示。
privatefunctioncreateUserInterface():
void{
with(_backgroundImage){
x=1;
y=1;
}
with(closeBtn){
x=515;
y=15;
}
with(stage){
addChild(_backgroundImage);
addChild(closeBtn);
}
}
(7)自定义setComponentStyle()函数,用于设置影片中各组件的样式,如下所示。
privatefunctionsetComponentStyle():
void{
with(formLabelStyle){
color=0x0099cc;
font="微软雅黑";
size=15;
}
with(inputLabelStyle){
color=0x333333;
font="微软雅黑";
size=12;
}
with(errorLabelStyle){
color=0xffcc00;
font="微软雅黑";
size=12;
}
with(successLabelStyle){
color=0x008800;
font="微软雅黑";
size=12;
}
with(linkLabelStyle){
color=0x0099cc;
font="微软雅黑";
size=12;
}
}
(8)自定义createLabelComponents()函数,定义各标签组件的属性,如下所示。
privatefunctioncreateLabelComponents():
void{
with(formLabel){
move(50,30);
setSize(120,30);
text="用户注册";
setStyle("textFormat",formLabelStyle);
}
with(userNameLabel){
move(50,90);
setSize(60,25);
text="用户名:
";
setStyle("textFormat",inputLabelStyle);
}
with(passWordLabel){
move(50,120);
text="密码:
";
setSize(60,25);
setStyle("textFormat",inputLabelStyle);
}
with(reInputPassWordLabel){
move(50,150);
text="重复密码:
";
setSize(60,25);
setStyle("textFormat",inputLabelStyle);
}
with(emailLabel){
move(50,180);
text="Email:
";
setSize(60,25);
setStyle("textFormat",inputLabelStyle);
}
with(regEmailLinkLabel){
move(80,205);
text="注册本站超大邮箱";
setSize(100,25);
setStyle("textFormat",linkLabelStyle);
}
with(checkCodeLabel){
move(50,240);
text="验证码:
";
setSize(60,25);
setStyle("textFormat",inputLabelStyle);
}
with(changeCheckCodeLabel){
move(175,240);
setSize(60,18);
text="换一个";
setStyle("textFormat",linkLabelStyle);
addEventListener(MouseEvent.CLICK,changeCheckCode);
}
with(submitBtn){
move(110,300);
setSize(40,22);
setStyle("textFormat",inputLabelStyle);
label="提交";
}
with(acceptCheckBox){
move(155,300);
label="同意";
setStyle("textFormat",inputLabelStyle);
}
with(acceptTextLinkLabel){
move(205,301);
text="服务条款";
setStyle("textFormat",linkLabelStyle);
}
with(alreadyRegLabel){
move(320,170);
setStyle("textFormat",inputLabelStyle);
text="已有账号?
";
}
with(loginTextLinkLabel){
move(380,170);
setStyle("textFormat",linkLabelStyle);
text="单击这里登录";
}
with(stage){
addChild(formLabel);
addChild(userNameLabel);
addChild(passWordLabel);
addChild(reInputPassWordLabel);
addChild(emailLabel);
addChild(regEmailLinkLabel);
addChild(checkCodeLabel);
addChild(changeCheckCodeLabel);
addChild(submitBtn);
addChild(acceptCheckBox);
addChild(acceptTextLinkLabel);
addChild(alreadyRegLabel);
addChild(loginTextLinkLabel);
}
}
(9)自定义createInputComponents()函数,用于定义各种输入文本域的属性,同时在函数中调用创建验证码的函数,如下所示。
privatefunctioncreateInputComponents():
void{
with(userNameInput){
move(110,93);
setSize(140,18);
setStyle("textFormat",inputLabelStyle);
addEventListener(Event.CHANGE,verifyUserName);
}
with(passWordInput){
move(110,123);
setSize(140,18);
setStyle("textFormat",inputLabelStyle);
displayAsPassword=true;
addEventListener(Event.CHANGE,verifyPassWord);
}
with(reInputPassWordInput){
move(110,153);
setSize(140,18);
setStyle("textFormat",inputLabelStyle);
displayAsPassword=true;
addEventListener(Event.CHANGE,verifyRePassWord);
}
with(emailInput){
move(110,183);
setSize(140,18);
setStyle("textFormat",inputLabelStyle);
addEventListener(Event.CHANGE,verifyEmail);
}
with(checkCodeInput){
move(110,243);
setSize(60,18);
setStyle("textFormat",inputLabelStyle);
addEventListener(MouseEvent.CLICK,showCheckCode);
addEventListener(MouseEvent.ROLL_OUT,hideCheckCode);
addEventListener(Event.CHANGE,verifyCheckCode);
}
with(checkCode){
x=120;
y=223;
text=createCheckCode();
}
with(checkCodeSP){
graphics.lineStyle(1,0x000000,1);
graphics.beginFill(0xFFFF66);
graphics.drawRect(110,222,60,20);
graphics.endFill();
visible=false;
addChild(checkCode);
}
with(stage){
addChild(userNameInput);
addChild(passWordInput);
addChild(reInputPassWordInput);
addChild(emailInput);
addChild(checkCodeInput);
addChild(checkCodeSP);
}
}
(10)自定义createVerifyResult()函数,用于显示验证用户输入的结果信息,如下所示。
privatefunctioncreateVerifyResult():
void{
with(errorImage){
x=50;
y=270;
visible=false;
}
with(successImage){
x=50;
y=270;
visible=false;
}
with(verifyTextLabel){
move(66,268);
setSize(120,22);
visible=false;
}
with(stage){
addChild(errorImage);
addChild(successImage);
addChild(verifyTextLabel);
}
}
(11)自定义verifyUserName()函数,通过正则表达式验证用户名是否符合要求,如下所示。
privatefunctionverifyUserName(event:
Event=null):
void{
varuserNameRegExp:
RegExp=/^[A-Za-z_]\w{3,15}$/;
/*用户名为4到16位的大写或小写字母、数字与下划线。
其中首字母只允许是字母或下划线*/
if(userNameRegExp.test(userNameInput.text)==true){
errorImage.visible=false;
successImage.visible=true;
with(verifyTextLabel){
visible=true;
setStyle("textFormat",successLabelStyle);
text="用户名格式正确";
}
}else{
successImage.visible=false;
errorImage.visible=true;
with(verifyTextLabel){
visible=true;
setStyle("textFormat",errorLabelStyle);
text="用户名格式错误";
}
}
}
(12)自定义verifyPassWord()函数,通过正则表达式验证密码是否符合要求,如下所示。
privatefunctionverifyPassWord(event:
Event=null):
avoid{
varpassWordRegExp:
RegExp=/^\w{8,}$/;
/*密码是否是由数字、英文字母和下划线组成的大于8位的字符串*/
//验证过程略……
}
}
(13)自定义verifyRePassWord()函数,用于验证重复密码与输入的密码是否相等,如下所示。
privatefunctionverifyRePassWord(event:
Event=null):
void{
if(reInputPassWordInput.text==passWordInput.text){
//判断过程略……
}
else{
//判断过程略……
}
}
(14)自定义verifyEmail()函数,使用正则表达式验证用户输入的电子邮件地址格式是否正确,如下所示。
privatefunctionverifyEmail(event:
Event=null):
void{
varemailRegExp:
RegExp=/^[a-z0-9][_.a-z0-9]*@([a-z0-9][_.a-z0-9]*\.)+[a-z]{2,6}$/i;
/*判断电子邮件地质的格式是否为若干字母、数字与下划线组成的字符串加电子邮件符号“@”加字符串加点“.”再加2到6位字符串*/
//判断过程略……
}
(15)自定义verifyCheckCode()函数,用于验证输入的验证码是否与随机生成的验证码相等。
然后,再自定义createCheckCode()函数,通过随机方法生成验证码,如下所示。
privatefunctioncreateCheckCode():
String{
varcheckCode:
String="";
varcharArray:
Array=["0","1","2","3","4","5","6","7","8","9","a","b","c","d","e","f","g","h","i","j","k","l","m","n","o","p","q","r","s","t","u","v","w","x","y","z"];
for(vari:
int=0;i<=5;i++){
checkCode+=charArray[Math.round(Math.random()*35)];
}
returncheckCode;
}
(16)自定义showCheckCode()函数、hideCheckCode()函数和changeCheckCode()函数,分别响应验证码所在的输入文本域的事件,如下所示。
privatefunctionshowCheckCode(event:
MouseEvent=null):
void{
checkCodeSP.visible=true;
}
privatefunctionhideCheckCode(event:
MouseEvent=nul
 升级会员
升级会员 