mysqlmmm部署.docx
《mysqlmmm部署.docx》由会员分享,可在线阅读,更多相关《mysqlmmm部署.docx(13页珍藏版)》请在冰豆网上搜索。
mysqlmmm部署
linux下安装mysqlmmm
环境:
OS:
RadHatLinuxAs5
1.安装步骤
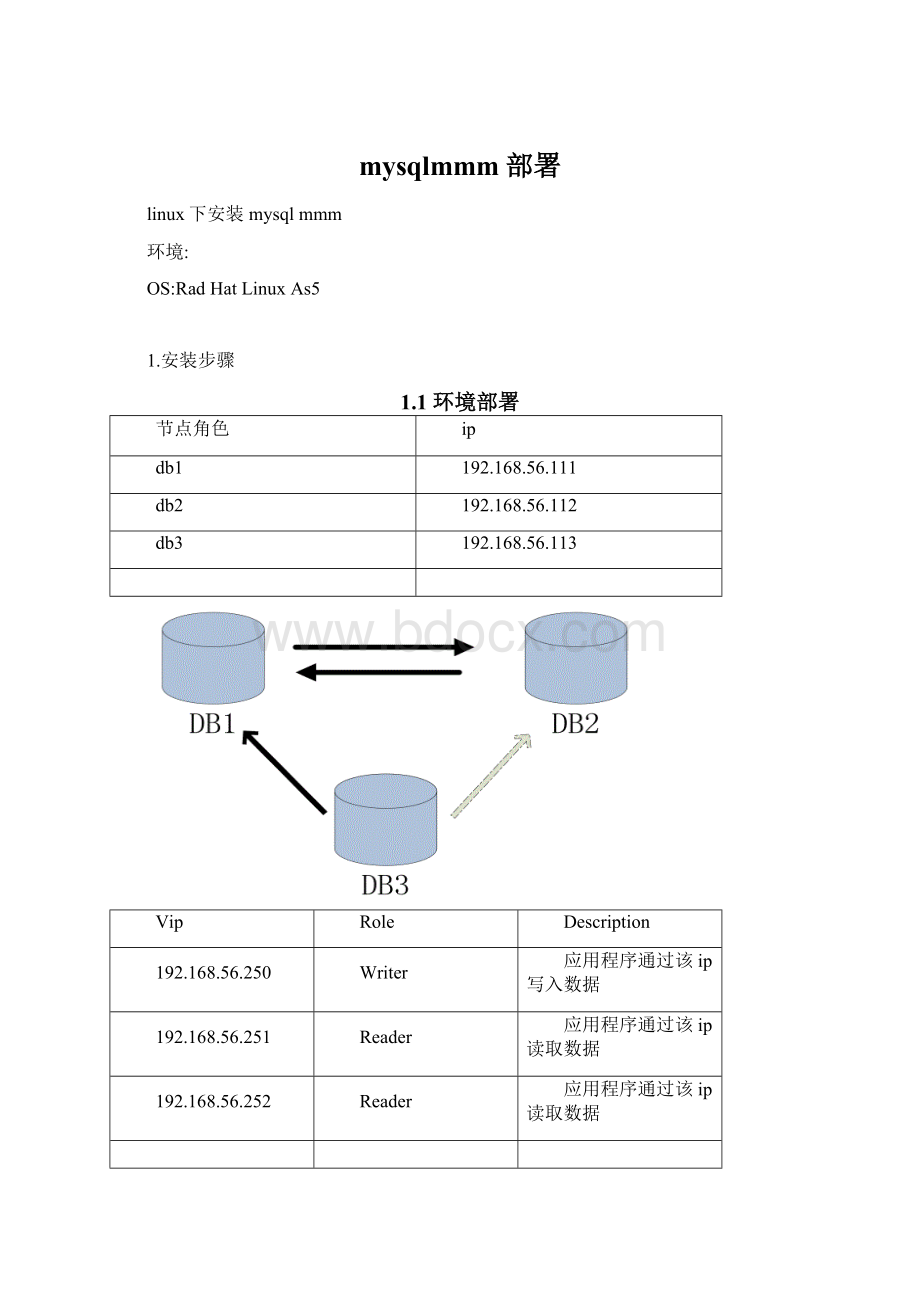
1.1环境部署
节点角色
ip
db1
192.168.56.111
db2
192.168.56.112
db3
192.168.56.113
Vip
Role
Description
192.168.56.250
Writer
应用程序通过该ip写入数据
192.168.56.251
Reader
应用程序通过该ip读取数据
192.168.56.252
Reader
应用程序通过该ip读取数据
DB1从正常运行到宕机,再正常运行的整个过程:
DB1宕机后,mmm会将写入的VIP地址飘逸到DB2,DB3从库对应的主库由之前的DB1转变为DB2,当DB1恢复后,DB1和DB2互为主从,DB1宕机期间在DB2上的操作会自动同步到DB1,但是DB3从库对应的主库不会自动指向DB1,同时写入的VIP也不会转移到DB1,这个需要在下次DB2宕机之后才会指向DB1.
1.2mmm下载
mmm下载地址:
1.3建立各主机的等效连接
步骤省略
1.3.1验证等效连接
1.3.1.1名称节点到各节点的等效性
[root@host01~]#sshhost02;host03date
Lastlogin:
MonApr1811:
27:
012016from
[root@host02~]#sshhost01;host03date
Lastlogin:
MonApr1810:
48:
312016from
[root@host03~]#sshhost01;host02date
Lastlogin:
MonApr1814:
52:
302016from
1.4在3台机器上安装mysql
分别在db1、db2、db3上安装mysql
安装步骤可以参考
1.5配置各机器配置文件
1.5.1DB1
vi/db/mmm/mysql/conf/f内容如下
[mysqld]
server_id=1001
log-bin=binlog
log-bin-index=binlog.index
port=3306
basedir=/db/mmm/mysql
datadir=/db/mmm/mysql/data
socket=/db/mmm/mysql/mysql.sock
character-set-server=utf8
max_connections=1500
show_compatibility_56=on
replicate-wild-ignore-table=mysql.%
replicate-wild-ignore-table=information_schema.%
replicate-wild-ignore-table=performance_schema.%
replicate-wild-ignore-table=sys.%
slave-net-timeout=3600
##master-connect-retry=605.1版本以后不支持该参数
##master-retry-count=864005.1版本以后不支持该参数
sync_binlog=1
innodb_flush_log_at_trx_commit=1
1.5.2DB2
vi/db/mmm/mysql/conf/f内容如下
[mysqld]
server_id=1002
log-bin=binlog
log-bin-index=binlog.index
port=3306
basedir=/db/mmm/mysql
datadir=/db/mmm/mysql/data
socket=/db/mmm/mysql/mysql.sock
character-set-server=utf8
max_connections=1500
show_compatibility_56=on
replicate-wild-ignore-table=mysql.%
replicate-wild-ignore-table=information_schema.%
replicate-wild-ignore-table=performance_schema.%
replicate-wild-ignore-table=sys.%
slave-net-timeout=3600
##master-connect-retry=605.1版本以后不支持该参数
##master-retry-count=864005.1版本以后不支持该参数
sync_binlog=1
innodb_flush_log_at_trx_commit=1
1.5.3DB3
vi/db/mmm/mysql/conf/f内容如下
[mysqld]
server_id=1003
read_only=1##设置为只读,跟db1db2的差别
log-bin=binlog
log-bin-index=binlog.index
port=3306
basedir=/db/mmm/mysql
datadir=/db/mmm/mysql/data
socket=/db/mmm/mysql/mysql.sock
character-set-server=utf8
max_connections=1500
show_compatibility_56=on
replicate-wild-ignore-table=mysql.%
replicate-wild-ignore-table=information_schema.%
replicate-wild-ignore-table=performance_schema.%
replicate-wild-ignore-table=sys.%
slave-net-timeout=3600
##master-connect-retry=605.1版本以后不支持该参数
##master-retry-count=864005.1版本以后不支持该参数
1.6启动mysql
启动各DB
[root@host01bin]#./mysqld_safe--defaults-file=/db/mmm/mysql/conf/f--user=mysql
登陆各DB
./mysql-hlocalhost-uroot-p-S/db/mmm/mysql/mysql.sock
1.7主从配置(db1和db2配置为主主,db3配置为db1的从)
1.7.1授权
在db1和db2上执行:
grantreplicationslaveON*.*TO'repl'@'%'identifiedby'mysql';
flushprivileges;
1.7.2db3配置为db1的从
changemastertomaster_host='192.168.56.111',
master_port=3306,
master_user='repl',
master_password='mysql',
master_log_file='binlog.000002',
master_log_pos=746;
startslave;
1.7.3db1和db2配置为主主
db1:
changemastertomaster_host='192.168.56.112',
master_port=3306,
master_user='repl',
master_password='mysql',
master_log_file='binlog.000002',
master_log_pos=746;
startslave;
db2:
changemastertomaster_host='192.168.56.111',
master_port=3306,
master_user='repl',
master_password='mysql',
master_log_file='binlog.000002',
master_log_pos=746;
startslave;
1.8安装mmm
db1、db2、db3都要安装mysql-mmm-agent,我们这里db1还需要充当monitor的角色,所以在db1上还需要安装mysql-mmm-monitor.
1.8.1DB1
------------依赖包-----------------------------------
rpm-ivhperl-Algorithm-Diff-1.1902-1.el5.rf.noarch.rpm
rpm-ivhperl-Class-Singleton-1.4-1.el5.rf.noarch.rpm
rpm-ivhperl-Proc-Daemon-0.03-1.2.el5.rf.noarch.rpm
rpm-ivhperl-Net-ARP-1.0-1.el5.rf.x86_64.rpm
rpm-ivhperl-Log-Log4perl-1.33-1.el5.pp.noarch.rpm
rpm-ivhperl-Path-Class-0.16-1.el5.rf.noarch.rpm
------------mmm安装包----------------------------
rpm-ivhmysql-mmm-2.2.1-1.el5.noarch.rpm
rpm-ivhmysql-mmm-tools-2.2.1-1.el5.noarch.rpm
rpm-ivhmysql-mmm-agent-2.2.1-1.el5.noarch.rpm
rpm-ivhmysql-mmm-monitor-2.2.1-1.el5.noarch.rpm
1.8.2DB2
------------依赖包-----------------------------------
rpm-ivhperl-Algorithm-Diff-1.1902-1.el5.rf.noarch.rpm
rpm-ivhperl-Class-Singleton-1.4-1.el5.rf.noarch.rpm
rpm-ivhperl-Proc-Daemon-0.03-1.2.el5.rf.noarch.rpm
rpm-ivhperl-Net-ARP-1.0-1.el5.rf.x86_64.rpm
rpm-ivhperl-Log-Log4perl-1.33-1.el5.pp.noarch.rpm
rpm-ivhperl-Path-Class-0.16-1.el5.rf.noarch.rpm
------------mmm安装包----------------------------
rpm-ivhmysql-mmm-2.2.1-1.el5.noarch.rpm
rpm-ivhmysql-mmm-tools-2.2.1-1.el5.noarch.rpm
rpm-ivhmysql-mmm-agent-2.2.1-1.el5.noarch.rpm
1.8.3DB3
------------依赖包-----------------------------------
rpm-ivhperl-Algorithm-Diff-1.1902-1.el5.rf.noarch.rpm
rpm-ivhperl-Class-Singleton-1.4-1.el5.rf.noarch.rpm
rpm-ivhperl-Proc-Daemon-0.03-1.2.el5.rf.noarch.rpm
rpm-ivhperl-Net-ARP-1.0-1.el5.rf.x86_64.rpm
rpm-ivhperl-Log-Log4perl-1.33-1.el5.pp.noarch.rpm
rpm-ivhperl-Path-Class-0.16-1.el5.rf.noarch.rpm
------------mmm安装包----------------------------
rpm-ivhmysql-mmm-2.2.1-1.el5.noarch.rpm
rpm-ivhmysql-mmm-tools-2.2.1-1.el5.noarch.rpm
rpm-ivhmysql-mmm-agent-2.2.1-1.el5.noarch.rpm
1.9mmm配置
1.9.1授权
在db1db2db3上执行如下授权语句:
grantsuper,replicationclient,processon*.*to'mmm_agent'@'192.168.56.%'identifiedby'mysql';
grantreplicationclienton*.*to'mmm_monitor'@'192.168.56.%'identifiedby'mysql';
flushprivileges;
1.9.2编辑配置文件
1.9.2.1mmm_common.conf
db1、db2、db3上都配置一样,可以在db1上配置好后,拷贝到db2、db3.
[root@host01mysql-mmm]#more/etc/mysql-mmm/mmm_common.conf
active_master_rolewriter
cluster_interfaceeth0
pid_path/var/run/mysql-mmm/mmm_agentd.pid
bin_path/usr/libexec/mysql-mmm/
replication_userrepl##复制的账号
replication_passwordmysql##复制账号密码
agent_usermmm_agent##跟上面步骤创建的用户保持一致
agent_passwordmysql
ip192.168.56.111##db1的ip
modemaster
peerdb2
ip192.168.56.112##db2的ip
modemaster
peerdb1
ip192.168.56.113##db3的ip
modeslave
hostsdb1,db2
ips192.168.56.250##设置写入的虚拟IP
modeexclusive
hostsdb1,db2
ips192.168.56.251,192.168.56.252##设置读取的虚拟IP
modebalanced
1.9.2.2mmm_agent.conf
在db1、db2、db3上都需要配置,配置分别如下:
db1
[root@host01mysql-mmm]#more/etc/mysql-mmm/mmm_agent.conf
includemmm_common.conf
#The'this'variablereferstothisserver.Properoperationrequires
#that'this'server(db1bydefault),aswellasallotherservers,havethe
#properIPaddressessetinmmm_common.conf.
thisdb1
db2
[root@host02mysql-mmm]#moremmm_agent.conf
includemmm_common.conf
#The'this'variablereferstothisserver.Properoperationrequires
#that'this'server(db1bydefault),aswellasallotherservers,havethe
#properIPaddressessetinmmm_common.conf.
thisdb2
db3
[root@host03mysql-mmm]#moremmm_agent.conf
includemmm_common.conf
#The'this'variablereferstothisserver.Properoperationrequires
#that'this'server(db1bydefault),aswellasallotherservers,havethe
#properIPaddressessetinmmm_common.conf.
thisdb3
1.9.2.3mmm_mon.conf
仅在monitor的节点上配置,我们这里db1充当monitor的角色,所以只需要在db1上做配置。
[root@host01mysql-mmm]#more/etc/mysql-mmm/mmm_mon.conf
includemmm_common.conf
ip127.0.0.1
pid_path/var/run/mysql-mmm/mmm_mond.pid
bin_path/usr/libexec/mysql-mmm
status_path/var/lib/mysql-mmm/mmm_mond.status
ping_ips192.168.56.111,192.168.56.112##监控的双主db的ip地址
auto_set_online60
#Thekill_host_bindoesnotexistbydefault,thoughthemonitorwill
#throwawarningaboutitmissing.Seethesection5.10"KillHost
#Functionality"inthePDFdocumentation.
#
#kill_host_bin/usr/libexec/mysql-mmm/monitor/kill_host
#
monitor_usermmm_monitor##监控账号
monitor_passwordmysql##监控账号密码
debug0
1.10启动mmm
1.10.1启动agent
在db1db2db3上执行如下命令
[root@host01init.d]#/etc/init.d/mysql-mmm-agentstart
StartingMMMAgentDaemon:
[OK]
1.10.2启动监控
在监控机器上执行如下命令,我们这里是采用db1做监控机,就在该机器上执行即可。
[root@host01init.d]#/etc/init.d/mysql-mmm-monitorstart
StartingMMMMonitorDaemon:
[OK]
1.10.3查看监控状态
在监控机器上执行命令
[root@host01init.d]#mmm_controlshow
db1(192.168.56.111)master/ONLINE.Roles:
reader(192.168.56.251),writer(192.168.56.250)
db2(192.168.56.112)master/ONLINE.Roles:
reader(192.168.56.252)
db3(192.168.56.113)slave/ONLINE.Roles:
1.11故障模拟
停止db1看下192.168.56.250看下是否能否漂移到db2上去,同时查看DB3的Slave的IP会不会从DB1改到DB2。
停止db1:
[root@host01init.d]#mysqladmin-hlocalhost-uroot-p-S/db/mmm/mysql/mysql.sockshutdown
查看mmm状态
[root@host01init.d]#mmm_controlshow
db1(192.168.56.111)master/HARD_OFFLINE.Roles:
db2(192.168.56.112)master/ONLINE.Roles:
reader(192.168.56.251),reader(192.168.56.252),writer(192.168.56.250)
db3(192.168.56.113)slave/ONLINE.Roles:
们可以看到当db1恢复后就充当slave的角色了!
只有当db2挂了以后db1又会担当起主服务器的写入功能
查看db3复制的状态
mysql>showslavestatus\G;
***************************1.row***************************
Slave_IO_State:
Waitingformastertosendevent
Master_Host:
192.168.56.112
Master_User:
repl
Master_Port:
3306
Connect_Retry:
60
Master_Log_File:
binlog.000004
Read_Master_Log_Pos:
692
Relay_Log_File:
host03-relay-bin.000002
Relay_Log_Pos:
317
Relay_Master_Log_File:
binlog.000004
Slave_IO_Running:
Yes
Slave_SQL_Ru
 升级会员
升级会员 