ssh整合 myeclipse100 struts2 hibernate spring.docx
《ssh整合 myeclipse100 struts2 hibernate spring.docx》由会员分享,可在线阅读,更多相关《ssh整合 myeclipse100 struts2 hibernate spring.docx(16页珍藏版)》请在冰豆网上搜索。
ssh整合myeclipse100struts2hibernatespring
Struts2,hibernate,spring整合,Myeclipse10.0
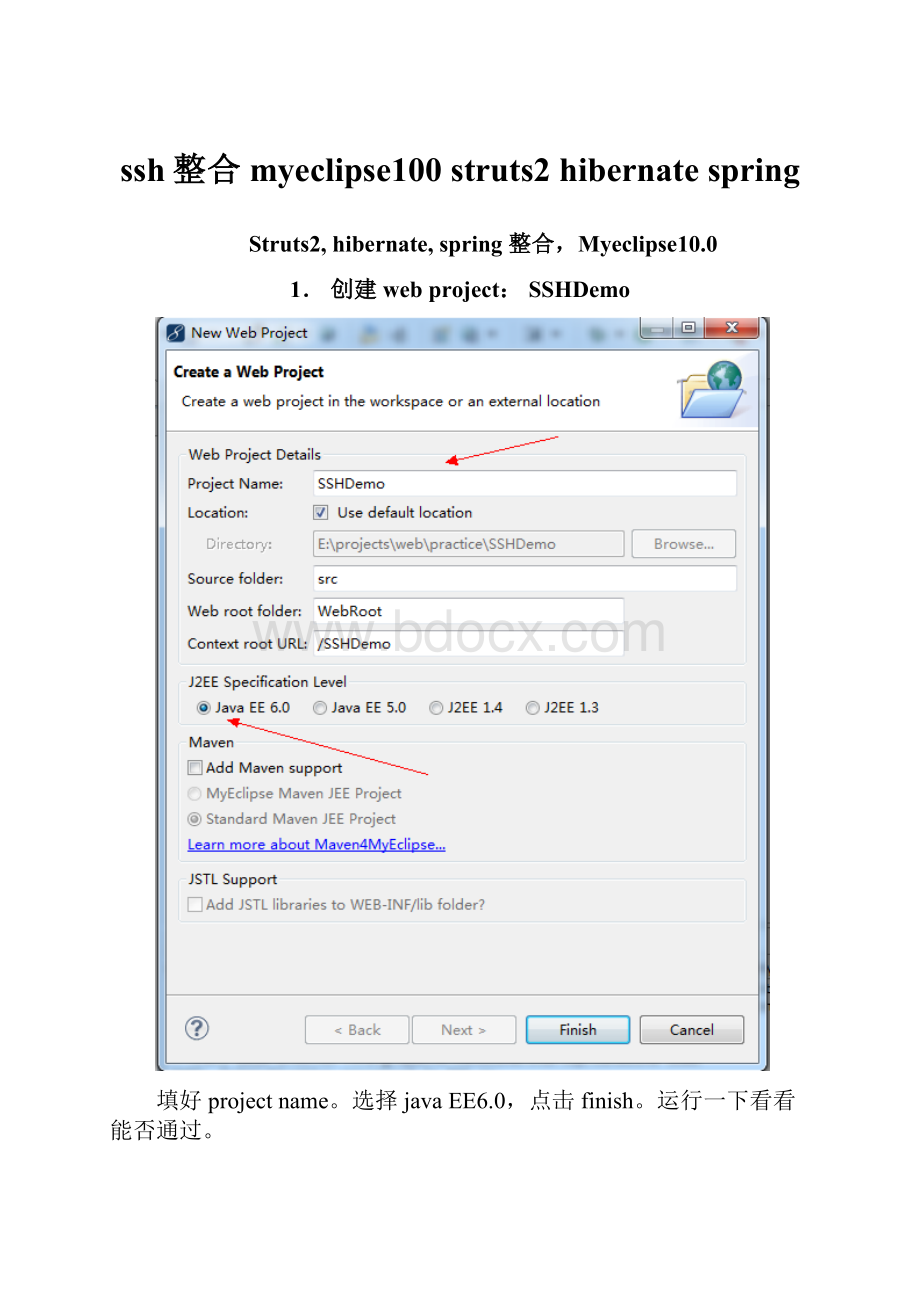
1.创建webproject:
SSHDemo
填好projectname。
选择javaEE6.0,点击finish。
运行一下看看能否通过。
2.添加struts
为了避免myeclipse自动导入jar包产生冲突。
这里选择了手动添加struts支持。
如果手动添加麻烦可以选择自动添加。
出现冲突再到网上寻找解决办法。
2.1到http:
//struts.apache.org/download.cgi#struts2341下载struts2的所有文件如
2.2打开刚才解压的struts压缩文件。
进入apps目录。
解压struts2-blank.war到struts2-blank
2.3打开struts2-blankWEB-INF下的web.xml文件。
将选中部分添加到SSHDemo项目中的web.xml文件中
此时SSHDemo下的web.xml文件如下
xmlversion="1.0"encoding="UTF-8"?
>
xmlns:
xsi="http:
//www.w3.org/2001/XMLSchema-instance"
xsi:
schemaLocation="
index.jsp
struts2
org.apache.struts2.dispatcher.ng.filter.StrutsPrepareAndExecuteFilter
struts2
/*
2.4进入到struts2-blankWEB-INFlib文件夹下,将所有jar文件复制到SSHDemo的lib目录下
2.5复制struts2-blankWEB-INFclasses下的struts.xml到SSHDemo的src目录下,修改内容如下
得到struts.xml文件内容如下
xmlversion="1.0"encoding="UTF-8"?
>
DOCTYPEstrutsPUBLIC
"-//ApacheSoftwareFoundation//DTDStrutsConfiguration2.3//EN"
"http:
//struts.apache.org/dtds/struts-2.3.dtd">
/hello.jsp
--Addpackageshere-->
2.6在WebRoot目录下添加hello.jsp文件。
选中SSHDemo右键。
Runasmyeclipseserverapplication,在浏览器中访问http:
//localhost:
8080/SSHDemo/userHello到达hello.jsp文件即成功添加struts2支持
3.添加spring支持。
1、将鼠标定位到WebProject项目名称上,单击右键,依次选择菜单MyEclipse->AddSpringCapabilities,勾选"Spring 3.0AOP","Spring 3.0Core","Spring 3.0PersistenceCore","Spring 3.0PersistenceJDBC","Spring 3.0Web"等五个核心Libraries,注意将它们Copy到/WebRoot/WEB-INF/lib目录下,再点击Next:
2、配置Spring配置文件的存放的路径与名称,jar包放在WebRoot/WEB-INF/lib下,配置文件放在src下即可,配置文件名称为applicationContext.xml
3.finish结束spring部分。
4.添加hibernate
4.1.下载并复制mysqljdbc驱动到SSHDemo的lib目录下
到
4.2.将鼠标定位到WebProject项目名称上,单击右键,依次选择菜单MyEclipse->AddHibernate Capabilities.选择Hibernate3.3,注意将LibraryCopy到/WebRoot/WEB-INF/lib目录下:
4.3.在对话框中选择Spring configuration file,表示我们希望将Hibernate托管给Spring进行管理,这是将Hibernate与Spring进行整合的基础。
然后点击Next:
4.4.在出现的对话框中选择ExistingSpringconfigurationfile。
因为我们已经添加了Spring的配置文件,所以这里选择的是已存在的配置文件。
MyEclipse会自动找到存在的那个文件。
然后在SessionFactory ID中输入Hibernate的SessionFactory在Spring配置文件中的BeanID的名字,这里我们输入sessionFactory即可。
然后点击Next:
4.5.填写数据库链接信息
4.6.不创建sessionfactory
4.7.
5.为struts添加spring支持
5.1.拷贝struts2lib下的struts2-spring-plugin-2.3.4.jar到SSHDemo的lib下
5.2.添加listener
org.springframework.web.context.ContextLoaderListener
6.ssh测试SSH整合
6.1.在数据库中新建数据库sshdemo
6.2.在SSHDemo中创建实体类User,编写映射文件User.hbm.xml
6.3.编写UserDao
6.4.编写UserService
6.5.配置struts.xml
6.6.配置applicationContext.xml添加bean
6.7.启动服务器,在浏览器中访问http:
//localhost:
8080/SSHDemo/userHello?
user.username=xxx
6.8.页面跳转,数据库更新
由于具体代码编写全部写入本文件繁琐。
下面是整个SSHDemo的完整代码。
其中src文件夹下的文件、struts.xml、applicationContext.xml中的内容均对项目调试起到重要作用。
希望能够认真体会
完整项目下载地址
 升级会员
升级会员 