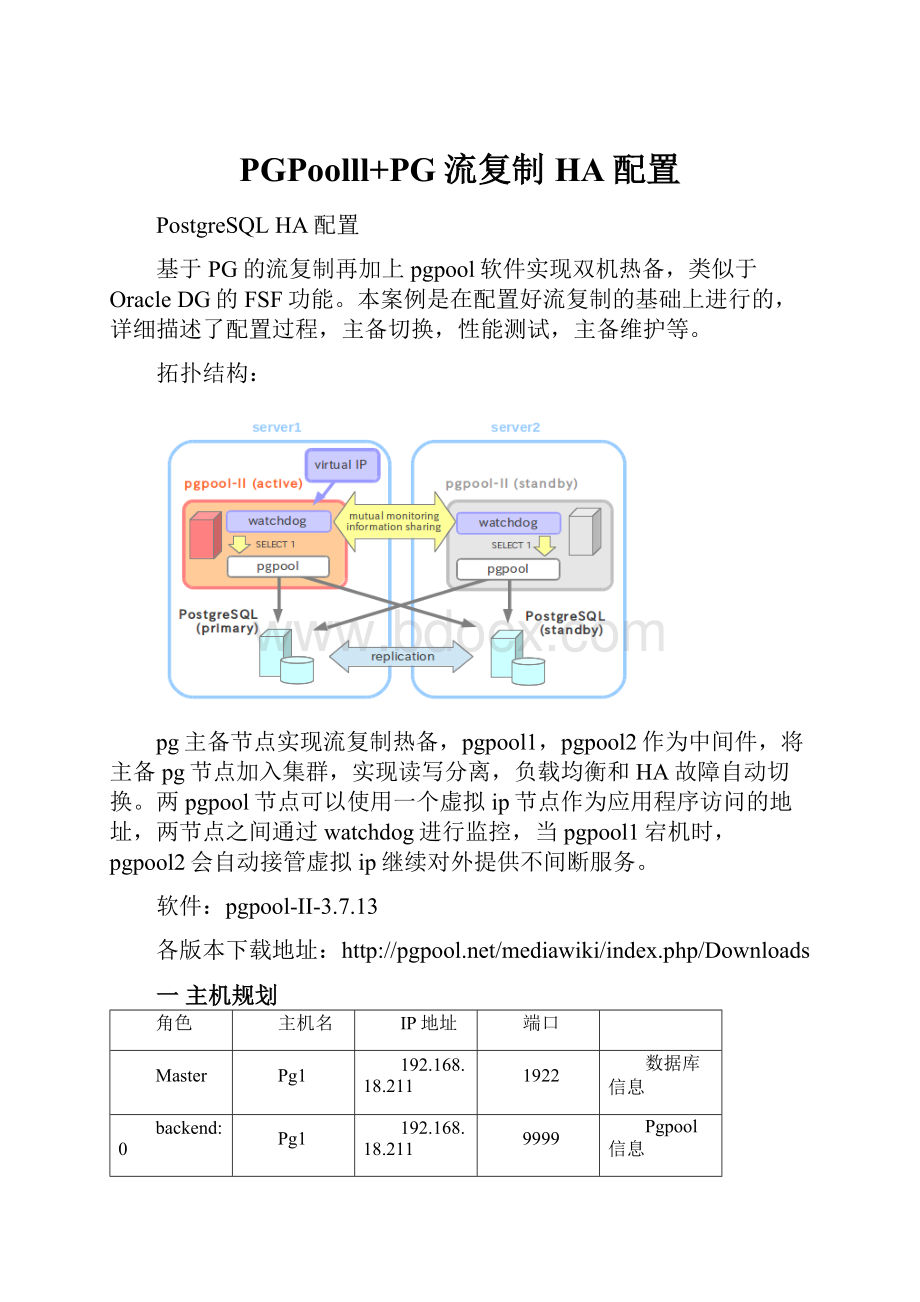
PGPoolll+PG流复制HA配置Word文档格式.docx
《PGPoolll+PG流复制HA配置Word文档格式.docx》由会员分享,可在线阅读,更多相关《PGPoolll+PG流复制HA配置Word文档格式.docx(30页珍藏版)》请在冰豆网上搜索。

9999
Pgpool信息
Slave
Pg2
192.168.18.212
1
Vip(虚拟IP)
192.168.18.215
对外提供服务
二配置主机信任关系
在pg1机器上都生成ssh密钥和公钥如下:
ssh-keygen-trsa
cat~/.ssh/id_rsa.pub>
>
~/.ssh/authorized_keys.pg1
chmod600~/.ssh/authorized_keys.pg1
在pg2机器上都生成ssh密钥和公钥如下:
~/.ssh/authorized_keys.pg2
chmod600~/.ssh/authorized_keys.pg2
把pg1的公钥cp到pg2上,并且改名:
scp.ssh/authorized_keys.pg1pg2:
/home/postgres/.ssh/authorized_keys
把pg2的公钥cp到pg1上,并且改名:
scp.ssh/authorized_keys.pg2pg1:
把pg1的公钥写入到自己主机的authorized_keys文件中,自己主机信任自己:
cat.ssh/authorized_keys.pg1>
.ssh/authorized_keys
把pg2的公钥写入到自己主机的authorized_keys文件中,自己主机信任自己:
cat.ssh/authorized_keys.pg2>
验证信任关系配置是否成功,注意远程和本机都要以远程方式验证,如果不需要密码,说明配置成功。
#pg1主机
sshpostgres@pg2uptime
sshpostgres@pg1uptime#第一次需要密码
#pg2主机
sshpostgres@pg2uptime#第一次需要密码
sshpostgres@pg1uptime
三安装pgpool
3.1、安装pgpool
mkdir/usr/local/pgpool(root)
chownpostgres:
postgres/usr/local/pgpool(root)
cd/soft/pgpool-II-3.7.13
./configure--prefix=/usr/local/pgpool--with-pgsql=/usr/local/pg12.2/
make
makeinstall
3.2、安装pgpool相关函数,可选,建议安装
cd/soft/pgpool-II-3.7.13/src/sql
cdsql
psql-finsert_lock.sql
3.3、配置postgres用户环境变量(pg1,pg2)
vi.bash_profile
exportPGPOOL_HOME=/usr/local/pgpool
exportPATH=$PATH:
$PGPOOL_HOME/bin
四、配置pgpool
4.1、配置pg1主机上的pool_hba.conf
pool_hba.conf是对登录用户进行验证的,要和pg1的pg_hba.conf保持一致。
cd/usr/local/pgpool/etc/
cppool_hba.conf.samplepool_hba.conf
vipool_hba.conf–添加如下内容
hostreplicationreplpg2trust
hostreplicationrepl192.168.18.0/24trust
hostallall192.168.18.0/24trust
4.2、配置pg2主机上的pool_hba.conf,添加如下内容:
hostreplicationreplpg1trust
4.3、配置pcp.conf(pg1,pg2)
pcp.conf配置用于pgpool自己登陆管理使用的,一些操作pgpool的工具会要求提供密码等,比如节点的添加和删除等,配置如下:
cd/usr/local/pgpool/etc
cppcp.conf.samplepcp.conf
#使用pg_md5生成配置的用户名密码
pg_md5postgres
e8a48653851e28c69d0506508fb27fc5
#编辑pcp.conf文件,文件里面有样本内容
postgres:
4.4、在pgpool中添加pg数据库的用户名和密码(pg1,pg2):
#需要先创建一个pgpool.conf,否则在产生pool_passwd文件时会报错:
cppgpool.conf.sample-master-slavepgpool.conf
pg_md5-p-m-upostgrespool_passwd
#输入数据库登录用户postgres密码,生成pool_passwd文件
4.5、配置pgpool.conf
配置该文件是最核心的内容,HA是否能够正常运行,跟此文件的配置息息相关。
该配置文件分为不同模块,所以我们配置的时候要根据不同模块进行分类,否则配置的时候容易出错。
我们可以根据前面4.4步骤产生的配置文件进行编辑。
4.5.1、主机pg1pgpool.conf配置,由于参数繁多,只列出需要修改或者关注的内容,有些值是默认的:
#------------------------------------------------------------------------------
#CONNECTIONS
#-pgpoolConnectionSettings-
listen_addresses='
*'
port=9999
#-pgpoolCommunicationManagerConnectionSettings-
pcp_listen_addresses='
pcp_port=9898
#-BackendConnectionSettings–此配置非常重要,不容易理解
backend_hostname0='
pg1'
#以后bankend0就代表了pg1在集群中的表述
backend_port0=1922#连接pg数据库的端口
backend_weight0=1
backend_data_directory0='
/usr/local/pg12.2/data'
#pg数据库路径
backend_flag0='
ALLOW_TO_FAILOVER'
backend_hostname1='
pg2'
#bankend1代表pg2
backend_port1=1922
backend_weight1=1
backend_data_directory1='
backend_flag1='
#-Authentication-
enable_pool_hba=on
pool_passwd='
pool_passwd'
#此处的poo_passwd就是上面产生的文件
#FILELOCATIONS
pid_file_name='
/usr/local/pgpool/pgpool.pid'
#LOADBALANCINGMODE启用负载均衡
load_balance_mode=on
#MASTER/SLAVEMODE
master_slave_mode=on
master_slave_sub_mode='
stream'
#-Streaming–流复制检查
sr_check_period=10
sr_check_user='
repl'
#postgresreplication用户的名字
sr_check_period=0
sr_check_password='
oracle'
#postgresreplication用户的密码
sr_check_database='
postgres'
#HEALTHCHECKGLOBALPARAMETERS各个节点之间健康检查
health_check_period=10#默认为0,则不检查
health_check_timeout=20
health_check_user='
#pg数据库用户的名字,要求要有supper权限
health_check_password='
health_check_database='
#FAILOVERANDFAILBACK
failover_command='
/usr/local/pgpool/failover_stream.sh%H'
#切换脚本,后面需要编辑
#WATCHDOG
#-Enabling-
use_watchdog=on
#-WatchdogcommunicationSettings-看门狗设置
wd_hostname='
wd_port=9000#看门狗进行通信的端口
#-VirtualIPcontrolSetting–虚拟ip配置,非常重要,否则无法启动虚拟ip
delegate_IP='
192.168.18.215'
#虚拟ip
if_cmd_path='
/sbin'
if_up_cmd='
ipaddradd$_IP_$/24deveth4labeleth4:
0'
#注意选择公网ip的网口
if_down_cmd='
ipaddrdel$_IP_$/24deveth4'
#以后需要把ip命令加上setuid的权限
arping_path='
/usr/sbin'
arping_cmd='
arping-U$_IP_$-w1-Ieth4'
#-LifecheckSetting–
wd_monitoring_interfaces_list='
eth4'
#--heartbeatmode–心跳线设置,与备机的通信
wd_heartbeat_port=9694
wd_heartbeat_keepalive=2
wd_heartbeat_deadtime=30
heartbeat_destination0='
#备机的名字
heartbeat_destination_port0=9694#进行测试存活状态的端口
heartbeat_device0='
eth1'
#pg2网络心跳的网口,一般选择专门的网口
#-OtherpgpoolConnectionSettings–与pg2连接的配置
other_pgpool_hostname0='
other_pgpool_port0=9999
other_wd_port0=9000
4.5.2、备机pg2pgpool.conf配置,可以把主机的配置复制到备机,然后做少量的修改。
#主机的名字
heartbeat_destination_port0