HIVE安装使用说明Word下载.docx
《HIVE安装使用说明Word下载.docx》由会员分享,可在线阅读,更多相关《HIVE安装使用说明Word下载.docx(14页珍藏版)》请在冰豆网上搜索。
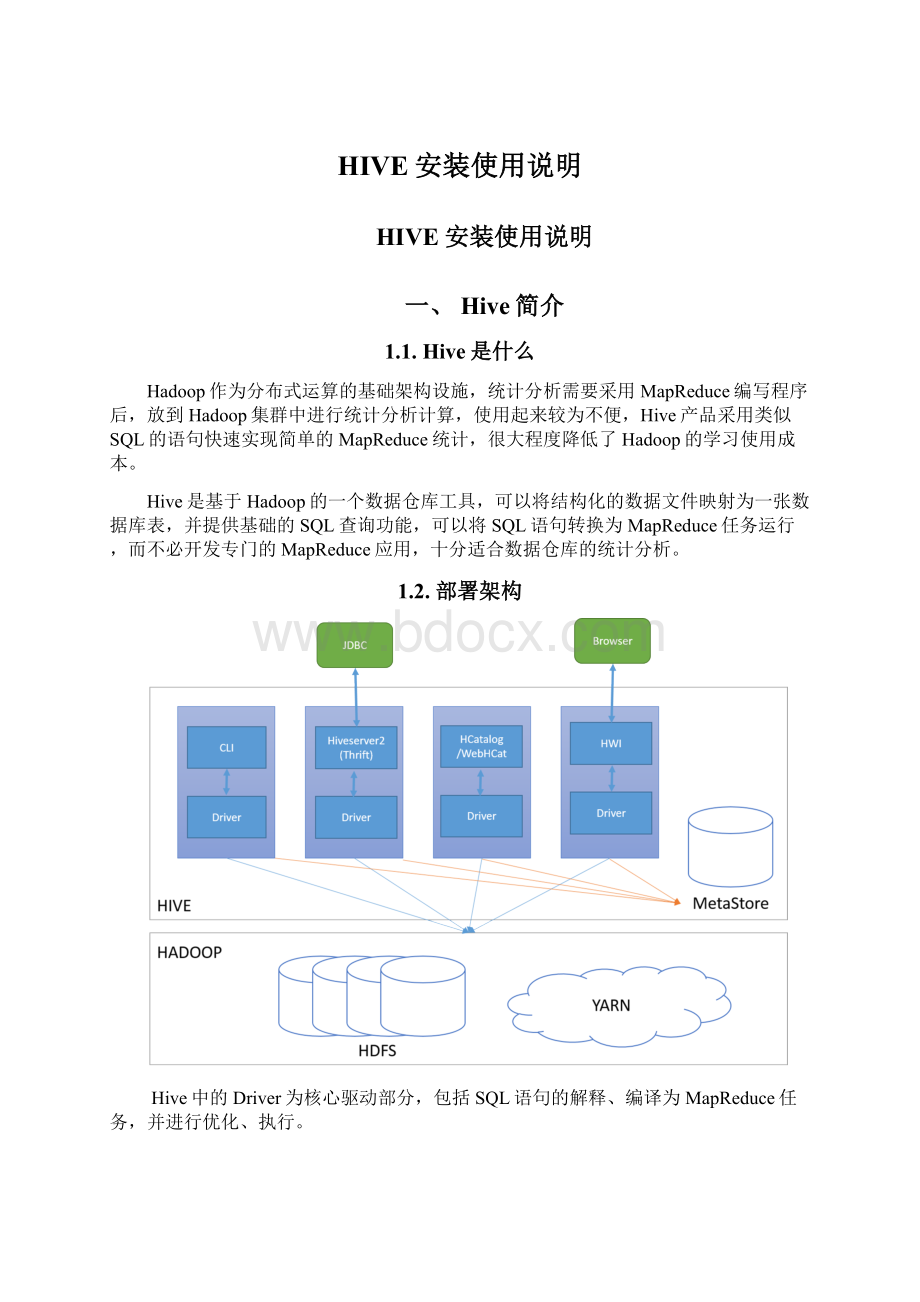
在本安装示例中采用的第二种方式进行安装部署。
备注:
在本文后续的安装和说明中,所有示例均以HiverServer2、Beeline方式进行。
另:
因Hive在查询时性能较差,后期拟计划采用SPARK或Presto进行替代,因此本安装手册不对Hive的集群方案进行描述。
1.3.环境说明
本安装示例在Ubuntu14.04.3的虚拟器中进行安装,并提前安装配置Hadoop。
机器名
IP地址
安装软件
启用服务
hdfs1
10.68.19.184
Hive
Hadoop
hdfs2
10.68.19.182
hdfs3
10.68.19.183
MySQL
二、MySQL安装配置
2.1.MySQL安装
登录到hdfs3中,安装MySQL服务器。
$sudoapt-getinstallmysql-server
修改my.cfg的配置文件
$sudovi/etc/mysql/my.cfg
修改内容如下:
bind-address
=10.68.19.183
:
wq
重新启动mysql服务
$sudoservicemysqlrestart
2.2.创建Hive需要的数据库和用户
$mysql-uroot-p
依次输入以下命令:
#创建hive用户
insertintomysql.user(Host,User,Password)values("
localhost"
"
hive"
password("
));
#创建数据库
createdatabasehive;
#授权
grantallonhive.*tohive@'
%'
identifiedby'
hive'
;
localhost'
flushprivileges;
#退出
exit
三、Hive安装
3.1.下载Hive
从官网(http:
//hive.apache.org/downloads.html)上下载最新的稳定版本地址,并上传到服务器上。
本安装示例采用的版本为apache-hive-1.2.1-bin.tar.gz。
3.2.解压并配置环境变量
解压安装文件到/opt目录
$tar-zxvfapache-hive-1.2.1-bin.tar.gz-C/opt
修改环境变量
$sudovi/etc/profile
修改如下内容
exportHIVE_HOME=/opt/hive-1.2.1
exportPATH="
$JAVA_HOME/bin:
$HADOOP_HOME/bin:
$HIVE_HOME/bin:
$PATH"
启用配置
$source/etc/profile
3.3.修改配置文件
$cd$HIVE_HOME
$cpconf/hive-default.xml.templateconf/hive-site.xml
$viconf/hive-site.xml
修改以下内容的值
<
configuration>
<
property>
name>
javax.jdo.option.ConnectionURL<
/name>
value>
jdbc:
mysql:
//10.68.19.183:
3306/hive<
/value>
description>
JDBCconnectstringforaJDBCmetastore<
/description>
/property>
javax.jdo.option.ConnectionDriverName<
com.mysql.jdbc.Driver<
DriverclassnameforaJDBCmetastore<
javax.jdo.option.ConnectionPassword<
hive<
passwordtouseagainstmetastoredatabase<
javax.jdo.option.ConnectionUserName<
Usernametouseagainstmetastoredatabase<
hive.exec.local.scratchdir<
/data/hive/scratach<
LocalscratchspaceforHivejobs<
hive.downloaded.resources.dir<
/data/hive/download<
Temporarylocaldirectoryforaddedresourcesintheremotefilesystem.<
hive.querylog.location<
/data/hive/querylog<
LocationofHiveruntimestructuredlogfile<
hive.server2.logging.operation.log.location<
/data/hive/operation_logs<
Topleveldirectorywhereoperationlogsarestoredifloggingfunctionalityisenabled<
...
/configuration>
3.4.创建需要的目录
$mkdir/data/hive
$mkdir/data/hive/scratach
$mkdir/data/hive/download
$mkdir/data/hive/querylog
$mkdir/data/hive/operation_logs
3.5.上传MySQL驱动
将mysql-connector-java-5.1.36.jar上传到$HIVE_HOME/lib目录下。
3.6.启动
$hiveserver2
3.7.基本操作验证
$beeline
!
connectjdbc:
hive2:
//hdfs1:
10000
输入当前用户名,密码为空
或者直接输入
$./bin/beeline–ujdbc:
#查看当前数据库
showdatabases;
#查看所有表
showtables;
#创建表
createtableusers(user_idint,fnamestring,lnamestring);
#插入数据
INSERTINTOusers(user_id,fname,lname)VALUES(1,'
john'
'
smith'
);
INSERTINTOusers(user_id,fname,lname)VALUES(2,'
doe'
INSERTINTOusers(user_id,fname,lname)VALUES(3,'
#查询数据
select*fromuserslimit2;
selectcount
(1)fromusers;
3.8.数据导入示例
示例场景说明:
先将输入导入到tmp_sell_day_corp_cig,再将数据写入sell_day_corp_cig中。
创建表
createtabletmp_sell_day_corp_cig
(
sell_dstring,
cig_codestring,
stat_codestring,
statyearsmallint,
halfyearsmallint,
quartersmallint,
statmonthsmallint,
stattendaysmallint,
statdatesmallint,
cig_provincestrin
 升级会员
升级会员 