实验五 链路捆绑与STP讲解Word文档下载推荐.docx
《实验五 链路捆绑与STP讲解Word文档下载推荐.docx》由会员分享,可在线阅读,更多相关《实验五 链路捆绑与STP讲解Word文档下载推荐.docx(13页珍藏版)》请在冰豆网上搜索。
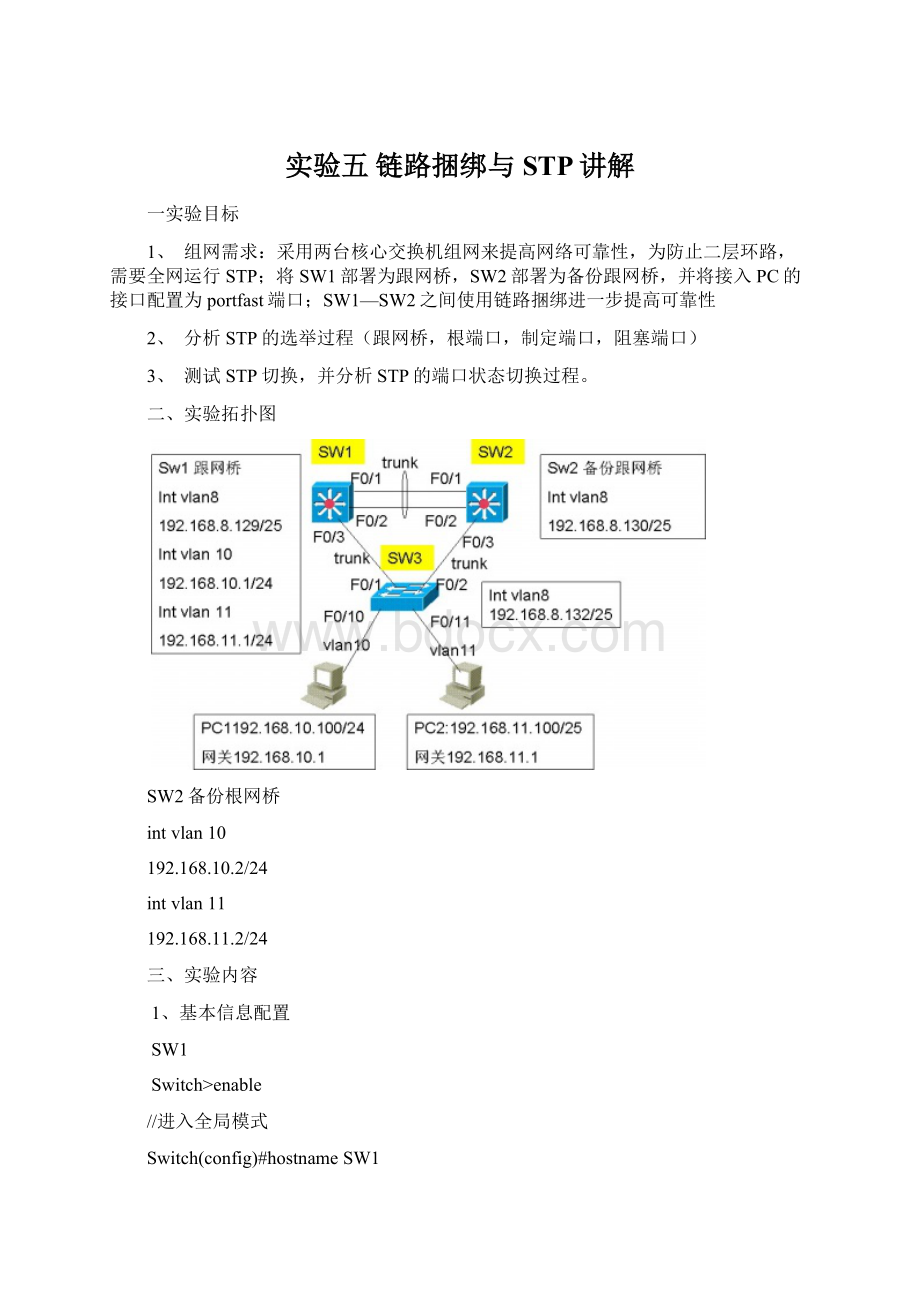
192.168.11.2/24
三、实验内容
1、基本信息配置
SW1
Switch>
enable
//进入全局模式
Switch(config)#hostnameSW1
//进入特权模式
SW1(config)#noipdomainlookup
//禁用域名查找
SW1(config)#enablepasswordip
//设置进入特权模式密码
SW1(config)#lineconsole0
//连接到console线口
SW1(config-line)#loggingsynchronous
//自动换行
SW1(config-line)#exec-t0
//超时为0
SW1(config-line)#passwordip
//设置进入console线口的密码
SW1(config-line)#login
//进入console线口是需要进行认证
SW1(config-line)#exit
//退出console线口
SW1(config)#lineaux0
//进入线口
SW1(config-line)#passwordbluefox
//设置进入本线口的密码
//设置进入线口是进行认证
//退出线口
SW1(config)#linevty04
SW1(config-line)#loggingsynchronous
//超时为0
//设置进入密码
//设置进入是进行认证
SW2
Switch>
Switch#configterminal
Switch(config)#hostnameSW2
SW2(config)#noipdomainlookup
SW2(config)#enablepasswordip
SW2(config)#lineconsole0
SW2(config-line)#loggingsynchronous
SW2(config-line)#exec-t0
SW2(config-line)#passwordip
SW2(config-line)#login
SW2(config-line)#exit
SW2(config)#lineaux0
SW2(config-line)#passwordbluefox
SW2(config-line)#login
SW2(config)#linevty04
SW2(config-line)#loggingsynchronous
SW3
Switch(config)#hostnameSW3
SW3(config)#noipdomainlookup
SW3(config)#enablepasswordip
SW3(config)#lineconsole0
SW3(config-line)#loggingsynchronous
SW3(config-line)#exec-t0
SW3(config-line)#passwordip
SW3(config-line)#login
SW3(config-line)#exit
SW3(config)#lineaux0
SW3(config-line)#passwordbluefox
SW3(config-line)#login
SW3(config)#linevty04
SW3(config-line)#loggingsynchronous
2、创建vlan
SW1#vlandatabase
//进入vlandatabase模式
SW1(vlan)#vlan8
//创建vlan8
SW1(vlan)#vlan10
//创建vlan10
SW1(vlan)#vlan11
//创建vlan11
SW1(vlan)#exit
//退出vlandatabase模式、
SW2#vlandatabase
SW2(vlan)#vlan8
SW2(vlan)#vlan10
SW2(vlan)#vlan11
SW2(vlan)#exit
//退出vlandatabase模式
SW3#vlandatabase
//进入vlan数据库
SW3(vlan)#vlan8
SW3(vlan)#vlan10
SW3(vlan)#vlan11
SW3(vlan)#exit
4、
跟网桥配置
SW1(config)#spanning-treevlan8priority0
//配置sw1为vlan8的跟网桥
SW1(config)#spanning-treevlan10priority0
//配置sw1为vlan10的跟网桥
SW1(config)#spanning-treevlan11priority0
//配置sw1为vlan11的跟网桥
注:
模拟器上不支持批量配置vlan跟网桥,只能一个一个配置
SW2(config)#spanning-treevlan8priority4096
//配置sw2为vlan8的备份网桥
SW2(config)#spanning-treevlan10priority4096
//配置sw2为vlan10的备份网桥
SW2(config)#spanning-treevlan11priority4096
//配置sw2为vlan11的备份网桥
5、
二层链路捆绑
SW1
SW1(config)#interfacerangefastEthernet0/1-2
//进入端口1和2
SW1(config-if-range)#switchporttrunkencapsulationdot1q
//设置trunk封装协议为dot1q
SW1(config-if-range)#switchportmodetrunk
//端口为trunk模式
SW1(config-if-range)#switchporttrunkallowedvlanall
//配置trunk允许所有vlan通过
SW1(config-if-range)#channel-group2modeon
//将端口1和2划分到通道组2中
SW1(config-if-range)#exit
//退出端口1和2
SW2(config)#interfacerangefastEthernet0/1-2
//进入端口1和2
SW2(config-if-range)#switchporttrunkencapsulationdot1q
//配置trunk封装协议为dot1q
SW2(config-if-range)#switchportmodetrunk
//配置端口为trunk接口
SW2(config-if-range)#switchporttrunkallowedvlanall
SW2(config-if-range)#channel-group2modeon
//将接口1和2划分到通道组2中
SW2(config-if-range)#exit
//退出接口
6、
二层接口配置
SW1(config)#interfacefastEthernet0/3
//进入接口
SW1(config-if)#switchporttrunkencapsulationdot1q
SW1(config-if)#switchportmodetrunk
//配置接口为trunk接口
SW1(config-if)#switchporttrunkallowedvlanall
SW1(config-if)#exit
//退出端口
SW2(config)#interfacefastEthernet0/3
//进入接口
SW2(config-if)#switchporttrunkencapsulationdot1q
SW2(config-if)#switchportmodetrunk
SW2(config-if)#switchporttrunkallowedvlanall
SW2(config-if)#exit
SW3(config)#interfacefastEthernet0/10
SW3(config-if)#switchportmodeaccess
//配置接口为access接入模式
SW3(config-if)#switchportaccessvla
 升级会员
升级会员 