一个优秀的国外网站教程1.docx
《一个优秀的国外网站教程1.docx》由会员分享,可在线阅读,更多相关《一个优秀的国外网站教程1.docx(46页珍藏版)》请在冰豆网上搜索。
一个优秀的国外网站教程1
HowToCreateaCleanandColorfulWebLayout–PhotoshopTutorial
InthistutorialIamgoingtoshowyouhowtocreateacleancorporatelayoutinPhotoshop.TheoriginallayoutwascreatedbykuntizfromThemeForestandIwanttothankhimforallowingmetowritethistutorial.
MaterialsNeeded:
∙leafs
∙pixelatedbluerectangle
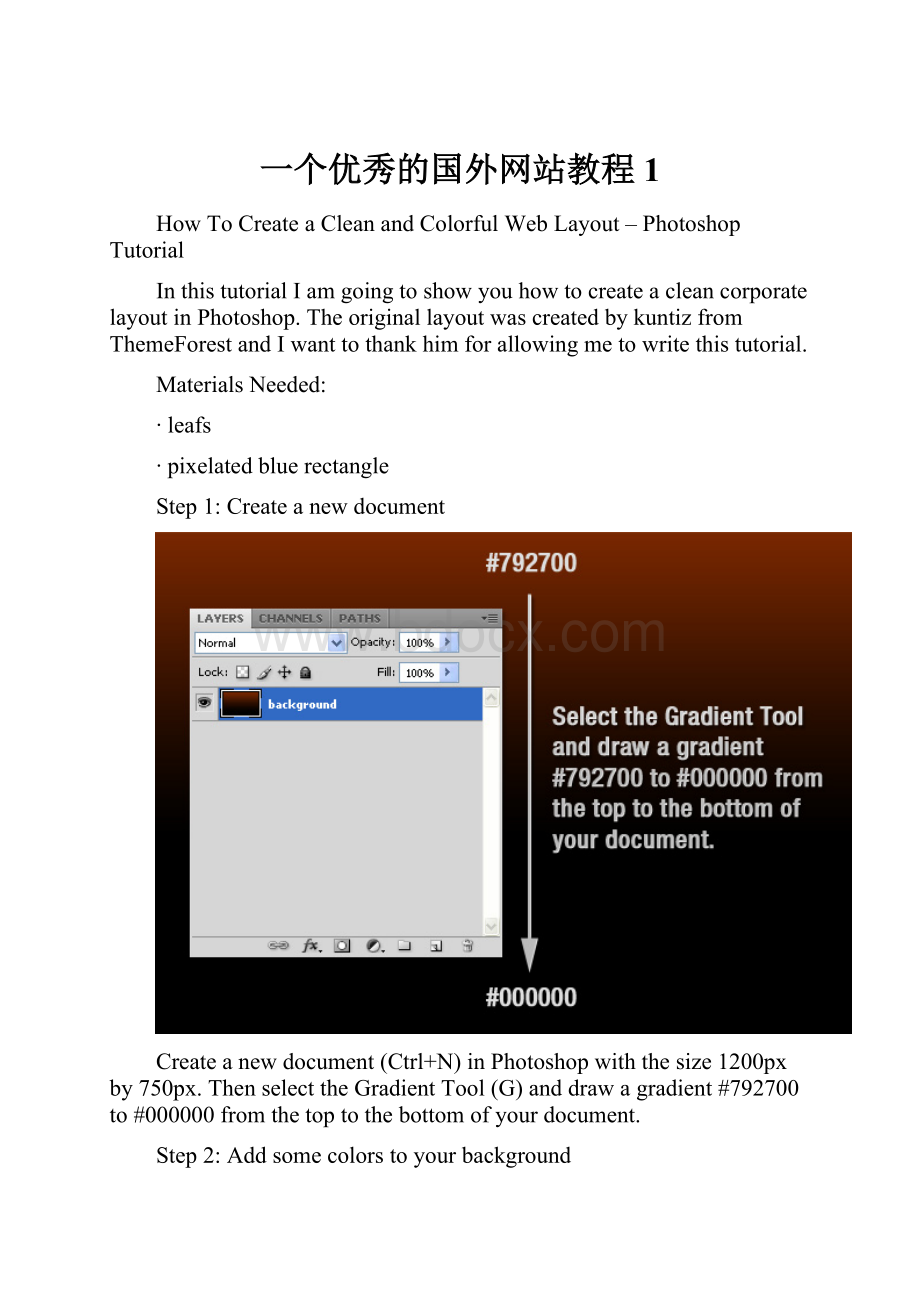
Step1:
Createanewdocument
Createanewdocument(Ctrl+N)inPhotoshopwiththesize1200pxby750px.ThenselecttheGradientTool(G)anddrawagradient#792700to#000000fromthetoptothebottomofyourdocument.
Step2:
Addsomecolorstoyourbackground
Createanewlayer,selecttheBrushTool(B),selectasoftbrushwiththediameter300pxandaddsomecolorstoyourlayout.Ihaveusedred,orangeandblue.Namethislayer"color."
Step3:
Addatexturetothebackground
Nowwearegoingtocreateatextureforourbackground.OpeninPhotoshoptheleafsimagewhichyouhavedownloadedatthebeginningofthetutorialandmoveitintoyourdocumentusingtheMoveTool(V).Right-clickonthislayerandselectConverttoSmartObject.ThengotoFilter>Artistic>FilmGrainandusethesettingsfromthefollowingimage.ThengotoFilter>Pixelate>Mosaic,andagainusethesettingsfromthefollowingimage.SettheblendmodeforthislayertoDifference,theopacityto30%andnameit"texture"
Step4:
Createadarkbackgroundforthecontent
Createanewlayer,selecttheRoundedRectangleTool(U),settheRadiusto3pixelsandcreatearoundedblackrectangle.Thendouble-clickonthislayertoopentheLayerStylewindowandusethesettingsfromthefollowingimageforDropShadow.Settheopacityofthislayerto70%andnameit"blackshape."
Step5:
Usegroupstoorganizeyourlayers
HolddowntheCtrlkeyandselectallthelayerswhichyouhavecreateduntilnowandthengroupthem(Ctrl+G).Namethegroup"background."
Step6:
Createmoregroups
Createanewgroup(Layer>New>Group)andnameit"home."Thencreateanothergroupinsidethe"home"groupandnameit"logo."
Step7:
Addalogoandatagline
Createanewlayerinsidethe"logo"group.ThenselecttheTypeTool(T)andwritethenameofyourlayoutusingthecolor#f4f4f4.Double-clickonthislayertoopentheLayerStylewindowandusethesettingsfromthefollowingimage.Thencreateanewlayerandwriteataglineusingthecolor#eeeeee.
Step8:
"Signup"and"login"buttons
Nowwearegoingtocreatetwobuttonsintheupperrightcornerofourlayout.Createanewgroupandnameit"Signup|Login."ThenselecttheRoundedRectangleTool(U)andcreatearoundedrectanglelikeIdid.Double-clickontheshape’slayertoopentheLayerStylewindowandusethesettingsfromthefollowingimage.SettheforegroundcolortowhiteandusetheTypeTool(T)towritethewords"Signup|Login"onyourbutton.Settheopacityofthetextlayerto75%.
Step9:
Createabluelinewiththeheightof1px
Createanewgroupandnameit"Navigation."Createanewlayer,selecttheSingleRowMarqueeToolandclickonceonyourdocumenttocreateaselectionwiththeheightof1px.Fillthatselectionwiththecolor#406f94anddeletewhatisoutsideoftheblackrectangleusingtheRectangularMarqueeTool(M).Settheopacityofthislayerto40%andnameit"Line."
Step10:
Addagradienttothenavigationbar
Createanewlayer,selecttheRectangularMarqueeTool(M)andcreateaselectionlikeIdid(note:
youcanusesomeguidestohelpyoucreatetheselection).ThenselecttheGradientTool(G)anddrawagradient#35423etotransparentfromthebottomtothetopoftheselection.HitCtrl+Dtodeselect.ThengotoFilter>Noise>AddNoiseandusethesettingsfromthefollowingimage.Namethislayer"gradient"andleaveadistanceof1pixelbetweenthelineandthegradient.
Step11:
Writethenamesofyourlayout’spages
SelecttheTypeTool(T)andwritethenamesofyourlayout’spagesinthenavigationbar.Thendouble-clickonthetextlayertoopentheLayerStylewindowandusethesettingsfromthenextimage.ThefontwhichIhaveusediscalledGreyscaleBasic.
Step12:
Createaseparator
Nowwearegoingtocreateaseparator.Createanewlayer,selecttheSingleColumnMarqueeToolandclickonceonyourlayout.ThenselecttheRectangularMarqueeTool(M),clickonthe"Intersectwithselection"buttonfromtheoptionbarandcreateaselectionliketheonefromthenextimage.FilltheselectionwithwhiteandhitCtrl+Dtodeselect.
Step13
Double-clickonthelayerwhichyouhavecreatedattheprevioussteptoopentheLayerStylewindowandusethesettingsfromthefollowingimage.Namethislayer"line1."
Step14:
Step15:
Convertthe"line1"and"line2"layersintoasmartobject
HolddowntheCtrlkeyandselectthe"line1"and"line2"layers.Thenright-clickononeofthemandselectConverttoSmartObject.Namethesmartobject"separator."
Step16:
Createabluehighlight
Createanewlayerbeneaththe"separator"layer.SelecttheRectangularMarqueeTool(M),createaselectionliketheonefromthefollowingimageandfillitwiththecolor#35423e.Right-clickonthislayerandselectConverttoSmartObject.GotoFilter>Blur>GaussianBlurandusethesettingsfromthenextimage.ThengotoFilter>Noise>AddNoiseandagainusethesettingsfromthefollowingimage.Settheopacityofthislayerto60%andnameit"highlight."
Step17:
Createamaskforthe"separator"layer
Clickonthe"separator"layerintheLayerspalettetoselectitandthengotoLayer>LayerMask>RevealAll.SelecttheGradientTool(G)anddrawablacktotransparentgradientfromthetoptothemiddleofyourseparator.
Step18:
Duplicatetheseparator
HolddowntheCtrlkeyandclickonthe"separator"and"highlight"layersintheLayerspalettetoselectthem.ThenselecttheMoveTool(V),holddowntheAltandShiftkeysandthenclickonyourdocumentanddragthemouse.Nowyouhaveduplicatedtheselectedlayers.UsetheMoveTool(V)tomovethesenewlayerstotheright.Repeatthisstepandcreateasmanyseparatorsasyouneed.
Step19:
Groupalltheseparators
Selectallthe"separator"and"highlight"layersintheLayerspaletteandhitCtrl+Gtogroupthem.Namethegroup"separators."`
Step20:
Createabuttonfortheactivepage
Nowwearegoingtocreateabackgroundfortheactivemenupagetodifferentiateitfromtheothers.SelecttheRectangleTool(U)andcreatearectanglelikeIdid.Putthislayerbeneaththetextlayerwhichcontainsallthepagesnames.Double-clickonthislayerandusethesettingsfromthefollowingimageforGradientOverlay.Thennameit"activemenu"andsetitsopacityto50%.
Step21:
Createthesearchbar
Createanewgroup(Layer>New>Group),nameit"search"andputitabovethe"navigation"group.SelecttheRoundedRectangleTool(U),settheRadiusto3pxandcreatearoundedrectanglelikeIdidusingthecolor#104f59.Namethislayer"textfield"andsetitsopacityto80%.
Step22:
Createthesearchbutton
SelecttheRectangleTool(U)andcreatearectanglelikeIdid.Putthisrectangleintherightsideofthesearchbar.Double-clickonthislayerandusethesettingsfromthefollowingimageforGradientOverlay.Thenright-clickonthislayerandselectCreateClippingMask.
Step23:
Writetheword"search"onyourbutton
SelecttheTypeTool(T)andwritetheword"search"usingthewhitecolor.Settheopacityofthislayerto75%.
Step24:
Createaverticallineforthesearchbar
SelecttheLineTool(U)andcreateaverticallineusingthecolor#123036.Namethislayer"line",putitbeneaththe"button"layerandmoveitbetweenthesearchbarandthebuttonusingtheMoveTool(V).
Step25:
Createabluerectangle
Createanewgroup(Layer>New>Group)andnameit"Showcase."Createanothergroupinsidethisoneandnameit"background."SelecttheRectangleTool(U)andcreatearectangleusingthecolor#219aad.Myrectangleis983pxwideby273pxheight(youmaywanttoopentheInfopalette-Window>Info–beforeyoucreatetherectangle,soyoucanseetheexactsizeofyourrectangle).Settheopacityofthislayerto55%andnameit"bg4."
Step26:
Addatexturetothebluerectangle
OpeninPhotoshopthe"pixelatedbluerectangle"image,moveitintoyourdocumentandputthisimageaboveyourbluerectangle.Settheopacityofthislayerto55%andnameit"bg3."
Step27:
Addagradienttothebluerectangle
Ctrl-clickonthe"bg4"layer’svectormasktoselectit,thencreateanewlayer,selecttheGradientTool(G)anddrawagradient#56b8e5totransparentfromthebottomtothetopofyourselection.ThenhitCtrl+Dtodeselect.
Step28:
Createasmallerbluerectangle
Createanewlayer,selecttheRectangularMarqueeTool(M)andcreateaselectionlikeIdid.SelecttheGradientTool(G)anddrawagradient#0f2b42to#2a607ffromthebottomtothetopofyourselection.ThenhitCtrl+Dtodeselect.Namethislayer"bg1."
Step29:
"Signup"button
Createanewgroup(Layer>New>Group)andnameit"signupbutton."SelecttheRoundedRectangleTool(U),settheRadiusto2pxandcreatearoundedrectanglelikeIdid.Double-clickonthislayertoopentheLayerStylewindowandusethesettingsfromthefollowingimage.ThenselecttheTypeTool(T)andwritethewords"signup"usingthewhitecolor.
Step30:
"Learnmore"button
Repeattheprevioussteptocreateanotherbutton,butthistimewritethewords"learnmore"onyourbutton.Thencreateanewlayer,selecttheCustomShapeTool(U)andcreateawhitearrowlikeIdid.
Step31:
Createabuttonintheleftsideoftherectangle
Createa
 升级会员
升级会员 