Linux程序设计基础C环境.docx
《Linux程序设计基础C环境.docx》由会员分享,可在线阅读,更多相关《Linux程序设计基础C环境.docx(23页珍藏版)》请在冰豆网上搜索。

Linux程序设计基础C环境
Linux程序设计基础—C环境
一VI编辑器的使用
使用VI编辑下列几个函数文件:
hello.h
starfun.h
hello.c
star.c
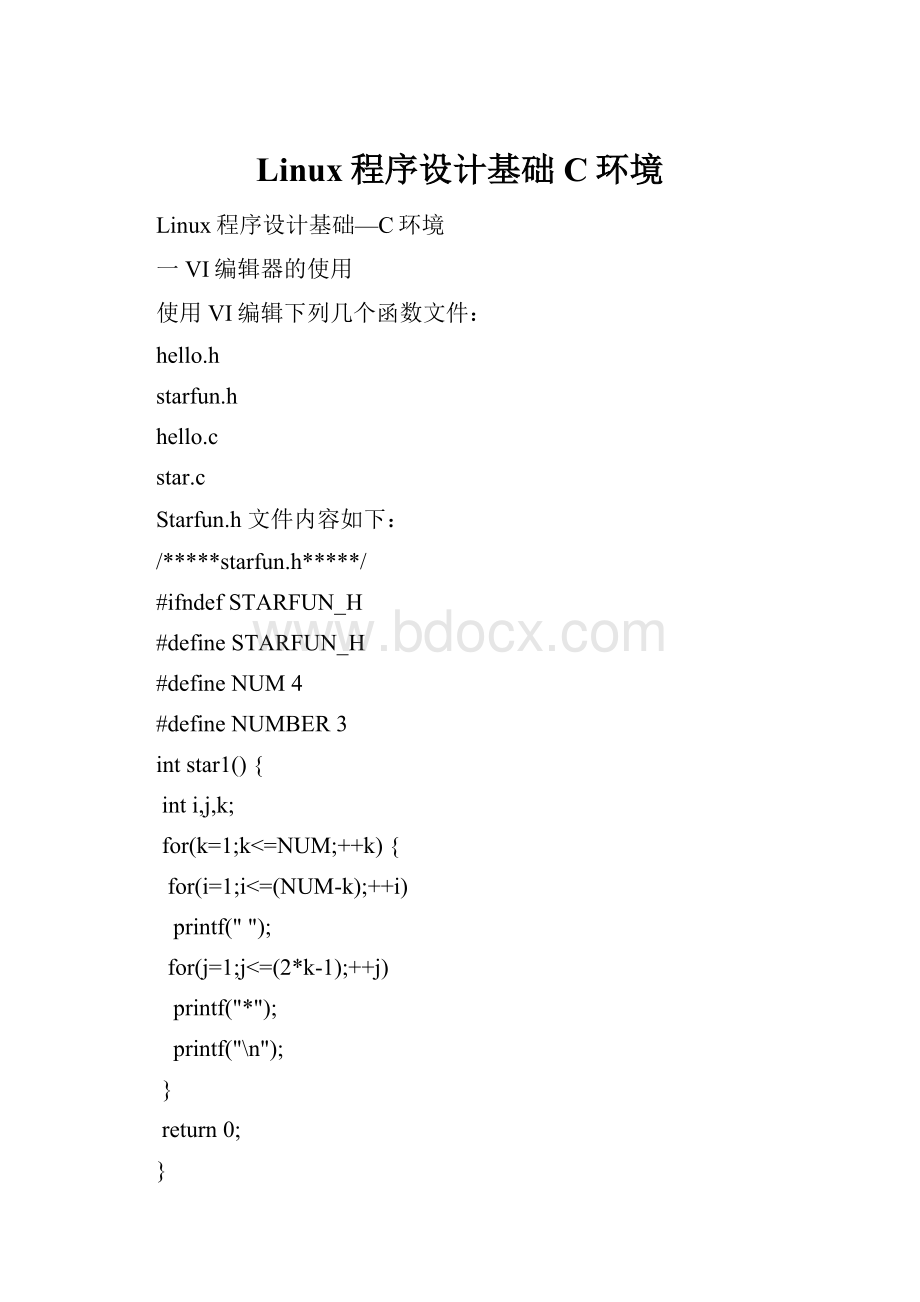
Starfun.h文件内容如下:
/*****starfun.h*****/
#ifndefSTARFUN_H
#defineSTARFUN_H
#defineNUM4
#defineNUMBER3
intstar1(){
inti,j,k;
for(k=1;k<=NUM;++k){
for(i=1;i<=(NUM-k);++i)
printf("");
for(j=1;j<=(2*k-1);++j)
printf("*");
printf("\n");
}
return0;
}
intstar2(){
inti,j,k;
for(k=NUMBER;k>=0;--k){
for(i=1;i<=(NUMBER-k+1);++i)
printf("");
for(j=1;j<=(2*k-1);++j)
printf("*");
printf("\n");
}
return0;
}
#endif
hello.h文件内容如下:
/*hello.h*/
#ifndefHELLO_H
#defineHELLO_H
voidhello(){
star1();
printf("hello,myfriends\n");
}
#endif
hello.c文件内容如下:
voidshowhello(){
hello();
}
star.c文件内容如下:
#include"starfun.h"
#include"hello.h"
#include
intmain(){
star1();
star2();
showhello();
return0;
}
Vi编辑器的使用,可以参考PPT,在使用Vi编辑器的过程中,注意使用Vi的单行和多行复制命令,练习字符串查找替换命令,删除一个字符,删除光标后整个内容命令,删除一行命令,恢复删除,保存和退出命令等命令,并尝试使用其他命令。
掌握
#ifndefSTARFUN_H
#defineSTARFUN_H
的宏定义用法
二.使用gcc编译器,编译程序
第一种方法:
分步进行
1.由star.cstarfun.h文件生成star.o目标文件
gcc-cstar.c-ostar.o
2.由hello.chello.hstarfun.h生成hello.o目标文件
gcc-chello.c-ohello.o
3.由hello.ostar.o生成应用程序myprog
gccstar.ohello.o-omyprog
[root@localhost01_hello]#./myprog
*
***
*****
*******
*****
***
*
*
***
*****
*******
hello,myfriends
第二种方法:
一条命令完成以上操作
gccstar.chello.c-omyprog
结合本次课的PPT关于gcc部分,体会gcc编译器编译的过程,并在实验报告中描述
在以上编译中尝试
[root@localhost01_hello]#gccstar.chello.c-omyprog
[root@localhost01_hello]#gcc-wstar.chello.c-omyprog
[root@localhost01_hello]#gcc-Wallstar.chello.c-omyprog
Infileincludedfromstar.c:
1:
starfun.h:
Infunction`star1':
starfun.h:
13:
warning:
implicitdeclarationoffunction`printf'
star.c:
Infunction`main':
star.c:
8:
warning:
implicitdeclarationoffunction`showhello'
hello.c:
Infunction`showhello':
hello.c:
4:
warning:
implicitdeclarationoffunction`hello'
体会-Wll-w选项的作用
查阅当前的gcc版本命令
[root@localhost01_hello]#gcc-v
Readingspecsfrom/usr/lib/gcc-lib/i386-redhat-linux/3.2.2/specs
Configuredwith:
../configure--prefix=/usr--mandir=/usr/share/man--infodir=/usr/share/info--enable-shared--enable-threads=posix--disable-checking--with-system-zlib--enable-__cxa_atexit--host=i386-redhat-linux
Threadmodel:
posix
gccversion3.2.220030222(RedHatLinux3.2.2-5)
三.使用动态库
(1)[root@localhost01_hello]#gcc-c-fpichello.c
[root@localhost01_hello]#ls
amakehello.chello.hhello.omakefile_01makefile_02makefile_03Makefile_rulestar.cstarfun.h
(2)[root@localhost01_hello]#gcc-shared-s-olibhello.sohello.o
[root@localhost01_hello]#ls
amakehello.chello.hhello.olibhello.somakefile_01makefile_02makefile_03Makefile_rulestar.cstarfun.h
注意libhello.so库文件的命名格式,
(1)
(2)也可以用下边命令替代
gcc-fpic-shared-shello.c-olibhello.so
[root@localhost01_hello]#cplibhello.so/usr/lib
注意/usr/lib为用户库自动搜索路径
[root@localhost01_hello]#gcc-lhellostar.c-omystar
[root@localhost01_hello]#lddmystar
libhello.so=>/usr/lib/libhello.so(0x4002d000)
libc.so.6=>/lib/tls/libc.so.6(0x42000000)
/lib/ld-linux.so.2=>/lib/ld-linux.so.2(0x40000000)
[root@localhost01_hello]#./mystar
*
***
*****
*******
*****
***
*
*
***
*****
*******
hello,myfriends
[root@localhost01_hello]#
四,使用静态库
[root@localhost01_hello]#rm*.o
rm:
是否删除一般文件‘hello.o’?
y
[root@localhost01_hello]#rmmystar
rm:
是否删除一般文件‘mystar’?
y
[root@localhost01_hello]#
[root@localhost01_hello]#rmlibhello.*
[root@localhost01_hello]#gcc-chello.c-ohello.o
[root@localhost01_hello]#ar-rclibhello.ahello.o
[root@localhost01_hello]#gccstar.clibhello.a-omystar
[root@localhost01_hello]#./mystar
*
***
*****
*******
*****
***
*
*
***
*****
*******
hello,myfriends
五.调试器的使用
1.gdb
进入02_gdb_gdbserver目录
执行
[root@vm-dev02_gdb_gdbserver]#gcc-geg1.c-oeg1
[root@vm-dev02_gdb_gdbserver]#gdbeg1
GNUgdbRedHatLinux(6.3.0.0-1.132.EL4rh)
Copyright2004FreeSoftwareFoundation,Inc.
GDBisfreesoftware,coveredbytheGNUGeneralPublicLicense,andyouare
welcometochangeitand/ordistributecopiesofitundercertainconditions.
Type"showcopying"toseetheconditions.
ThereisabsolutelynowarrantyforGDB.Type"showwarranty"fordetails.
ThisGDBwasconfiguredas"i386-redhat-linux-gnu"...Usinghostlibthread_dblibrary"/lib/tls/libthread_db.so.1".
(gdb)run
Startingprogram:
/home/sprife/xpide/02_gdb_gdbserver/eg1
ProgramreceivedsignalSIGFPE,Arithmeticexception.
0x08048388inwib(no1=8,no2=8)ateg1.c:
6
6result=no1/diff;
(gdb)
(gdb)list
1#include
2intwib(intno1,intno2)
3{
4intresult,diff;
5diff=no1-no2;
6result=no1/diff;
7returnresult;
8}
9intmain(intargc,char*argv[])
10{
(gdb)list
11intvalue,div,result,i,total;
12value=10;
13div=6;
14total=0;
15for(i=0;i<10;i++)
16{
17result=wib(value,div);
18total+=result;
19div++;
20value--;
(gdb)list
21}
22printf("%dwibedby%dequals%d\n",value,div,total);
23return0;
24}
(gdb)
Linenumber25outofrange;eg1.chas24lines.
(gdb)printno1
$1=8
(gdb)printdiff
$2=0
(gdb)
(gdb)break17
Breakpoint1at0x80483d6:
fileeg1.c,line17.
(gdb)run
Startingprogram:
/home/sprife/xpide/02_gdb_gdbserver/eg1
Breakpoint1,main(argc=1,argv=0xbff1a684)ateg1.c:
17
17result=wib(value,div);
(gdb)infolocals
value=10
div=6
result=7602164
i=0
total=0
(gdb)c
Continuing.
Breakpoint1,main(argc=1,argv=0xbff1a684)ateg1.c:
17
17result=wib(value,div);
(gdb)infolocals
value=9
div=7
result=2
i=1
total=2
(gdb)c
Continuing.
Breakpoint1,main(argc=1,argv=0xbff1a684)ateg1.c:
17
17result=wib(value,div);
(gdb)infolocals
value=8
div=8
result=4
i=2
total=6
(gdb)c
Continuing.
ProgramreceivedsignalSIGFPE,Arithmeticexception.
0x08048388inwib(no1=8,no2=8)ateg1.c:
6
6result=no1/diff;
(gdb)infolocals
value=8
div=8
result=4
i=2
total=6
(gdb)c
Continuing.
ProgramreceivedsignalSIGFPE,Arithmeticexception.
0x08048388inwib(no1=8,no2=8)ateg1.c:
6
6result=no1/diff;
(gdb)infolocals
result=4
diff=0
(gdb)
参考“使用GDB调试Linux软件.htm”使用gdb
2.在开发板上进行远程调试
在开发板上
[/mnt/yaffs/exp]ls
eg1gdbservermyshellterm
eg2hellopthread
[/mnt/yaffs/exp]./eg1
Floatingpointexception
[/mnt/yaffs/exp]gdbserver192.168.0.199:
1234eg1
Processeg1created;pid=121
Remotedebuggingfromhost192.168.0.199
在PC上
[root@localhost02_gdb]#armv4l-unknown-linux-gdbeg1
GNUgdb5.2.1
Copyright2002FreeSoftwareFoundation,Inc.
GDBisfreesoftware,coveredbytheGNUGeneralPublicLicense,andyouare
welcometochangeitand/ordistributecopiesofitundercertainconditions.
Type"showcopying"toseetheconditions.
ThereisabsolutelynowarrantyforGDB.Type"showwarranty"fordetails.
ThisGDBwasconfiguredas"--host=i686-pc-linux-gnu--target=armv4l-unknown-linux"...
(gdb)targetremote192.168.0.191:
1234
Remotedebuggingusing192.168.0.191:
1234
0x40000d00in?
?
()
(gdb)list
3{
4intresult,diff;
5diff=no1-no2;
6result=no1/diff;
7returnresult;
8}
9intmain(intargc,char*argv[])
10{
11intvalue,div,result,i,total;
12value=10;
(gdb)infolocals
Nosymboltableinfoavailable.
(gdb)break17
Breakpoint1at0x2000424:
fileeg1.c,line17.
(gdb)continue
Continuing.
Breakpoint1,main(argc=1,argv=0xbffffea4)ateg1.c:
17
17result=wib(value,div);
(gdb)infolocals
value=10
div=6
result=1075053560
i=0
total=0
(gdb)bt
#0main(argc=1,argv=0xbffffea4)ateg1.c:
17
(gdb)
六Makefile的编写(参考)
一、Makefile介绍
Makefile是用于自动编译和链接的,一个工程有很多文件组成,每一个文件的改变都会导致工程的重新链接,但是不是所有的文件都需要重新编译,Makefile中纪录有文件的信息,在make时会决定在链接的时候需要重新编译哪些文件。
Makefile的宗旨就是:
让编译器知道要编译一个文件需要依赖其他的哪些文件。
当那些依赖文件有了改变,编译器会自动的发现最终的生成文件已经过时,而重新编译相应的模块。
Makefile的基本结构不是很复杂,但当一个程序开发人员开始写Makefile时,经常会怀疑自己写的是否符合惯例,而且自己写的Makefile经常和自己的开发环境相关联,当系统环境变量或路径发生了变化后,Makefile可能还要跟着修改。
这样就造成了手工书写Makefile的诸多问题,automake恰好能很好地帮助我们解决这些问题。
使用automake,程序开发人员只需要写一些简单的含有预定义宏的文件,由autoconf根据一个宏文件生成configure,由automake根据另一个宏文件生成Makefile.in,再使用configure依据Makefile.in来生成一个符合惯例的Makefile。
下面我们将详细介绍Makefile的automake生成方法。
二、使用的环境
本文所提到的程序是基于Linux发行版本:
FedoraCorerelease1,它包含了我们要用到的autoconf,automake。
三、从helloworld入手
我们从大家最常使用的例子程序helloworld开始。
下面的过程如果简单地说来就是:
新建三个文件:
helloworld.c
configure.in
Makefile.am
然后执行:
aclocal;autoconf;automake--add-missing;./configure;make;./helloworld
就可以看到Makefile被产生出来,而且可以将helloworld.c编译通过。
很简单吧,几条命令就可以做出一个符合惯例的Makefile,感觉如何呀。
现在开始介绍详细的过程:
1、建目录
在你的工作目录下建一个helloworld目录,我们用它来存放helloworld程序及相关文件,如在/home/my/build下:
$mkdirhelloword
$cdhelloworld
2、helloworld.c
然后用你自己最喜欢的编辑器写一个hellowrold.c文件,如命令:
vihelloworld.c。
使用下面的代码作为helloworld.c的内容。
intmain(intargc,char**argv)
{
printf("Hello,LinuxWorld!
\n");
return0;
}
完成后保存退出。
好了,现在在helloworld目录下就应该有一个你自己写的helloworld.c了。
3、生成configure
我们使用autoscan命令来帮助我们根据目录下的源代码生成一个configure.in的模板文件。
命令:
$autoscan
$ls
configure.scanhelloworld.c
执行后在hellowrold目录下会生成一个文件:
configure.scan,我们可以拿它作为configure.in的蓝本。
现在将configure.scan改名为configure.in,并且编辑它,按下面的内容修改,去掉无关的语句:
============================configure.in内容开始=========================================
#-*-Autoconf-*-
#Processthisfilewithautoconftoproduceaconfigurescript.
AC_INIT(helloworld.c)
AM_INIT_AUTOMAKE(helloworld,1.0)
#Checksforprograms.
AC_PROG_CC
#Checksforlibraries.
#Checksforheaderfiles.
#Checksfortypedefs,structures,andcompilercharacteristics.
#Checksforlibraryfunctions.
AC_OUTPUT(Makefile)
============================configure.in内容结束======================