硒鼓加粉步骤.docx
《硒鼓加粉步骤.docx》由会员分享,可在线阅读,更多相关《硒鼓加粉步骤.docx(15页珍藏版)》请在冰豆网上搜索。
硒鼓加粉步骤
浏览文章
惠普Q2612A硒鼓加粉图解--HP1020加粉图解
【日期】2009-3-4 【人气】572【作者】【来源】
HP1020打印机的使用量非常的大,矽鼓是用HP2612A的鼓,使用量也非常的大,比如HP1010;HP1018;HP1020PLUS都是用这个鼓。
下面我就找来2612加粉的详细步骤,详细大家看了都能自己加了,感谢普广出的教程。
LET'SGO
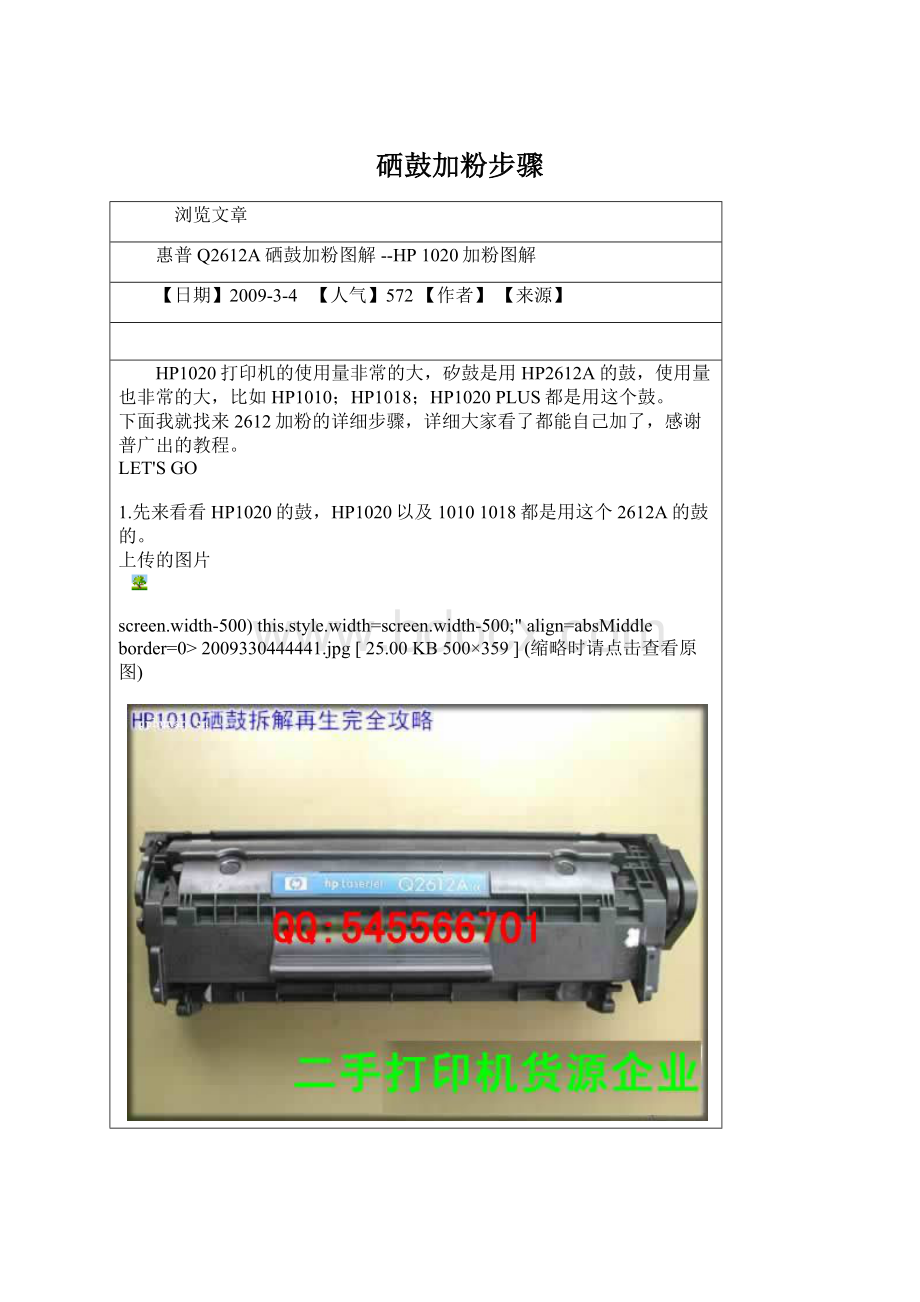
1.先来看看HP1020的鼓,HP1020以及10101018都是用这个2612A的鼓的。
上传的图片
screen.width-500)this.style.width=screen.width-500;"align=absMiddleborder=0>2009330444441.jpg[25.00KB500×359](缩略时请点击查看原图)
screen.width-500)this.style.width=screen.width-500;"border=0>
2.拆掉旁边的两个螺丝。
上传的图片
screen.width-500)this.style.width=screen.width-500;"align=absMiddleborder=0>2009330481641.jpg[32.02KB500×413](缩略时请点击查看原图)
screen.width-500)this.style.width=screen.width-500;"border=0>
3.打开旁边的盖子,小心取下弹簧。
上传的图片
screen.width-500)this.style.width=screen.width-500;"align=absMiddleborder=0>2009330504841.jpg[35.06KB500×432](缩略时请点击查看原图)
screen.width-500)this.style.width=screen.width-500;"border=0>
4.取下鼓芯,小心不要划伤表面。
上传的图片
screen.width-500)this.style.width=screen.width-500;"align=absMiddleborder=0>2009330531141.jpg[36.18KB500×409](缩略时请点击查看原图)
screen.width-500)this.style.width=screen.width-500;"border=0>
5.取下清洁棍,可以自己清理下表面。
上传的图片
screen.width-500)this.style.width=screen.width-500;"align=absMiddleborder=0>200933055441.jpg[36.53KB500×416](缩略时请点击查看原图)
screen.width-500)this.style.width=screen.width-500;"border=0>
6.顶出销子,需要稍微用点力。
上传的图片
screen.width-500)this.style.width=screen.width-500;"align=absMiddleborder=0>2009331152541.jpg[36.90KB500×419](缩略时请点击查看原图)
screen.width-500)this.style.width=screen.width-500;"border=0>
7.需要借助工具把销子拔掉
上传的图片
screen.width-500)this.style.width=screen.width-500;"align=absMiddleborder=0>200933117141.jpg[31.36KB500×432](缩略时请点击查看原图)
screen.width-500)this.style.width=screen.width-500;"border=0>
8.鼓体就已经可以分开了。
上传的图片
screen.width-500)this.style.width=screen.width-500;"align=absMiddleborder=0>200933119841.jpg[32.77KB500×411](缩略时请点击查看原图)
screen.width-500)this.style.width=screen.width-500;"border=0>
9.拧下另外侧的螺丝
上传的图片
screen.width-500)this.style.width=screen.width-500;"align=absMiddleborder=0>2009331212141.jpg[34.89KB500×413](缩略时请点击查看原图)
screen.width-500)this.style.width=screen.width-500;"border=0>
上传的图片
screen.width-500)this.style.width=screen.width-500;"align=absMiddleborder=0>2009331231641.jpg[29.83KB500×433](缩略时请点击查看原图)
screen.width-500)this.style.width=screen.width-500;"border=0>
11.取出磁芯,把里面的废粉仓清理干净。
(一定要清理干净,不然影响打印质量)
上传的图片
screen.width-500)this.style.width=screen.width-500;"align=absMiddleborder=0>2009331253941.jpg[28.29KB500×389](缩略时请点击查看原图)
screen.width-500)this.style.width=screen.width-500;"border=0>
12.重新装上磁芯。
上传的图片
screen.width-500)this.style.width=screen.width-500;"align=absMiddleborder=0>2009331274641.jpg[30.78KB500×406](缩略时请点击查看原图)
screen.width-500)this.style.width=screen.width-500;"border=0>
13.把刚刚拆掉螺丝看到的盖子拿掉,加入代用粉。
上传的图片
screen.width-500)this.style.width=screen.width-500;"align=absMiddleborder=0>2009331294141.jpg[37.28KB500×432](缩略时请点击查看原图)
screen.width-500)this.style.width=screen.width-500;"border=0>
14.加好粉,盖上盖子。
上传的图片
screen.width-500)this.style.width=screen.width-500;"align=absMiddleborder=0>2009331314541.jpg[35.10KB500×427](缩略时请点击查看原图)
screen.width-500)this.style.width=screen.width-500;"border=0>
15.把外面的塑料盖盖回去
上传的图片
screen.width-500)this.style.width=screen.width-500;"align=absMiddleborder=0>2009331331941.jpg[29.23KB500×427](缩略时请点击查看原图)
screen.width-500)
 升级会员
升级会员 