Linux下MySQL主从服务器的搭建详细实例完整版要点.docx
《Linux下MySQL主从服务器的搭建详细实例完整版要点.docx》由会员分享,可在线阅读,更多相关《Linux下MySQL主从服务器的搭建详细实例完整版要点.docx(21页珍藏版)》请在冰豆网上搜索。

Linux下MySQL主从服务器的搭建详细实例完整版要点
Linux下MySQL主从服务器搭建
一.主从服务器原理
MySQL的Replication是一个异步的复制过程,从一个MySQLinstace(我们称之为Master)复制到另一个MySQLinstance(我们称之Slave)。
在Master与Slave之间的实现整个复制过程主要由三个线程来完成,其中两个线程(Sql线程和IO线程)在Slave端,另外一个线程(IO线程)在Master端。
要实现MySQL的Replication,首先必须打开Master端的BinaryLog(MySQL-bin.xxxxxx)功能,否则无法实现。
因为整个复制过程实际上就是Slave从Master端获取该日志然后再在自己身上完全顺序的执行日志中所记录的各种操作。
打开MySQL的BinaryLog可以通过在启动MySQLServer的过程中使用“—log-bin”参数选项,或者在f配置文件中的MySQLd参数组([MySQLd]标识后的参数部分)增加“log-bin”参数项。
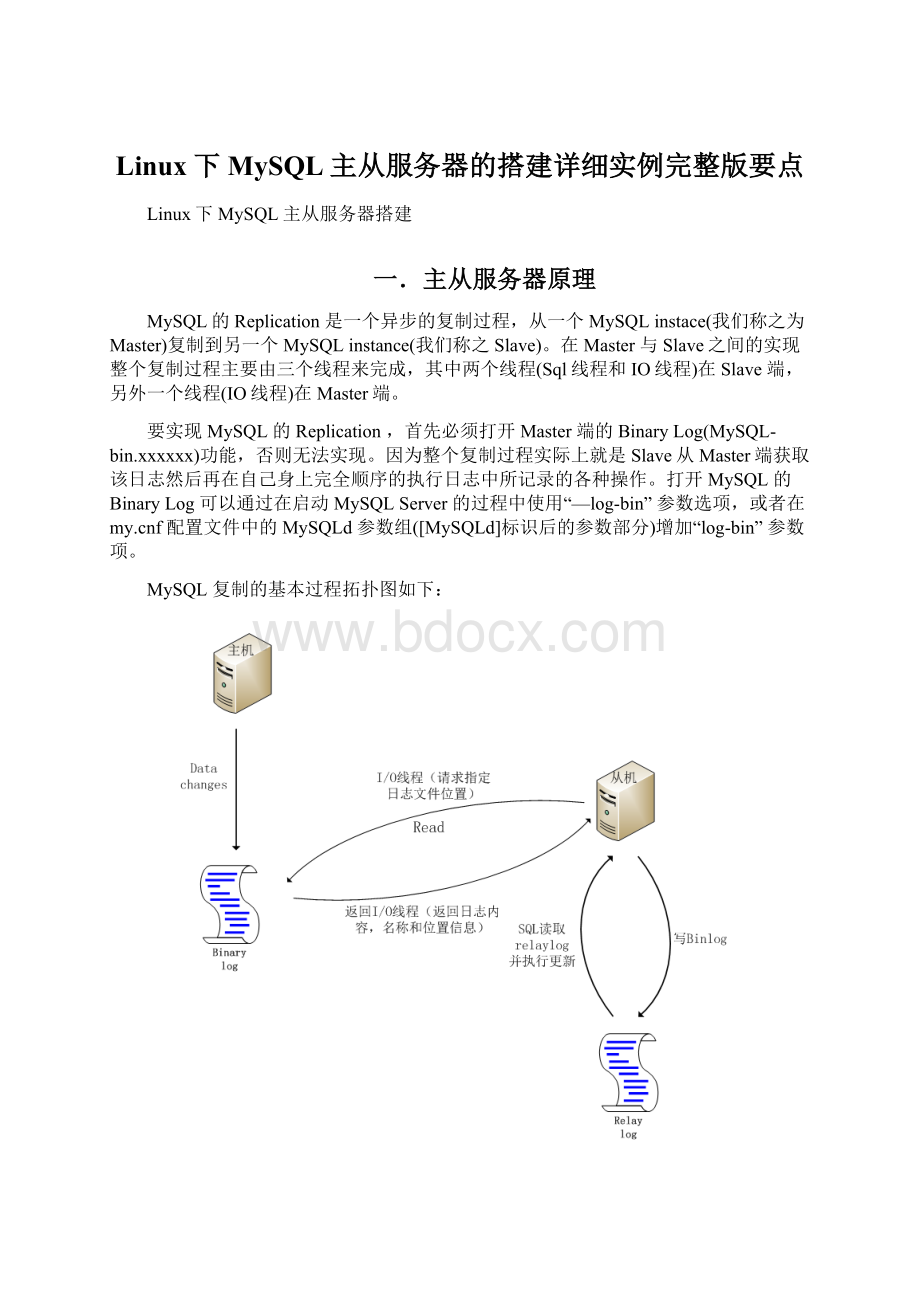
MySQL复制的基本过程拓扑图如下:
1.Slave上面的IO线程连接上Master,并请求从指定日志文件的指定位置(或者从最开始的日志)之后的日志内容;
2.Master接收到来自Slave的IO线程的请求后,通过负责复制的IO线程根据请求信息读取指定日志指定位置之后的日志信息,返回给Slave端的IO线程。
返回信息中除了日志所包含的信息之外,还包括本次返回的信息在Master端的BinaryLog文件的名称以及在BinaryLog中的位置;
3.Slave的IO线程接收到信息后,将接收到的日志内容依次写入到Slave端的RelayLog文件(MySQL-relay-bin.xxxxxx)的最末端,并将读取到的Master端的bin-log的文件名和位置记录到master-info文件中,以便在下一次读取的时候能够清楚的高速Master“我需要从某个bin-log的哪个位置开始往后的日志内容,请发给我”
4.Slave的SQL线程检测到RelayLog中新增加了内容后,会马上解析该Log文件中的内容成为在Master端真实执行时候的那些可执行的Query语句,并在自身执行这些Query。
这样,实际上就是在Master端和Slave端执行了同样的Query,所以两端的数据是完全一样的。
二.MySQL主从配置的优点和实验环境
优点:
1.解决web应用系统,数据库出现的性能瓶颈,采用数据库集群的方式来实现查询负载;一个系统中数据库的查询操作比更新操作要多得多,通过多台查询服务器将数据库的查询分担到不同的查询服务器上从而提高查询效率。
2.MySQL数据库支持数据库的主从复制功能,使用主数据库进行数据的插入、删除与更新操作,而从数据库则专门用来进行数据查询操作,这样可以将更新操作和查询操作分担到不同的数据库上,从而提高了查询效率。
环境:
虚拟机:
VMwareWorkstation8.0.0
系统:
RedHatEnterpriseLinux5
MySQL版本:
MySQL-client-5.1.7-0.i386
MySQL-server-5.1.7-0.i386
服务器主机IP:
192.168.0.2/24
服务器从机IP:
192.168.0.3/24
网关IP:
192.168.0.1/24
三.主从数据库服务器的配置
1.配置两台Linux服务器的ip地址
主机IP:
[root@localhost~]#ifconfig
eth0Linkencap:
EthernetHWaddr00:
0C:
29:
B4:
0B:
D8
inetaddr:
192.168.0.2Bcast:
192.168.0.255Mask:
255.255.255.0
从机IP:
[root@localhost~]#ifconfig
eth0Linkencap:
EthernetHWaddr00:
0C:
29:
0F:
65:
D6
inetaddr:
192.168.0.3Bcast:
192.168.0.255Mask:
255.255.255.0
2.主机从机安装MySQL
主服务器:
安装服务器端:
[root@localhostlxy]#rpm-ivhMySQL-server-5.1.7-0.i386.rpm
Preparing...###########################################[100%]
1:
MySQL-server###########################################[100%]
PLEASEREMEMBERTOSETAPASSWORDFORTHEMySQLrootUSER!
Todoso,starttheserver,thenissuethefollowingcommands:
/usr/bin/mysqladmin-urootpassword'new-password'
/usr/bin/mysqladmin-uroot-hlocalhost.localdomainpassword'new-password'
Seethemanualformoreinstructions.
Pleasereportanyproblemswiththe/usr/bin/mysqlbugscript!
ThelatestinformationaboutMySQLisavailableonthewebat
SupportMySQLbybuyingsupport/licensesat
StartingMySQL[确定]
查看MySQL的端口是否启动:
(MySQL的端口号是3306)
[root@localhostlxy]#netstat-nat
ActiveInternetconnections(serversandestablished)
ProtoRecv-QSend-QLocalAddressForeignAddressState
tcp00127.0.0.1:
22080.0.0.0:
*LISTEN
tcp000.0.0.0:
7440.0.0.0:
*LISTEN
tcp000.0.0.0:
33060.0.0.0:
*LISTEN
tcp000.0.0.0:
1110.0.0.0:
*LISTEN
tcp00127.0.0.1:
6310.0.0.0:
*LISTEN
tcp00127.0.0.1:
250.0.0.0:
*LISTEN
tcp00127.0.0.1:
22070.0.0.0:
*LISTEN
tcp00:
:
:
22:
:
:
*LISTEN
主服务器安装客户端:
[root@localhostlxy]#rpm-ivhMySQL-client-5.1.7-0.i386.rpm
Preparing...###########################################[100%]
1:
MySQL-client###########################################[100%]
用命令测试是否安装成功:
[root@localhostlxy]#mysql
WelcometotheMySQLmonitor.Commandsendwith;or\g.
YourMySQLconnectionidis1toserverversion:
5.1.7-beta
Type'help;'or'\h'forhelp.Type'\c'toclearthebuffer.
mysql>
由于MySQL的默认用户名是root由于初始没有密码,所以第一次进入时只需键入mysql即可。
当出现“mysql>”的时候说明已经安装成功了。
增加密码:
用户名root密码是84666058
[root@localhostlxy]#/usr/bin/mysqladmin-urootpassword84666058
测试不用密码登陆
[root@localhostlxy]#mysql
ERROR1045(28000):
Accessdeniedforuser'root'@'localhost'(usingpassword:
NO)
登陆不成功说明密码已经启用
用密码登陆
[root@localhostlxy]#mysql-uroot-p
Enterpassword:
WelcometotheMySQLmonitor.Commandsendwith;or\g.
YourMySQLconnectionidis9toserverversion:
5.1.7-beta
Type'help;'or'\h'forhelp.Type'\c'toclearthebuffer.
mysql>
登陆成功。
启动mysql
[root@localhostlxy]#/etc/init.d/mysqlstart
StartingMySQL[确定]
停止命令是:
/usr/bin/mysqladmin–uroot–pshutdown
给MySql添加一个lxy用户密码123
mysql>grantselect,insert,update,deleteon*.*tolxy@"%"identifiedby"123";
QueryOK,0rowsaffected(0.00sec)
登陆验证
[root@localhostlxy]#mysql-ulxy-p-h192.168.0.2
Enterpassword:
WelcometotheMySQLmonitor.Commandsendwith;or\g.
YourMySQLconnectionidis18toserverversion:
5.1.7-beta
Type'help;'or'\h'forhelp.Type'\c'toclearthebuffer.
mysql>
在数据库中建立数据库lxy和表name:
mysql>createdatabaselxy;
QueryOK,1rowaffected(0.00sec)
mysql>showdatabases;
+---------------------+
|Database|
+---------------------+
|information_schema|
|cluster_replication|
|lxy|
|mysql|
|test|
+---------------------+
5rowsinset(0.00sec)
Name表(包含id序号自动增长;xm姓名;xb性别;csny出生年月。
)
mysql>createtablename(idint(3)auto_incrementnotnullprimarykey,xmchar(8),xbchar
(2),csnydate);
QueryOK,0rowsaffected(0.00sec)
mysql>showtables;
+---------------+
|Tables_in_lxy|
+---------------+
|name|
+---------------+
1rowinset(0.00sec)
mysql>describename;
+-------+---------+------+-----+---------+----------------+
|Field|Type|Null|Key|Default|Extra|
+-------+---------+------+-----+---------+----------------+
|id|int(3)|NO|PRI|NULL|auto_increment|
|xm|char(8)|YES||NULL||
|xb|char
(2)|YES||NULL||
|csny|date|YES||NULL||
+-------+---------+------+-----+---------+----------------+
4rowsinset(0.00sec)
在表里增加几条记录
mysql>insertintonamevalues('','张三','男','1988-10-10');
QueryOK,1rowaffected,2warnings(0.00sec)
mysql>insertintonamevalues('','斯','男','1988-10-10');
QueryOK,1rowaffected,2warnings(0.00sec)
mysql>insertintonamevalues('','陆宇','男','1988-10-10');
QueryOK,1rowaffected,2warnings(0.00sec)
检查
mysql>select*fromname;
+----+--------+------+------------+
|id|xm|xb|csny|
+----+--------+------+------------+
|1|张三|男|1988-10-10|
|2|斯|男|1988-10-10|
|3|陆宇|男|1988-10-10|
+----+--------+------+------------+
3rowsinset(0.00sec)
从服务器数据库的安装和主服务器一样。
3.配置主服务器
复制配置文件到/etc/文件夹下:
[root@localhostlxy]#cp/usr/share/mysql/my-f/etc/f
Vim指令编辑/etc/f文件并添加以下信息:
server-id=1###每一个数据库服务器都要制定一个唯一的server-id,通常主服务器制定为1###
binlog-do-db=test###需要记录日志的数据库名,如果复制多个数据库,重复这只这项即可。
如果没有本行即表示同步所有的数据库。
###
binlog-ignore-db=mysql###不需要记录日志的数据库名,如果复制多个数据库,重复这只这项即可###
log-bin=mysql-bin###MySQL进行主从复制是通过二进制的日志文件来进行的,所以必须开启MySQL的日志功能(这个是/etc/f的默认配置,保持不变即可)###
重启服务:
[root@localhostlxy]#servicemysqlrestart
ShuttingdownMySQL.[确定]
StartingMySQL[确定]
授权给从数据库服务器192.168.0.3
mysql>GRANTREPLICATIONSLAVEON*.*to'lxy'@'192.168.0.3'IDENTIFIEDBY'123';
QueryOK,0rowsaffected(0.00sec)
查看主服务器状态:
mysql>showmasterstatus;
+------------------+----------+--------------+------------------+
|File|Position|Binlog_Do_DB|Binlog_Ignore_DB|
+------------------+----------+--------------+------------------+
|mysql-bin.000001|102|lxy|mysql|
+------------------+----------+--------------+------------------+
1rowinset(0.00sec)
4.配置从服务器
复制配置文件到/etc/文件夹下:
[root@localhost~]#cp/usr/share/mysql/my-f/etc/f
Vim指令编辑/etc/f文件并添加以下内容:
server-id=2###设置从服务器的ID号###
mast-host=192.168.0.2###设置主服务器的IP###
mast-user=lxy###设置连接主服务器的用户名###
mast-password=123###设置连接主服务器的密码###
mast-port=3306###配置成端口默认是3306###
replicate-do-db=test###设置要同步的数据库,可以设置多个###
从服务器数据库配置:
mysql>slavestop;
QueryOK,0rowsaffected(0.00sec)
mysql>CHANGEMASTERTOMASTER_LOG_FILE='mysql_bin.000001',MASTER_LOG_POS=102;
QueryOK,0rowsaffected(0.01sec)
mysql>slavestart;
QueryOK,0rowsaffected(0.00sec)
5.查看同步情况
mysql>showslavestatus\G;
***************************1.row***************************
Slave_IO_State:
Waitingformastertosendevent
Master_Host:
192.168.0.2
Master_User:
lxy
Master_Port:
3306
Connect_Retry:
60
Master_Log_File:
mysql-bin.000003
Read_Master_Log_Pos:
102
Relay_Log_File:
localhost-relay-bin.000002
Relay_Log_Pos:
243
Relay_Master_Log_File:
mysql-bin.000003
Slave_IO_Running:
Yes
Slave_SQL_Running:
Yes
Replicate_Do_DB:
lxy
Replicate_Ignore_DB:
Replicate_Do_Table:
Replicate_Ignore_Table:
Replicate_Wild_Do_Table:
Replicate_Wild_Ignore_Table:
Last_Errno:
0
Last_Error:
Skip_Counter:
0
Exec_Master_Log_Pos:
102
Relay_Log_Space:
243
Until_Condition:
None
Until_Log_File:
Until_Log_Pos:
0
Master_SSL_Allowed:
No
Master_SSL_CA_File:
Master_SSL_CA_Path:
Master_SSL_Cert:
Master_SSL_Cipher:
Master_SSL_Key:
Seconds_Behind_Master:
0
1rowinset(0.00sec)
如果出现Slave_IO_Running:
Yes和Slave_SQL_Running:
Yes就说明已经成功了。
四.验证
1.增加。
在主服务器建数据库test上创建一个表name
mysql>usetest
Databasechanged
mysql>showtables;
Emptyset(0.00sec)
mysql>createtablename(idint(3)auto_incrementnotnullprimarykey,xmchar(8),xbchar
(2),csnydate);
QueryOK,0rowsaffected(0.01sec)
mysql>showtables;
+----------------+
|Tables_in_test|
+----------------+
|name|
+----------------+
1rowinset(0.00sec)
mysql>describename;
+-------+---------+------+-----+---------+----------------+
|Field|Type|Null|Key|Default|Extra|
+-------+---------+------+-----+---------+----------------+
|id|int(3)|NO|PRI|NULL|auto_increment|
|xm|char(8)|YES||NULL||
|xb|char
(2)|YES||NULL||
|csny|date|YES||NULL||
+-------+---------+------+-----+---------+----------------+
4rowsinset(0.01sec)
mysql>insertintonamevalues('','zhangsan','nan','1990-1-1');
QueryOK,1rowaffected,2warnings(0.00sec)