读Axis2用户帮助文档.docx
《读Axis2用户帮助文档.docx》由会员分享,可在线阅读,更多相关《读Axis2用户帮助文档.docx(13页珍藏版)》请在冰豆网上搜索。
读Axis2用户帮助文档
读Axis2用户帮助文档
作者:
李红霞
声明:
本文可以算作Axis2用户手册的翻译,但是翻译后的文本是经过作者理解写出来的,可能有些偏差,欢迎讨论。
本文属作者原创,允许转载,但请注明出处。
英文原文http:
//ws.apache.org/axis2/1_0/userguide.html
概述
这个说明文档涉及以下内容:
Ø如何使用axis2创建webservice和客户端程序
Ø如何定制一个模块(Module)并在webservice中使用它
ØSamplesdiscussion
ØAdvancedTopics
第一部分:
简介
Axis2是重新设计的一个架构,它没有基于Axis1.*的结构,这种新的架构muchmoreflexible,efficientandconfigurable。
Axis2的特性有:
Speed采用自己的对象模型,利用StAX解析
LowmemoryfootprintAxis2在设计过程中一直遵循lowmemorycost的理念
AXIOM采用自己的轻量级的对象模型,使得消息处理过程可扩展、性能高,对开发者来说更加简单。
HotDeploymentAxis2装备了在系统运行时部署服务和处理器的能力。
也就是说,新的服务新服务的添加不再需要重启服务器。
将服务的发布包放在服务部属文件夹中,部署模型将自动部署该服务。
AsynchronousWebServicesAxis2现在可以通过non-blockingclientsandtransports支持异步的服务和异步的服务调用。
(?
什么是异步的服务?
)
MEPSupportAxis2具备良好的伸缩性来支持MEPs,因为它内置了对WSDL2.0中MEPs的支持。
FlexibilityAxis2的架构使得程序员能自由的对Axis添加扩展,这些扩展包括对自定义Header的处理,系统管理,甚至是任何一件你可以想象的到的事情
StabilityAxis2定义了一套公共接口,这些接口相对于其他代码而言改动很小
Component-orientedDeployment你可以自定义一些在处理过程中常用的可重用的处理器,并可以将这些处理器发布出来供其它人使用
TransportFramework定义了一个干净、简单的抽象作品来集成任意的传输协议,引擎的核心部分的实现是与传输协议无关的
Add-ons一些webservice相关的协议也合并了进来。
如安全方面的WSS4J(Rampart),可靠消息传输的Sandesha,封装了WS-Coordination,WS-AtomicTransaction和WS-BusinessActivity的Kandula。
CompositionandExtensibility模块和层支持可扩展性和可组合性(composability)。
模块支持可组合性,对添加新的webservice规范的支持的方式非常简单和干净。
但是他们并不是热部署的,因为他们影响整个系统的功能。
Tips:
WSS4J:
http:
//ws.apache.org/wss4j/
ApacheWSS4JisanimplementationoftheOASISWebServicesSecurity(WS-Security)fromOASISWebServicesSecurityTC.WSS4JisaprimarilyaJavalibrarythatcanbeusedtosignandverifySOAPMessageswithWS-Securityinformation.WSS4JwilluseApacheAxisandApacheXML-SecurityprojectsandwillbeinteroperablewithJAX-RPCbasedserver/clientsand.NETserver/clients.
这个项目提供了在Axis上部署的帮助文档和例子
Rampart
这是Axis2的一个Module(现在Axis2有两个可选的Module,分别是Addressing和Security,Addressing包含在Standard版本中,但是Rampart需要单独下载),目前作用不详,猜测是与WSS4J合作完成WS-Security
Sendesha:
http:
//ws.apache.org/sandesha/
Sandesha2isanimplementationofWS-ReliableMessagingspecificationpublishedbyIBM,Microsoft,BEAandTIBCO.Sandesha2wasbuiltontopofAxis2.ThereforebyusingSandesha2youcanaddreliablemessagingcapabilitytothewebserviceshostedusingAxis2.Sandesha2canalsobeusedwithAxis2clienttointeractwithalreadyhostedwebservicesinareliablemanner.Pleaseseesandesha2userguideformoreinformationonusingSandesha2.
Kandula:
http:
//ws.apache.org/kandula/2/index.html
Kandulawillprovideanopen-sourceimplementationofWS-Coordination,WS-AtomicTransactionandWS-BusinessActivitybasedonAxis.TheinitialimplementationwillbeinJavausingAxis/Java.Inadditiontoprovidinganimplementation,amajorfocusofthisprojectwouldbetoensureinteroperabilitywithotherimplementationsofabovespecifications,particularlythosebyMicrosoft(.NET)andIBM.
第二部分:
使用Axis2开发webservices
首先你需要在Servlet容器中部署axis2.war
可以通过两种方式来创建webservices
1.使用Axis2的API,实现业务代码
2.从WSDL开始,生成代码框架,然后实现业务逻辑
1)使用Axis2的API
首先,计划生成一个服务MyService,它有两个方法:
publicvoidping(OMElementelement){}//IN-ONLYoperation,justacceptstheOMElementanddosomeprocessing.
publicOMElementecho(OMElementelement){}//IN-OUToperation,acceptsanOMElementand
//sendsbackthesameagain
从例子里找到实现的代码:
"Axis2Home/samples/userguide/src"中的"userguide/example1"
创建一个服务分4个步骤
a.编写实现代码
b.用service.xml来解释这个服务
c.创建一个*.aar的服务部署包
d.发布服务
Step1:
实现代码
publicclassMyService{
publicvoidping(OMElementelement){
......
}
publicOMElementecho(OMElementelement){
......
}
}
Step2:
通过service.xml来描述服务
<service>
<description>
ThisisasampleWebServicewithtwooperations,echoandping.
</description>
<parametername="ServiceClass"locked="false">userguide.example1.MyService</parameter>
<operationname="echo">
<messageReceiverclass="org.apache.axis2.receivers.RawXMLINOutMessageReceiver"/>
<actionMapping>urn:
echo</actionMapping>
</operation>
<operationname="ping">
<messageReceiverclass="org.apache.axis2.receivers.RawXMLINOnlyMessageReceiver"/>
<actionMapping>urn:
ping</actionMapping>
</operation>
</service>
说明:
Forthe"echo"operationwehaveusedaRawXMLINOutMessageReceiversinceitisanIN-OUToperation.ForIN-ONLYoperation"ping",wehaveusedRawXMLINOnlyMessageReceiverasthemessagereceiver.
TheactionMappingisrequiredonlyifyouwanttoenableWS-Addressing.
还可以用这个文件来描述一组服务,这组服务之间可以共享ServiceGroupContext
<serviceGroup>
<servicename="Service1">
<!
--detailsforService1-->
</service>
<servicename="Service2">
<!
--detailsforService2-->
</service>
<moduleref="ModuleName"/>
<parametername="serviceGroupParam1"locked="false">value1</parameter>
</serviceGroup>
Step3:
创建服务发布包
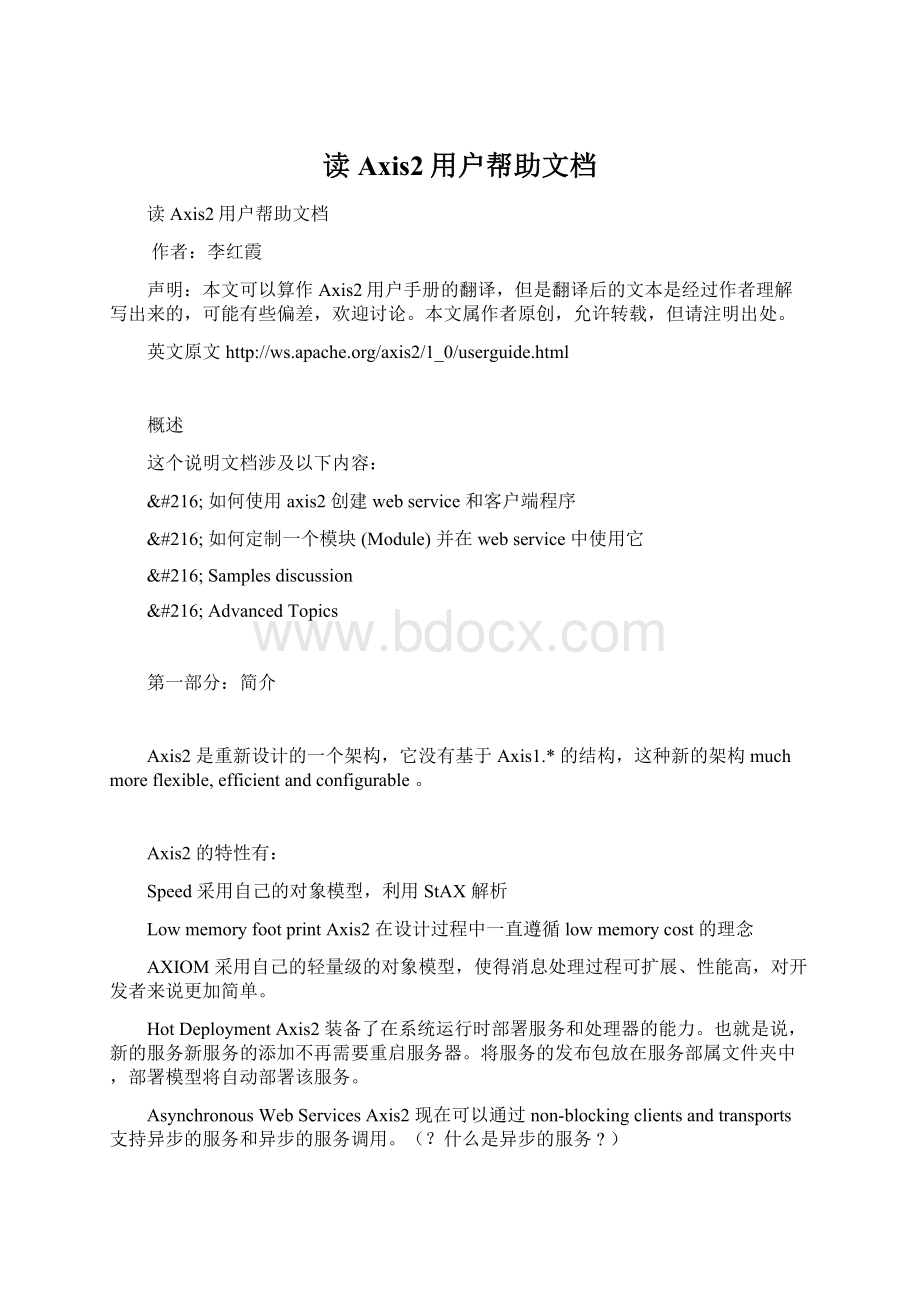
这个服务发布包的结构如图所示。
将这些文件按照图中的结构组织好,然后打包成jar或者rar,然后修改后缀名为aar即可。
Step4:
部属服务
将服务发布包放到"\webapps\axis2\WEB-INF"中的"services"文件夹下,然后在Axis2的首页(http:
//localhost:
8080/axis2/index.jsp)的’services’连接下察看服务发布情况
2)用服务代码生成的方式创建服务
首先要写好服务的wsdl
然后利用WSDL2Java工具
该工具的命令有:
UsageWSDL2Code-uri<LocationofWSDL>:
WSDLfilelocation
-o<outputLocation>:
outputfilelocation
-a:
Generateasyncstylecodeonly.Defaultisoff
-s:
Generatesyncstylecodeonly.Defaultisoff.takesprecedenceover-a
-p<packagename>:
setcustompackagename
-l<language>:
validlanguagesarejavaandcsharp.Defaultisjava
-t:
GenerateTestCasetotestthegeneratedcode
-ss:
Generateserversidecode(i.e.skeletons).Defaultisoff
-sd:
Generateservicedescriptor(i.e.services.xml).Defaultisoff.Validwith-ss
-d<databinding>:
validdatabinding(s)areadb,xmlbeansandjaxme.Defaultisadb
-gGeneratesalltheclasses.validonlywiththe-ss
-pn<port_name>:
nameofportinthepresenceofmultipleports
-sn<service_name>:
nameofserviceinthepresenceofmultipleservices
-u:
unpacksthedatabindingclasses
-r<repository_path>:
pathoftherepositoryagainstwhichcodeisgenerated
在windows平台下可以用
WSDL2Java-uri..\samples\wsdl\Axis2SampleDocLit.wsdl-ss-sd-dxmlbeans-o..\samples-porg.apache.axis2.userguide
在Linux平台下可以用
WSDL2Java-uri../samples/wsdl/Axis2SampleDocLit.wsdl-ss-sd-dxmlbeans-o../samples-porg.apache.axis2.userguide
于是生成了服务的代码框架,在代码框架中填入代码
第三部分:
用Axis2创建服务客户端
服务可以完成各种各样的功能,有的简单,时间消费比较低,有的复杂,时间消费比较高。
我们不能采用一个统一的机制来调用这些时间消费区别很大的服务。
例如:
我们用HTTP协议来带调用一个IN-OUT类型的服务,而这个服务的执行时间很长,于是我们可能得到一个connectiontimeout的结果。
而且,在一个客户端同时发出两个服务调用请求的情况下,使用’blocking’的客户端API将降低客户端程序的性能。
类似的,当我们使用One-Way传输的时候还可能有很多其他的后果产生。
BlockingAPI:
当服务调用请求发出后,客户端等待服务结果的返回,这期间不能再发出服务调用请求。
Non-BlockingAPI:
这是一个基于callback或者polling的API,让客户端发出服务调用请求的时候,客户端程序立刻得到控制权,服务的调用结果由callback对象来接收。
这样,客户端就可以同时调用多个服务而不进行阻止。
Axis将利用Non-BlockingAPI方式的异步叫做APILevelAsynchrony
前面提到的两个机制在Request和Response上使用了一个的传输连接,他们限制了服务调用在请求与结果返回使用两个传输连接的情况(eitherOne-WayorTwo-Way)。
所以这两种机制都无法解决在长时间运行的事务中的寻址问题(传输连接可能在操作结束前就已经timeout了)。
一种解决方案是在request和response中使用两个不同的传输连接。
在这个级别上得到的异步属性,称为TransportLevelAsynchrony
将前面的2种异步结合起来,就有了四种不同的调用模式
API(Blocking/Non-Blocking)DualTransports(Yes/No)Description
BlockingNoSimplestandthefamiliarinvocationpattern
Non-BlockingNoUsingcallbacksorpolling
BlockingYesThisisusefulwhentheserviceoperationisIN-OUTinnaturebutthetransportusedisOne-Way(e.g.SMTP)
Non-BlockingYesThisiscanbeusedtogainthemaximumasynchronousbehavior.NoblockingintheAPIlevelandalsointhetransportlevel
服务的调用代码:
blockinginvocation
try{
OMElementpayload=ClientUtil.getEchoOMElement();
Optionsoptions=newOptions();
options.setTo(targetEPR);//thissetsthelocationofMyServiceservice
ServiceClientserviceClient=newServiceClient();
serviceClient.setOptions(options);
OMElementresult=sender.sendReceive(payload);
System.out.println(result);
}catch(AxisFaultaxisFault){
axisFault.printStackTrace();
}
IN-ONLY
try{
OMElementpayload=ClientUtil.getPingOMElement();
Optionsoptions=newOptions();
options.setTo(targetEPR);
ServiceClientserviceClient=newServiceClient();
serviceClient.setOptions(options);
serviceClient.fireAndForget(payload);
/**Wehavetoblockthisthreaduntillwesendtherequest,theproblemisifwegooutofthe
*mainthread,thenrequestwontsend,soyouhavetowaitsometime:
)*/
Thread.sleep(500);
}catch(AxisFaultaxisFault){
axisFault.printStackTrace();
}
Youcantestthisclientbyrunningthetarget"testPingClient"oftheantbuildfileat"Axis2Home/samples/userguide".
EchoBlockingClient
将第一段代码的调用代码改为serviceClient.sendReceiveNonblocking(payload,callback);
具体的例子在"Axis2Home/samples/userguide/src/userguide/clients"中
Axis提供三个方法来接收callback对象
publicabstractvoidonComplete(AsyncResultresult);
publicabstractvoidonError(Exceptione);
publicbooleanisComplete(){}
其中,前面两个是需要用户来实现的
EchoNonBlockingDualClient
try{
OMElementpayload=ClientUtil.getEchoOMElement();
Optionsoptions=newOptions();
options.setTo(targetEPR);
options.setTransportInProtocol(Constants.TRANSPORT_HTTP);
options.setUseSeparateListener(true);
options.setAction("urn:
echo");//thisistheactionmappingweputwithintheservice.xml
//Callbacktohandletheresponse
Callbackcallback=newCallback(){
publicvoidonComplete(AsyncResultres
 升级会员
升级会员 