C#winform.docx
《C#winform.docx》由会员分享,可在线阅读,更多相关《C#winform.docx(25页珍藏版)》请在冰豆网上搜索。
C#winform
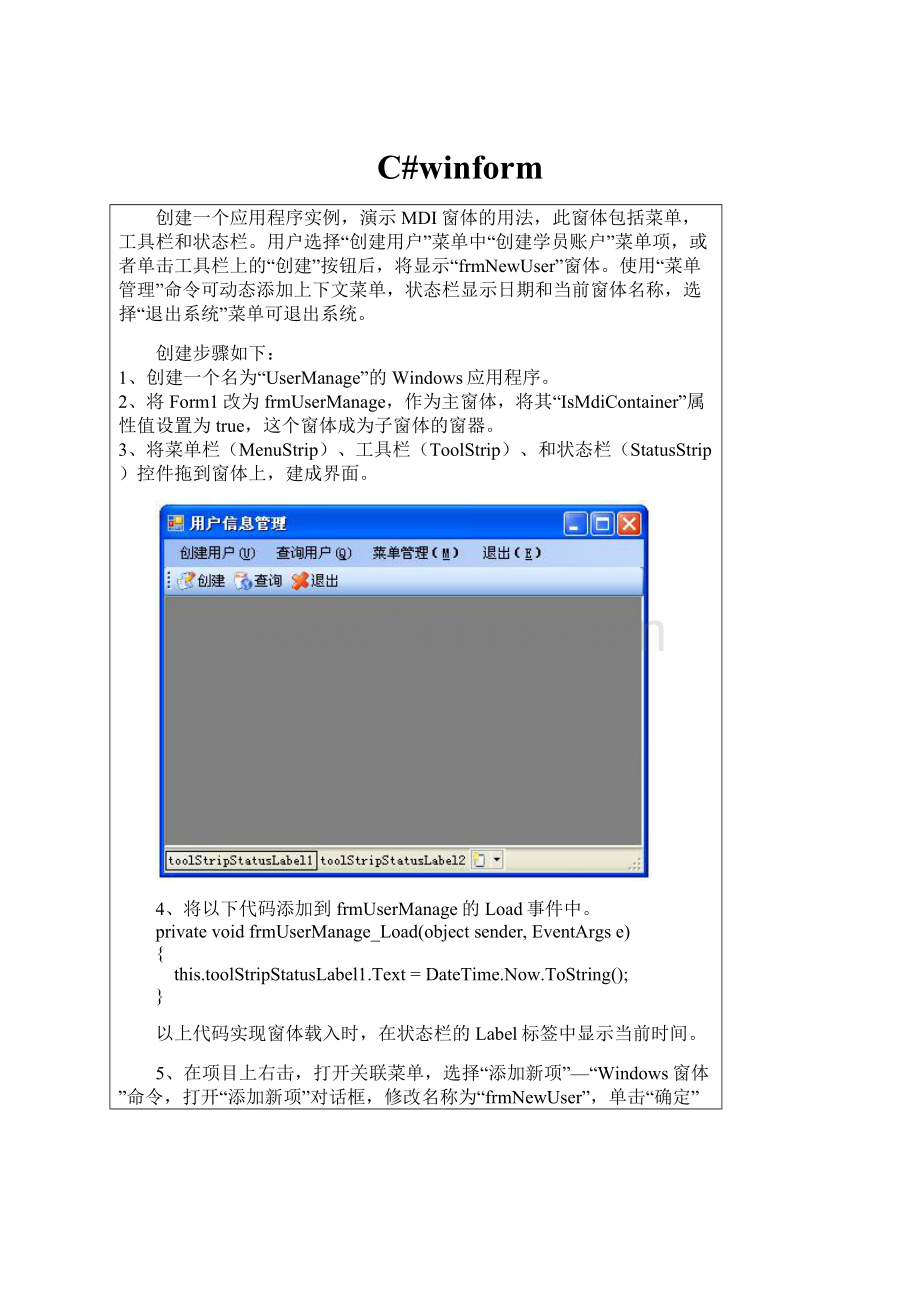
创建一个应用程序实例,演示MDI窗体的用法,此窗体包括菜单,工具栏和状态栏。
用户选择“创建用户”菜单中“创建学员账户”菜单项,或者单击工具栏上的“创建”按钮后,将显示“frmNewUser”窗体。
使用“菜单管理”命令可动态添加上下文菜单,状态栏显示日期和当前窗体名称,选择“退出系统”菜单可退出系统。
创建步骤如下:
1、创建一个名为“UserManage”的Windows应用程序。
2、将Form1改为frmUserManage,作为主窗体,将其“IsMdiContainer”属性值设置为true,这个窗体成为子窗体的窗器。
3、将菜单栏(MenuStrip)、工具栏(ToolStrip)、和状态栏(StatusStrip)控件拖到窗体上,建成界面。
4、将以下代码添加到frmUserManage的Load事件中。
privatevoidfrmUserManage_Load(objectsender,EventArgse)
{
this.toolStripStatusLabel1.Text=DateTime.Now.ToString();
}
以上代码实现窗体载入时,在状态栏的Label标签中显示当前时间。
5、在项目上右击,打开关联菜单,选择“添加新项”—“Windows窗体”命令,打开“添加新项”对话框,修改名称为“frmNewUser”,单击“确定”按钮。
窗体界面如下:
6、将以下代码添加到“创建学生用户的菜单”中
privatevoid创建学生用户ToolStripMenuItem_Click(objectsender,EventArgse)
{
frmNewUseruser=newfrmNewUser();
user.MdiParent=this;
user.WindowState=FormWindowState.Maximized;
user.Show();
this.toolStripStatusLabel2.Text=this.ActiveMdiChild.ToString();
}
以上代码实现选择“创建学生用户”菜单时,打开frmNewUser窗体,作为子窗体打开,并在主窗体的状态栏中显示当前活动窗体的信息。
7、将以下代码加到“退出”菜单项和工具栏的“退出”按钮中。
privatevoid退出EToolStripMenuItem_Click(objectsender,EventArgse)
{
Application.Exit();
}
8、将以下代码添加到“用户管理”菜单项的Click事件中。
privatevoid用户管理ToolStripMenuItem_Click(objectsender,EventArgse)
{
ContextMenuStripmnuContext=newContextMenuStrip();
this.ContextMenuStrip=mnuContext;
mnuContext.Items.Add("创建用户");
mnuContext.Items.Add("查询用户");
mnuContext.Items.Add("退出系统");
}
该代码用于动态创建应用程序上下文菜单。
9、对于实现的功能键,添加一个提示信息,代码如下:
privatevoidtoolStripButton2_Click(objectsender,EventArgse)
{
MessageBox.Show("正在建设中");
}
编译并运行,首先出现的是主窗体,单击“创建”按钮,frmNewUser窗体作为子窗体显示在主窗体中。
C#winForm将窗体状态栏StatusStrip示例(显示当前时间)
实现效果:
通过StatusStrip显示窗体状态栏,同时将状态栏分成三部分:
居左边显示相关文字信息,中间空白显示,居右边显示时间信息。
1.创建窗体及添加StatusStrip
默认StatusStrip名称为statusStrip1
2.在statusStrip1的Items属性中
添加三个StatusLabel
默认名称为toolStripStatusLabel1,2,3
按1,2,3的顺序排列
3.修改toolStripStatusLabel1的Text属性
为相关文字如"欢迎使用本系统"
4.修改toolStripStatusLabel2的Text属性为空
Sprint属性为True
BorderSides属性为Left,Right
5.修改toolStripStatusLabel3的Text属性为空
在Form的Load事件中修改其显示为当前时间
this.toolStripStatusLabel3.Text="登录时间:
"+DateTime.Now.ToString("yyyy-MM-ddhh:
mm:
ss");
6.如果要使状态栏时间信息随操作系统当前时间不停的改变
则可以通过增加Timer控件来实现
增加Timer控件timer1
编写其Tick事件为
privatevoidtimer1_Tick(objectsender,EventArgse)
{
this.toolStripStatusLabel3.Text="系统当前时间:
"+DateTime.Now.ToString("yyyy-MM-ddhh:
mm:
ss");
}
在Form的Load事件中对timer1进行相关设置
privatevoidMainForm_Load(objectsender,EventArgse)
{
this.toolStripStatusLabel3.Text="系统当前时间:
"+DateTime.Now.ToString("yyyy-MM-ddhh:
mm:
ss");
this.timer1.Interval=1000;
this.timer1.Start();
}
C#windows服务中的Timer控件的使用
C#windows服务程序中的Timer控件的使用是什么情况呢?
那么本文就C#windows服务程序中的Timer控件的使用问题向你介绍相关的操作。
C#windows服务程序中的Timer控件的使用问题是如何解决的呢?
今天和同事一起研究了下C#windows服务程序中的Timer控件的使用的写法.
我们在建立一个C#windows服务程序后,要用到计时器的话一般都会想到Timer控件,于是到工具器把Timer控件拉过来,双击写事件,设置时间,哇,成功了....
但服务一跑起来,唉,怎么回事,时间到了怎么没有执行事件呢?
后来,我找很多资料才知道,这个Timer控件是winForm下的,不能用在C#windows服务程序中.
怎么办呢.......
打开"工具箱"---右键---"选择项"---找到Timer控件,看好了,这个Timer控件的是system.Timer下的.可不是System.Windows.Form.然后添加.
双击...写事件...
OK,搞定
C#windows服务程序中的Timer控件的使用的相关操作就向你介绍到这里,希望对你了解C#windows服务程序中的Timer控件的使用有所帮助。
WindowsForms高级界面组件-Timer控件实例
要求显示计算机运行的时间长度和应用程序运行的时间长度,界面如图
代码如下:
usingSystem;
usingSystem.Drawing;
usingSystem.Collections;
usingSystem.ComponentModel;
usingSystem.Windows.Forms;
usingSystem.Data;
namespaceExample_1
{
///
///SummarydescriptionforForm1.
///
publicclassfrmTickCounter:
System.Windows.Forms.Form
{
privateSystem.Windows.Forms.LabellblComputer;
privateSystem.Windows.Forms.LabellblApplication;
privateSystem.Windows.Forms.GroupBoxgrpElapsed;
privateSystem.Windows.Forms.ButtonbtnClose;
privateSystem.Windows.Forms.TimertmrTickTimer;
privateSystem.ComponentModel.IContainercomponents;
privateintcompuTime;
publicfrmTickCounter()
{
InitializeComponent();
}
///
///Cleanupanyresourcesbeingused.
///
protectedoverridevoidDispose(booldisposing)
{
if(disposing)
{
if(components!
=null)
{
components.Dispose();
}
}
base.Dispose(disposing);
}
#regionWindowsFormDesignergeneratedcode
///
///RequiredmethodforDesignersupport-donotmodify
///thecontentsofthismethodwiththecodeeditor.
///
privatevoidInitializeComponent()
{
ponents=newSystem.ComponentModel.Container();
this.grpElapsed=newSystem.Windows.Forms.GroupBox();
this.lblApplication=newSystem.Windows.Forms.Label();
this.lblComputer=newSystem.Windows.Forms.Label();
this.btnClose=newSystem.Windows.Forms.Button();
this.tmrTickTimer=newSystem.Windows.Forms.Timer(ponents);
this.grpElapsed.SuspendLayout();
this.SuspendLayout();
//
//grpElapsed
//
this.grpElapsed.Controls.Add(this.lblApplication);
this.grpElapsed.Controls.Add(this.lblComputer);
this.grpElapsed.Font=newSystem.Drawing.Font("MicrosoftSansSerif",9.75F,System.Drawing.FontStyle.Bold,System.Drawing.GraphicsUnit.Point,((System.Byte)(0)));
this.grpElapsed.Location=newSystem.Drawing.Point(8,8);
this.grpElapsed.Name="grpElapsed";
this.grpElapsed.Size=newSystem.Drawing.Size(600,120);
this.grpElapsed.TabIndex=0;
this.grpElapsed.TabStop=false;
this.grpElapsed.Text="开机时长";
//
//lblApplication
//
this.lblApplication.Location=newSystem.Drawing.Point(16,72);
this.lblApplication.Name="lblApplication";
this.lblApplication.Size=newSystem.Drawing.Size(576,26);
this.lblApplication.TabIndex=1;
//
//lblComputer
//
this.lblComputer.Location=newSystem.Drawing.Point(16,32);
this.lblComputer.Name="lblComputer";
this.lblComputer.Size=newSystem.Drawing.Size(576,26);
this.lblComputer.TabIndex=0;
//
//btnClose
//
this.btnClose.Location=newSystem.Drawing.Point(488,136);
this.btnClose.Name="btnClose";
this.btnClose.Size=newSystem.Drawing.Size(115,26);
this.btnClose.TabIndex=1;
this.btnClose.Text="关闭";
this.btnClose.Click+=newSystem.EventHandler(this.btnClose_Click);
//
//tmrTickTimer
//
this.tmrTickTimer.Enabled=true;
this.tmrTickTimer.Interval=20;
this.tmrTickTimer.Tick+=newSystem.EventHandler(this.tmrTickTimer_Tick);
//
//frmTickCounter
//
this.AutoScaleBaseSize=newSystem.Drawing.Size(6,14);
this.ClientSize=newSystem.Drawing.Size(616,173);
this.Controls.Add(this.btnClose);
this.Controls.Add(this.grpElapsed);
this.Name="frmTickCounter";
this.Text="时钟";
this.Load+=newSystem.EventHandler(this.frmTickCounter_Load);
this.grpElapsed.ResumeLayout(false);
this.ResumeLayout(false);
}
#endregion
///
///Themainentrypointfortheapplication.
///
[STAThread]
staticvoidMain()
{
Application.Run(newfrmTickCounter());
}
privatevoidfrmTickCounter_Load(objectsender,System.EventArgse)
{
compuTime=Environment.TickCount;
}
privatevoidtmrTickTimer_Tick(objectsender,System.EventArgse)
{
//Environment类提供有关当前环境和平台的信息以及操作它们的方法
longcurTickValue=Environment.TickCount;
longdifference=curTickValue-compuTime;
longcomputerHours,computerMinutes,computerSeconds;
longapplicationHours,applicationMinutes,applicationSeconds;
//convertingmillisecondsintohours,minutesandsecondscomputerHours=(curTickValue/(3600*999))%24;
computerHours=(curTickValue/(3600*999))%24;
computerMinutes=(curTickValue/(60*999))%60;
computerSeconds=(curTickValue/999)%60;
applicationHours=(difference/(3600*999))%24;
applicationMinutes=(difference/(60*999))%60;
applicationSeconds=(difference/999)%60;
this.lblComputer.Text=String.Format("本计算机已运行了{0}小时{1}分{2}秒",computerHours.ToString(),computerMinutes.ToString(),
computerSeconds.ToString());
this.lblApplication.Text=String.Format("本应用程序已运行了{0}小时{1}分{2}秒",
applicationHours.ToString(),applicationMinutes.ToString(),
applicationSeconds.ToString());
}
privatevoidbtnClose_Click(objectsender,System.EventArgse)
{
this.Close();
}
}
}
以上代码是别人源码,我虽然在机器上运行过,但对其每行的意义不是很了解,希望朋友们多多指导!
WindowsForms高级界面组件-Timer控件
Timer控件提供了一种可在程序运行时操控时间的机制。
它是一种非可视化控件,不向用户提供用户界面,因此在运行时不会显示在界面上。
它类似与时钟,在指定的时间间隔不断记时,时间一到即触发事件,执行预设的动作。
Timer控件的主要属性
Enabled:
用于设置是否启用定时器
Interval:
设置时钟周期,单位ms
Timer控件的主要事件
Tick:
:
设定的时间到,触发该事件
Timer控件的主要方法
Start():
启动时钟进行计时。
Stop():
停止时钟
Interval属性用来决定每隔多长的时间要引发回送,其设置值的单位是毫秒(也就是千分之一秒),默认值则是60000毫秒,也就是60秒。
这里需要大家注意的是,将Timer控件的Interval属性设置成较小的值会使得回送频率增加,也很容易使得Web服务器的流量大增,对整体资源耗用与效率都会造成不良的影响。
因此尽量在确实需要的时候使用Timer控件来定时更新页面上的内容。
每当Timer控件的Interval属性所设置的间隔时间到达而进行回送时,就会在服务器上引发Tick事件。
我们通常会为Tick事件处理函数编写程序代码,以便能够根据自己的需求来定时执行特定操作。
另外一个常用的属性就是Enabled,用户可以将Enabled属性设置成false以便让Timer控件停止计时,而当需要让Timer控件再次开始计时的时候,只需再将Enabled属性设置成True即可。
Timer控件在UpdatePanel控件的内外是有区别的。
当Timer控件在UpdatePanel控件内部时,JavaScript计时组件只有在一次回传完成进才会重新建立。
也就说直到网页回传之前,定时器间隔时间不会从头计算。
例如,用户设置Timer控件的Interval属性值为6000ms(6s),但是回传操作本身却花了2s才完成,则下一次的回传将发生在前一次回传被引发之后的8s。
而如果Timer控件位于UpdatePanel控件之外,则当回传正在处理时,下一次的回传仍将发在前一次回传被引发之后的6s。
也就是说,UpdatePanel控件的内容被更新之后的4s,就会再次看到该控件被更新。
C#解决StatusStrip控件上的项目不能靠右对齐的问题
在C#中用到了状态栏控件StatusStrip,但当我想把StatusStrip上某个StatusLabel靠右对齐时出了问题。
按照MSDN中的办法,是设置ToolStripStatusLabel的Alignment属性为Right。
不过我在设计界面的属性窗口中找不到Alignment。
就算加入代码toolStripStatusLabel2.Alignment=ToolStripItemAlignment.Right;也还是没什么效果。
后来我找到两种方法解决这个问题:
方法一:
在状态栏所有项目(StatusLabel、ProgressBar、DropDownButton等)前添加一个空白的StatusLabel(Text属性为空),并将其Spring属性设为True。
Spring属性的作用是设置该项是否填满剩余空间,设为True以后,
 升级会员
升级会员 