POWERVM的创建步骤.docx
《POWERVM的创建步骤.docx》由会员分享,可在线阅读,更多相关《POWERVM的创建步骤.docx(36页珍藏版)》请在冰豆网上搜索。
POWERVM的创建步骤
需求:
机器:
P750
VIOSERVER:
2.1.3.10-FP23
Clientpartition:
2个
虚拟网卡:
5块
虚拟光卡:
12块
虚拟SCSI卡:
3块。
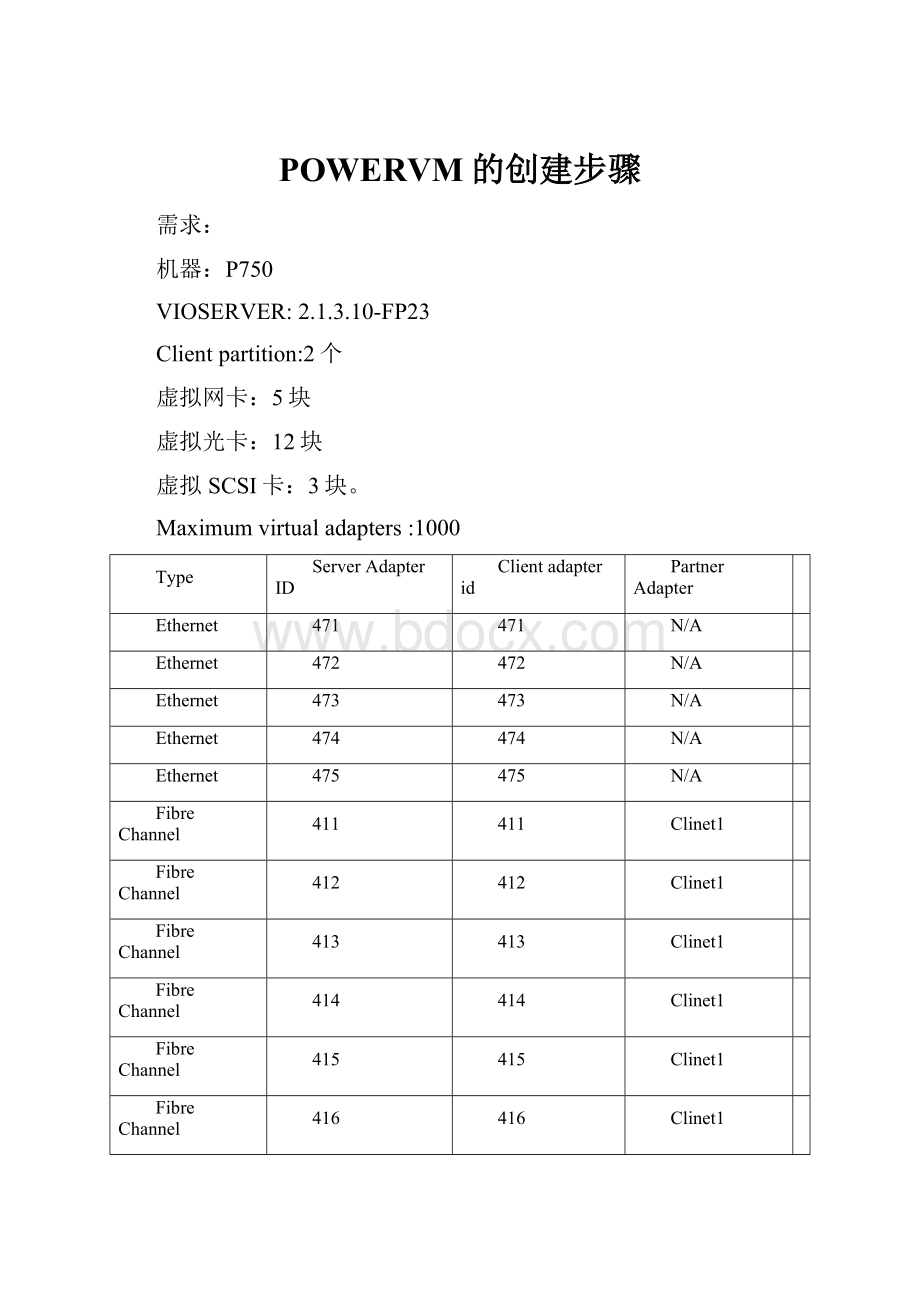
Maximumvirtualadapters:
1000
Type
ServerAdapterID
Clientadapterid
PartnerAdapter
Ethernet
471
471
N/A
Ethernet
472
472
N/A
Ethernet
473
473
N/A
Ethernet
474
474
N/A
Ethernet
475
475
N/A
FibreChannel
411
411
Clinet1
FibreChannel
412
412
Clinet1
FibreChannel
413
413
Clinet1
FibreChannel
414
414
Clinet1
FibreChannel
415
415
Clinet1
FibreChannel
416
416
Clinet1
FibreChannel
417
421
Clinet2
FibreChannel
418
422
Clinet2
FibreChannel
419
423
Clinet2
FibreChannel
420
424
Clinet2
FibreChannel
421
425
Clinet2
FibreChannel
422
426
Clinet2
SCSI
401
401
Client1
SCSI
402
402
Client2
SCSI
407
403
any
首先创建VIOSERVER
选择CPU的方式,可以选择dedicated或是share的方式,这个看自己规划的方式
给VIOSERVER内存的数量,一般不要太大,一般在2-7G之间就行了,我因为内存是512G的内存,所以给了大点,看内存和CPU的方式是给的什么方式,我选择选择是都是shared的模式,CPU如果是capped,而且是shared的方式,它的CPU是mincpu《CPU《desireCPU
如果是uncapped的CPU值是mincpu《CPU《maxcpu,weight越高的,能获得CPU的机会越大。
内存的方式是shared的方式:
minMEM《mem《desireMEM。
所以先选择共享的方式还是独占的模式,独占的模式分配多少用多少。
将物理的卡可以全部选择
首先虚拟出虚拟的网卡
给出虚拟的adapterid,portvirtualethernet这个值自己填写,就相当于是个VLAN的概念,
UserthisadapterforEthernetbridging这个是通过VIOSERVER起到网络桥接的作用,就相当于用VMWARE虚拟机,需要和外网连接,需要桥接一样的概念。
同样的虚拟出第二块网卡
虚拟出第三块网卡
虚拟出第四块网卡
虚拟出第五块网卡
网卡虚拟完毕,创建虚拟的光纤卡
给出虚拟光纤卡的adapterid,这个adapterid和clientadapterid一致,这样是便于管理,也可以不一致,clientpartition这个等VIOSERVER这边全部创建完之后再修改这个值,是分配给哪个虚拟clientpartition
虚拟第二块光纤卡
虚拟第三块光纤卡
虚拟第四块光纤卡
虚拟第五块HBA卡
虚拟第六块HBA卡
虚拟第2个clientpartition的光纤卡,如果是虚拟多个clientpartition的话,多虚拟出点光纤卡就行了,然后将光纤卡分配给clientpartition,将clientpartition选择下分配就行了。
虚拟出SCSIadapter卡,最好是虚拟出2块scsiadapter,一块给rootvg使用,一块给cd使用,或是不给CD使用,也可以当做standby使用
虚拟第二个分区的scsiadapter
给任何机器使用的,这个最好是分配了给一个机器,另外一个机器就不要使用,clientpartition不使用,就放在那里也没关系
创建clientpartition
创建clientpartitionprofile的步骤
CPUmin和max之间最好不要超过10倍的关系,超过了系统会提示CPU这个profile文件报错。
物理卡不需要选择
这个maximunvirtualadapter最好设置大一点,如果是多台机器做LPM的话,多台机器虚拟出来的ID都要小于这个值,如果其中有一台机器的adapterid大于这个值,LPM就会报错。
创建ethernetadapter卡,这个virtualethernetadapter需要和vioserver的virtualethernetadapter的值是一值的,portvirtualEthernet也和vioserver的一致,usethisadapterforEthernetbridging这个就不需要勾选,勾选了会造成clientpartition网络不通,vioserver上已经做了桥接的功能,clientpartition就不需要再做了。
同样的第二块网卡也是这样做
第三块网卡
第三块网卡
第五块网卡
创建虚拟光纤卡,这个virualfibrechanneladapter是client的值,这个可以随便给,但是我是选择和server一致,维护也方便。
Serveradapterid就是server上创建的值。
创建虚拟光纤卡
创建scsiadapter卡,同样的virtualscsiadapter卡也是自己给个值,最好和VIOSERVER一致。
HEA卡就不要选了,做LPM迁移就不能有实际物理的卡
这个是clientpartition创建后的profile文件的virtualadapter卡情况
下图是clientpartition2创建后的profile文件的virtualadapter卡情况
Clientpartition创建完了,就需要将VIOSERVER上的卡分配给clientpartition,
然后开启vioserver,clientpartition先不开启。
$oem_setup_env
#lsdev-Ccadapter|more
会看到有这个输出,这个就是虚拟出来的网卡,还没有和物理的网卡有关系,因为我有做etherchannel,我的做法是先做好etherchannel,然后让etherchannel创建出来的卡和virtual卡做成sea卡。
ent0Available01-002-Port10/100/1000Base-TXPCI-ExpressAdapter(14104003)
ent1Available01-012-Port10/100/1000Base-TXPCI-ExpressAdapter(14104003)
ent2Available00-002-Port10/100/1000Base-TXPCI-ExpressAdapter(14104003)
ent3Available00-012-Port10/100/1000Base-TXPCI-ExpressAdapter(14104003)
ent4Available03-002-Port10/100/1000Base-TXPCI-ExpressAdapter(14104003)
ent5Available03-012-Port10/100/1000Base-TXPCI-ExpressAdapter(14104003)
ent6Available0E-002-Port10/100/1000Base-TXPCI-ExpressAdapter(14104003)
ent7Available0E-012-Port10/100/1000Base-TXPCI-ExpressAdapter(14104003)
ent8Available0H-002-Port10/100/1000Base-TXPCI-ExpressAdapter(14104003)
ent9Available0H-012-Port10/100/1000Base-TXPCI-ExpressAdapter(14104003)
ent10AvailableEtherChannel/IEEE802.3adLinkAggregation
ent11AvailableEtherChannel/IEEE802.3adLinkAggregation
ent12AvailableEtherChannel/IEEE802.3adLinkAggregation
ent13AvailableEtherChannel/IEEE802.3adLinkAggregation
ent14AvailableEtherChannel/IEEE802.3adLinkAggregation
ent15AvailableVirtualI/OEthernetAdapter(l-lan)
ent16AvailableVirtualI/OEthernetAdapter(l-lan)
ent17AvailableVirtualI/OEthernetAdapter(l-lan)
ent18AvailableVirtualI/OEthernetAdapter(l-lan)
ent19AvailableVirtualI/OEthernetAdapter(l-lan)
虚拟出来的光纤卡,现在还没有和任何的物理光纤卡有关系
vfchost0AvailableVirtualFCServerAdapter
vfchost1AvailableVirtualFCServerAdapter
vfchost2AvailableVirtualFCServerAdapter
vfchost3AvailableVirtualFCServerAdapter
vfchost4AvailableVirtualFCServerAdapter
vfchost5AvailableVirtualFCServerAdapter
vfchost6AvailableVirtualFCServerAdapter
vfchost7AvailableVirtualFCServerAdapter
vfchost8AvailableVirtualFCServerAdapter
虚拟出来的SCSI卡
vhost0AvailableVirtualSCSIServerAdapter
vhost1AvailableVirtualSCSIServerAdapter
vhost2AvailableVirtualSCSIServerAdapter
vhost3AvailableVirtualSCSIServerAdapter
vhost4AvailableVirtualSCSIServerAdapter
vhost5AvailableVirtualSCSIServerAdapter
vhost6AvailableVirtualSCSIServerAdapter
查看虚拟出来的网卡的槽位,可以看到C471就是profile文件中给的值
#lscfg-vlent15
ent15U8233.E8B.063249R-V1-C471-T1VirtualI/OEthernetAdapter(l-lan)
NetworkAddress.............A6F7596CF7D7
DisplayableMessage.........VirtualI/OEthernetAdapter(l-lan)
HardwareLocationCode......U8233.E8B.063249R-V1-C471-T1
查看虚拟光纤卡的槽位,和profile文件中的光纤卡给的数值是一致的,这个可以和profile文件中和VIOSERVER中相对应起来
#lscfg-vlvfchost0
vfchost0U8233.E8B.063249R-V1-C417VirtualFCServerAdapter
HardwareLocationCode......U8233.E8B.063249R-V1-C417
SCSI卡的槽位
#lscfg-vlvhost0
vhost0U8233.E8B.063249R-V1-C401VirtualSCSIServerAdapter
HardwareLocationCode......U8233.E8B.063249R-V1-C401
#exit
$lsmap-all|more
SVSAPhyslocClientPartitionID
-----------------------------------------------------------------------------
vhost0U8233.E8B.063249R-V1-C4010x00000006
这个是没有和物理的光纤卡做map时候的信息
$lsmap–all–npiv
NamePhyslocClntIDClntNameClntOS
--------------------------------------------------------------------------
vfchost0U8233.E8B.063249R-V1-C4176pwr750d1AIX
Status:
LOGGED_IN
FCname:
FCloccode:
U5802.001.9K8Q889-P1-C7-T1
Portsloggedin:
13
Flags:
a
VFCclientname:
fcs6VFCclientDRC:
U8233.E8B.063249R-V6-C417
创建SEA卡
mkvdev-seaent10-vadapterent15-defaultent15-defaultid1(1就是vioserver创建网卡的PortVirtualEthernet1)
mkvdev-seaent11-vadapterent16-defaultent16-defaultid2(2就是vioserver创建网卡的PortVirtualEthernet2)
其他的创建类似
创建完了之后输出的结果
$lsmap-all-net
SVEAPhysloc
--------------------------------------------------
ent15U8233.E8B.063249R-V1-C471-T1
SEAent20
Backingdeviceent10
StatusAvailable
Physloc
SVEAPhysloc
--------------------------------------------------
ent16U8233.E8B.063249R-V1-C472-T1
SEAent21
Backingdeviceent11
StatusAvailable
Physloc
SVEAPhysloc
--------------------------------------------------
ent17U8233.E8B.063249R-V1-C473-T1
SEAent22
Backingdeviceent12
StatusAvailable
Physloc
SVEAPhysloc
--------------------------------------------------
ent18U8233.E8B.063249R-V1-C474-T1
SEAent23
Backingdeviceent13
StatusAvailable
Physloc
SVEAPhysloc
--------------------------------------------------
ent19U8233.E8B.063249R-V1-C475-T1
SEAent24
Backingdeviceent14
StatusAvailable
Physloc
创建NPIV
vfcmap-vadaptervfchost0-fcpfcs0
vfcmap-vadaptervfchost1-fcpfcs1
vfcmap-vadaptervfchost2-fcpfcs2
vfcmap-vadaptervfchost3-fcpfcs3
vfcmap-vadaptervfchost4-fcpfcs4
vfcmap-vadaptervfchost5-fcpfcs5
vfcmap-vadaptervfchost6-fcpfcs6
vfcmap-vadaptervfchost7-fcpfcs7
其他的vfcmap也一样的操作,如第二台clientpartition
Vfcmap–vadaptervfchost8–fcpfcs0
Vfcmap–vadaptervfchost9–fcpfcs1
Vfcmap–vadaptervfchost10–fcpfcs2
Vfcmap–vadaptervfchost11–fcpfcs3
……..
如果有多台的clientpartition,操作是同样的,做之前先确定下在系统中显示的vfchostX和profile文件中多少是对应的。
具体看vfchostX的槽位。
Mapping完了之后在看lsmap–all–npiv就会看到FCNAME有一个具体的光纤卡的对应设备。
$lsmap-all-npiv|more
NamePhyslocClntIDClntNameClntOS
--------------------------------------------------------------------------
vfchost0U8233.E8B.063249R-V1-C4176pwr750d1AIX
Status:
LOGGED_IN
FCname:
fcs0(和具体的物理光纤做mapping)FCloccode:
U5802.001.9K8Q889-P1-C7-T1
Portsloggedin:
13
Flags:
a
VFCclientname:
fcs6VFCclientDRC:
U8233.E8B.063249R-V6-C417
创建SCSI和clientpartition的mapping关系
Mkvdev–vdevhdisk32–vadaptervhost0–devp750d1_rootvg1
Mkvdev–vdevhdisk4–vadaptervhost0–devp750d1_rootvg2
Vhost0具体是哪个clientpartition分区,这个看槽位,如vhost0是401,因为在clientpartition中创建401的槽位,可以判定是clientpartition,其他也一样。
$lsmap-all|more
SVSAPhyslocClientPartitionID
-----------------------------------------------------------------------------
vhost0U8233.E8B.063249R-V1-C4010x00000006
VTDp750d1_rootvg1
StatusAvailable
LUN0x8100000000000000
Backingdevicehdisk32
PhyslocU5802.001.9K8Q889-P1-C3-T1-W500507630B000160-L4005402800000000
Mirroredfalse
VTDp750d1_rootvg2
StatusAvailable
LUN0x8200000000000000
Backingdevicehdisk4
PhyslocU5802.001.9K8Q889-P1-C3-T1-W500507630B000160-L4004403000000000
Mirroredfalse
Mkvdev–vdevhdisk33–vadaptervhost0–devp750d2_rootvg1
Mkvdev–vdevhdisk5–vadaptervhost0–devp750d2_rootvg2
SVSAPhyslocClientPartitionID
-----------------------------------------------------------------------------
vhost2U8233.E8B.063249R-V1-C4020x00000002
VTDp750d2_rootvg1
StatusAvailable
LUN0x8100000000000000
Backingdevicehdisk33
PhyslocU5802.001.9K8Q889-P1-C3-T1-W500507630B000160-L4005402900000000
Mirroredfalse
VTDp750d2_rootvg2
StatusAvailable
LUN0x8200000000000000
Backingdevicehdisk5
PhyslocU5802.001.9K8Q889-P1-C3-T1-W500507630B000160-L400440
 升级会员
升级会员 