实验五利用三层交换机实现VLAN间路由Word格式.docx
《实验五利用三层交换机实现VLAN间路由Word格式.docx》由会员分享,可在线阅读,更多相关《实验五利用三层交换机实现VLAN间路由Word格式.docx(14页珍藏版)》请在冰豆网上搜索。
三层交换机实现VLAN互访的原理是,利用三层交换机的路由功能,通过识别数据包的IP地址,查找路由表进行选路转发。
三层交换机利用直连路由可以实现不同VLAN之间的互相访问。
三层交换机给接口配置IP地址,采用SVI(交换虚拟接口)的方式实现VLAN间互连。
SVI是指为交换机中的VLAN创建虚拟接口,并且配置IP地址。
【实验步骤】
第一步:
配置两台交换机的主机名
Switch#configureterminal
Enterconfigurationcommands,oneperline.EndwithCNTL/Z.
Switch(config)#hostnameL2-SW
L2-SW(config)#
S3750#configureterminal
S3750(config)#hostnameL3-SW
L3-SW(config)#
第二步:
在三层交换机上划分VLAN添加端口,并设置Trunk
L3-SW(config)#vlan10
L3-SW(config-vlan)#namexiaoshou
L3-SW(config-vlan)#vlan20
L3-SW(config-vlan)#namejishu
L3-SW(config-vlan)#exit
L3-SW(config)#interfacerangefastEthernet0/6-10
L3-SW(config-if-range)#switchportmodeaccess
L3-SW(config-if-range)#switchportaccessvlan10
L3-SW(config-if-range)#exit
L3-SW(config)#interfacerangefastEthernet0/11-15
L3-SW(config-if-range)#switchportaccessvlan20
L3-SW(config-if-range)#exit
L3-SW(config)#interfacefastEthernet0/1
L3-SW(config-if)#switchportmodetrunk
L3-SW(config-if)#exit
第三步:
在二层交换机上划分VLAN添加端口,并设置Trunk
L2-SW(config)#vlan10
L2-SW(config-vlan)#namexiaoshou
L2-SW(config-vlan)#vlan20
L2-SW(config-vlan)#namejishu
L2-SW(config-vlan)#exit
L2-SW(config)#interfacerangefastEthernet0/6-10
L2-SW(config-if-range)#switchportmodeaccess
L2-SW(config-if-range)#switchportaccessvlan10
L2-SW(config-if-range)#exit
L2-SW(config)#interfacefastEthernet0/1
L2-SW(config-if)#switchportmodetrunk
L2-SW(config-if)#exit
第四步:
查看VLAN和Trunk的配置
L2-SW#showvlan
VLANNameStatusPorts
----------------------------------------------------------------------------
1defaultactiveFa0/1,Fa0/2,Fa0/3
Fa0/4,Fa0/5,Fa0/11
Fa0/12,Fa0/13,Fa0/14
Fa0/15,Fa0/16,Fa0/17
Fa0/18,Fa0/19,Fa0/20
Fa0/21,Fa0/22,Fa0/23
Fa0/24
10xiaoshouactiveFa0/1,Fa0/6,Fa0/7
Fa0/8,Fa0/9,Fa0/10
20jishuactiveFa0/1
L2-SW#
L2-SW#showinterfacesfastEthernet0/1switchport
InterfaceSwitchportModeAccessNativeProtectedVLANlists
-------------------------------------------------------------------------
Fa0/1EnabledTrunk11DisabledAll
L3-SW#showvlan
--------------------------------------------------------------------------------
1VLAN0001STATICFa0/1,Fa0/2,Fa0/3,Fa0/4
Fa0/5,Fa0/16,Fa0/17,Fa0/18
Fa0/19,Fa0/20,Fa0/21,Fa0/22
Fa0/23,Fa0/24,Gi0/25,Gi0/26
Gi0/27,Gi0/28
10xiaoshouSTATICFa0/1,Fa0/6,Fa0/7,Fa0/8
Fa0/9,Fa0/10
20jishuSTATICFa0/1,Fa0/11,Fa0/12,Fa0/13
Fa0/14,Fa0/15
L3-SW#
L3-SW#showinterfacesfastEthernet0/1switchport
InterfaceSwitchportModeAccessNativeProtectedVLANlists
--------------------------------------------------------------------------
FastEthernet0/1enabledTRUNK11DisabledALL
第五步:
验证配置
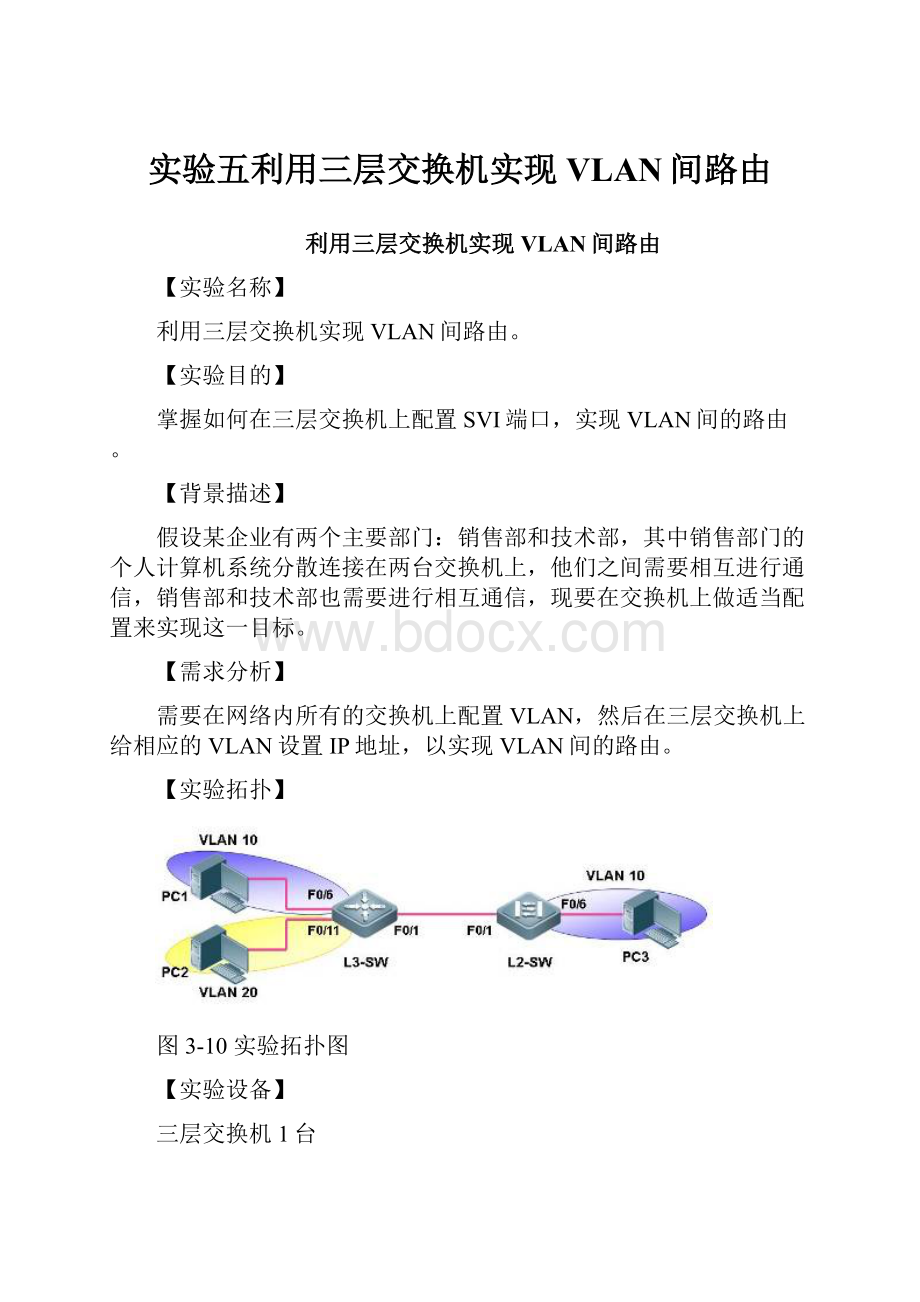
PC3和PC1都属于VLAN10,它们的IP地址都在C类网络192.168.10.0/24内,PC2属于VLAN20,它的IP地址在C类网络192.168.20.0/24内,此时,不同VLAN之间的PC3和PC2是不能ping通的,如错误!
未找到引用源。
所示。
图3-11从PC3不能ping通PC2
第六步:
在三层交换机上配置SVI端口
L3-SW#configureterminal
L3-SW(config)#interfacevlan10
!
激活VLAN10的SVI端口并配置IP地址
L3-SW(config-if)#Dec218:
59:
30L3-SW%7:
%LINEPROTOCOLCHANGE:
InterfaceVLAN10,changedstatetoUP
L3-SW(config-if)#ipaddress192.168.10.1255.255.255.0
L3-SW(config-if)#noshutdown
L3-SW(config)#interfacevlan20
激活VLAN20的SVI端口并配置IP地址
L3-SW(config-if)#Dec219:
00:
05L3-SW%7:
InterfaceVLAN20,changedstatetoUP
L3-SW(config-if)#ipaddress192.168.20.1255.255.255.0
第七步:
查看SVI端口的配置
L3-SW#showiproute
Codes:
C-connected,S-static,R-RIPB-BGP
O-OSPF,IA-OSPFinterarea
N1-OSPFNSSAexternaltype1,N2-OSPFNSSAexternaltype2
E1-OSPFexternaltype1,E2-OSPFexternaltype2
i-IS-IS,L1-IS-ISlevel-1,L2-IS-ISlevel-2,ia-IS-ISinterarea
*-candidatedefault
Gatewayoflastresortisnoset
C192.168.10.0/24isdirectlyconnected,VLAN10
C192.168.10.1/32islocalhost.
C192.168.20.0/24isdirectlyconnected,VLAN20
C192.168.20.1/32islocalhost.
从中可以看到,VLAN的虚拟端口上配置的IP地址,其网段成为了三层交换机的直连路由。
L3-SW#showinterfacesvlan10
Index(dec):
4106(hex):
100a
VLAN10isUP,lineprotocolisUP
HardwareisVLAN,addressis00d0.f821.a543(bia00d0.f821.a543)
Interfaceaddressis:
192.168.10.1/24
ARPtype:
ARPA,ARPTimeout:
3600seconds
MTU1500bytes,BW1000000Kbit
EncapsulationprotocolisEthernet-II,loopbacknotset
Keepaliveintervalis10sec,set
Carrierdelayis2sec
RXloadis1,Txloadis1
Queueingstrategy:
WFQ
L3-SW#showinterfacesvlan20
4116(hex):
1014
VLAN20isUP,lineprotocolisUP
192.168.20.1/24
第八步:
给PC3添加网关192.168.10.1,如错误!
所示,此时再从PC3去ping不同VLAN的主机PC2,是可以ping通的,如错误!
图3-12为PC3设置网关
图3-13设置三层交换机后,PC3可以ping通PC2
【注意事项】
1、两台交换机之间相连的端口应该设置为tagvlan模式。
2、给SVI端口设置完IP地址后,一定要使用noshutdown命令进行激活,否则无法正常使用。
3、如果VLAN内没有激活的端口,相应VLAN的SVI端口将无法被激活。
4、需要设置PC的网关为相应VLAN的SVI接口地址。
【参考配置】
L3-SW#showrunning-config
Buildingconfiguration...
Currentconfiguration:
1605bytes
!
versionRGNOS10.1.00(4),Release(18443)(TueJul1719:
51:
54CST2007-ubu6server)
hostnameL3-SW
vlan1
vlan10
namexiaoshou
vlan20
namejishu
interfaceFastEthernet0/1
switchportmodetrunk
interfaceFastEthernet0/2
interfaceFastEthernet0/3
interfaceFastEthernet0/4
interfaceFastEthernet0/5
interfaceFastEthernet0/6
switchportaccessvlan10
interfaceFastEthernet0/7
interfaceFastEthernet0/8
interfaceFastEthernet0/9
interfaceFastEthernet0/10
interfaceFastEthernet0/11
switchportaccessvlan20
interfaceFastEthernet0/12
interfaceFastEthernet0/13
interfaceFastEthernet0/14
interfaceFastEthernet0/15
interfaceFastEthernet0/16
interfaceFastEthernet0/17
interfaceFastEthernet0/18
interfaceFastEthernet0/19
interfaceFastEthernet0/20
interfaceFastEthernet0/21
interfaceFastEthernet0/22
interfaceFastEthernet0/23
interfaceFastEthernet0/24
interfaceGigabitEthernet0/25
interfaceGigabitEthernet0/26
interfaceGigabitEthernet0/27
interfaceGigabitEthernet0/28
interfaceVLAN10
ipaddress192.168.10.1255.255.255.0
interfaceVLAN20
ipaddress192.168.20.1255.255.255.0
linecon0
linevty04
login
end
L2-SW#showrunning-config
Systemsoftwareversion:
1.68BuildApr252007Release
457bytes
version1.0
hostnameL2-SW
interfacefastEthernet0/1
interfacefastEthernet0/6
interfacefastEthernet0/7
interfacefastEthernet0/8
interfacefastEthernet0/9
interfacefastEthernet0/10
 升级会员
升级会员 