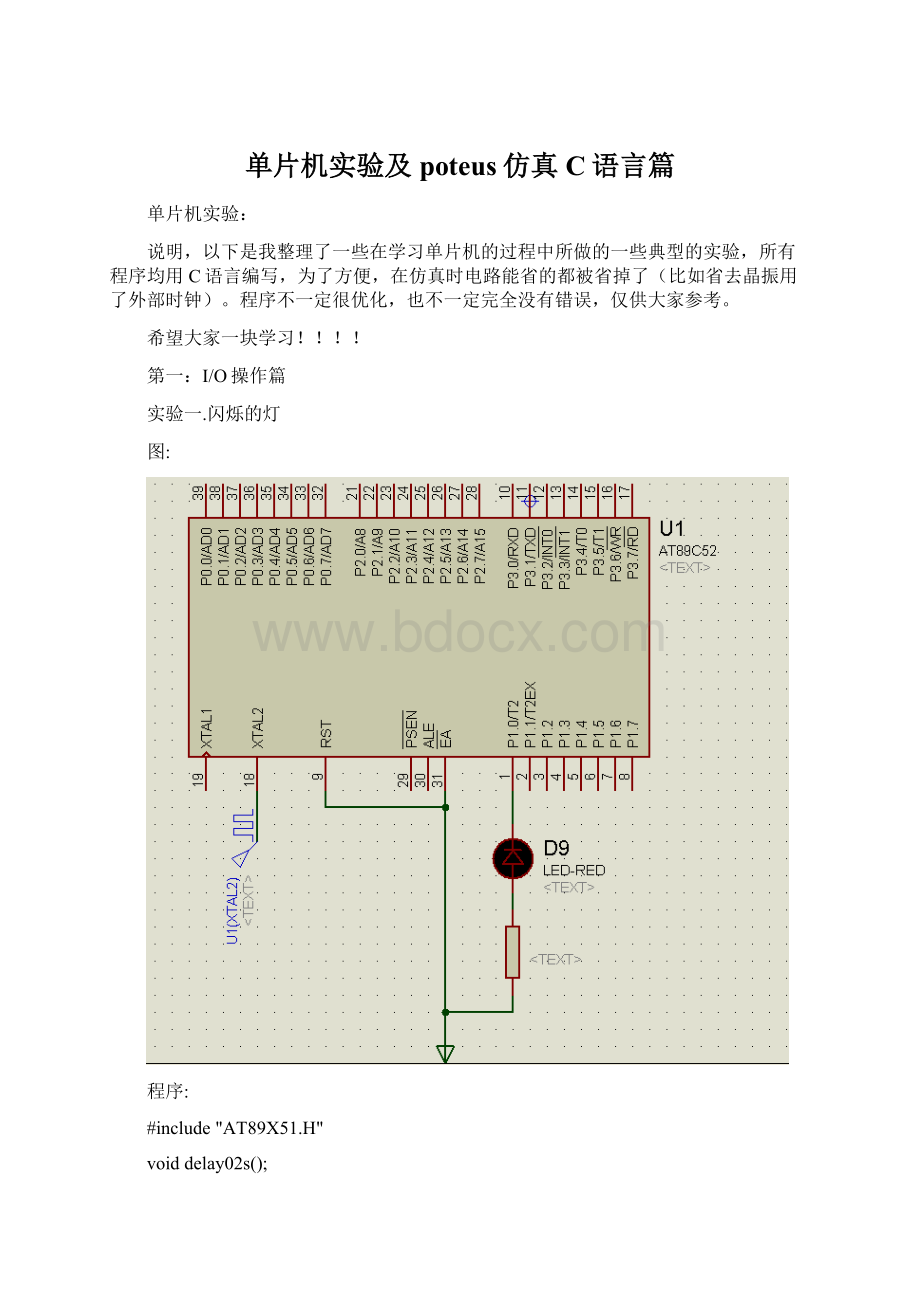
单片机实验及poteus仿真C语言篇文档格式.docx
《单片机实验及poteus仿真C语言篇文档格式.docx》由会员分享,可在线阅读,更多相关《单片机实验及poteus仿真C语言篇文档格式.docx(26页珍藏版)》请在冰豆网上搜索。

for(k=248;
k=0;
k--);
实验二:
模拟开关
voidmain()
{
while
(1)
{if(P1_7==0)P1_0=0;
//key按下P1_7=0,led点亮
elseif(P1_7==1)P1_0=1;
//key弹起P1_7=1,led熄灭
实验三:
多路开关
{P1_0=P1_7;
P1_1=P1_6;
P1_2=P1_5;
P1_3=P1_4;
实验四:
跑马灯
(一)
//单一灯的左移右移
//八个发光二极管L1-L8分别接在单片机的P1.0-P1.7接口上
//输出“0”时,发光二极管亮,开始时P1.0→P1.1→P1.2→P1.3→┅→P1.7→P1.6→┅→P1.0亮,重复循环。
{unsignedinta;
while
(1)
{P1=0xfe;
for(a=7;
a>
a--)//右移
{P1=(P1<
<
1)+1;
for(a=6;
a--)//左移
{P1=(P1>
>
1)+0x80;
voiddelay02s()
{unsignedinti,j,k;
for(i=0;
i<
20;
i++)
for(j=0;
j<
j++)
for(k=0;
k<
248;
k++);
实验五:
跑马灯(二、查表方式)
图:
程序:
{unsignedchartable[]={0xfe,0xfd,0xfb,0xf7,0xef,0xdf,0xbf,0x7f,//第一次,右移一行
0xfe,0xfd,0xfb,0xf7,0xef,0xdf,0xbf,0x7f,//第二次,右移一行
0x7f,0xbf,0xdf,0xef,0xf7,0xfb,0xfd,0xfe,//第一次,左移一行
0x7f,0xbf,0xdf,0xef,0xf7,0xfb,0xfd,0xfe,//第二次,左移一行
0x00,0xff,0x00,0xff};
//闪烁两次
unsignedchara;
{for(a=0;
a<
35;
a++)
{P1=table[a];
}
i>
k>
实验六:
led计数
#include<
AT89X51.H>
voidmain()
{unsignedcharcodetable[]={0x40,0xf9,0x24,0x30,0x19,0x12,0x03,0xf8,0x00,0x18};
unsignedchardisp;
while
(1)
{for(disp=0;
disp<
10;
disp++)
{P0=table[disp];
delay02s();
}
voiddelay02s()
{unsignedchari,j,k;
i--)
j--)
实验七:
二进制计数
//用四个发光二极管模拟计数点击开关次数.
voiddelay10ms();
{P0=0xff;
{
/*
//////////////////////////////////////////////
if(P0_7==1)//按键按下
{delay10ms();
if(P0_7==0)//按键弹起,此时灯亮.
P0=P0-1;
//////////////////////////////////////////////
*/
if(P0_7==0)//按键弹起
if(P0_7==1)//按键按下,此时灯亮.
voiddelay10ms()
{unsignedchari,j;
for(j=248;
j--);
验八:
一键多用
{unsignedcharid=0;
{if(P1_7==0)//按键弹起
if(P1_7==0)
{id++;
if(id==4)id=0;
while(P1_7==0);
}
switch(id)
{case0:
P0_0=~P0_0;
break;
case1:
P0_1=~P0_1;
case2:
P0_2=~P0_2;
case3:
P0_3=~P0_3;
voiddelay10ms()
{unsignedchari,k;
{unsignedcharj;
delay10ms();
实验九:
00~99计数
//00~99计数器
voiddelay1s();
{unsignedcharcodetable[]={0xf9,0x24,0x30,0x19,0x12,0x03,0xf8,0x00,0x18,0x40};
unsignedinthigh=9;
unsignedintlight=9;
P0=table[light];
P2=table[high];
delay1s();
{for(light=0;
light<
light++)
{if(light==9)high++;
if(high==10)high=0;
delay1s();
voiddelay1s()
for(i=82;
实验十:
可预置数加减计数器
//K1(P3_7)加计数.K2(P3_6)头减计数.
{P0=P2;
{if(P3_6==0)
if(P3_6==0)
{P0++;
if(P3_7==0)
{P0--;
实验十一:
共阴LED
//开关按下时显示"
12345"
开关弹起时显示"
HELLO"
.
voiddelay01ms();
voidmain(void)
{unsignedcharcodetable1[]={0xf9,0x24,0x30,0x19,0x12,0xff,0xff,0xff};
unsignedcharcodetable2[]={0x09,0x06,0xc7,0xc7,0x40,0xff,0xff,0xff};
unsignedchari;
{P2=0xfe;
if(P1_0==0)
{delay01ms();
for(i=0;
8;
i++)
{P0=table1[i];
P2=(P2<
elseif(P1_0==1)
if(P1_0==1)
{P0=table2[i];
P2=(P2<
}
voiddelay01ms()
{unsignedchara,b;
for(a=4;
a--)
for(b=248;
b>
b--);
实验十二、4*4键盘
{unsignedcharkey;
unsignedchartable[]={0x40,0xf9,0x24,0x30,
0x19,0x12,0x03,0xf8,
0x00,0x18,0x08,0x00,
0x46,0x40,0x06,0x0e,0xff};
{P0=0xff;
P3=0xff;
P3_4=0;
key=P3&
0x0f;
if(key!
=0x0f)
{switch(key)
{case0x0e:
key=0;
break;
case0x0d:
key=1;
case0x0b:
key=2;
case0x07:
key=3;
P0=table[key];
key=key&
while(key!
=0x0f)
{key=P3;
P3_5=0;
key=4;
key=5;
key=6;
key=7;
P3_6=0;
key=8;
key=9;
key=10;
key=11;
P3_7=0;
key=12;
key=13;
key=14;
key=15;
{unsignedinti,k;
for(k=20;
实验十三lcd
原理图:
AT89X52.H"
#definelcd_rsP3_2
#definelcd_rwP3_1
#definelcd_enP3_0
#definelcd_dataP1
voidwritecmd(inta)//写控制字
{inti;
for(i=2000;
i--);
lcd_rs=0;
lcd_rw=0;
lcd_en=1;
lcd_data=a;
lcd_en=0;
voidwritedata(charlcddata)//显示字符
lcd_rs=1;
lcd_data=lcddata;
voidwritestring(charaddr,char*str)//显示字符串
{writecmd(addr);
do{writedata(*str);
str++;
while(*str!
='
\0'
);
//=====lcd初始化================================
voidlcdinit()
{writecmd(0x38);
//8位,两行,5X7字型(控制字"
001d1d2d3xx"
其中d1:
数据长度选择(8位或4位),d2:
单双列选择,d3:
5X10或5X7字型选择)
writecmd(0x08);
//关闭显示屏
writecmd(0x01);
//清除显示屏
writecmd(0x0c);
//开启显示屏,游标,与闪烁(控制字"
00001d1d2d3"
其中d1:
屏幕开/关,d2:
光标开/关,d3:
闪烁开/关)
writecmd(0x06);
//地址递增(AC+1)
//==============================================
voidmain()
{chardisp1[]={"
MyQQ:
364402384"
};
chardisp2[]={"
HelloLameck!
"
lcdinit();
{writestring(0xc0,disp1);
writestring(0x80,disp2);
目前只完成了这些,剩下的还没来的及写出来,先跟大家共享一下吧。