BIND+SQUID打造WIN下的CDNWord文档格式.docx
《BIND+SQUID打造WIN下的CDNWord文档格式.docx》由会员分享,可在线阅读,更多相关《BIND+SQUID打造WIN下的CDNWord文档格式.docx(17页珍藏版)》请在冰豆网上搜索。

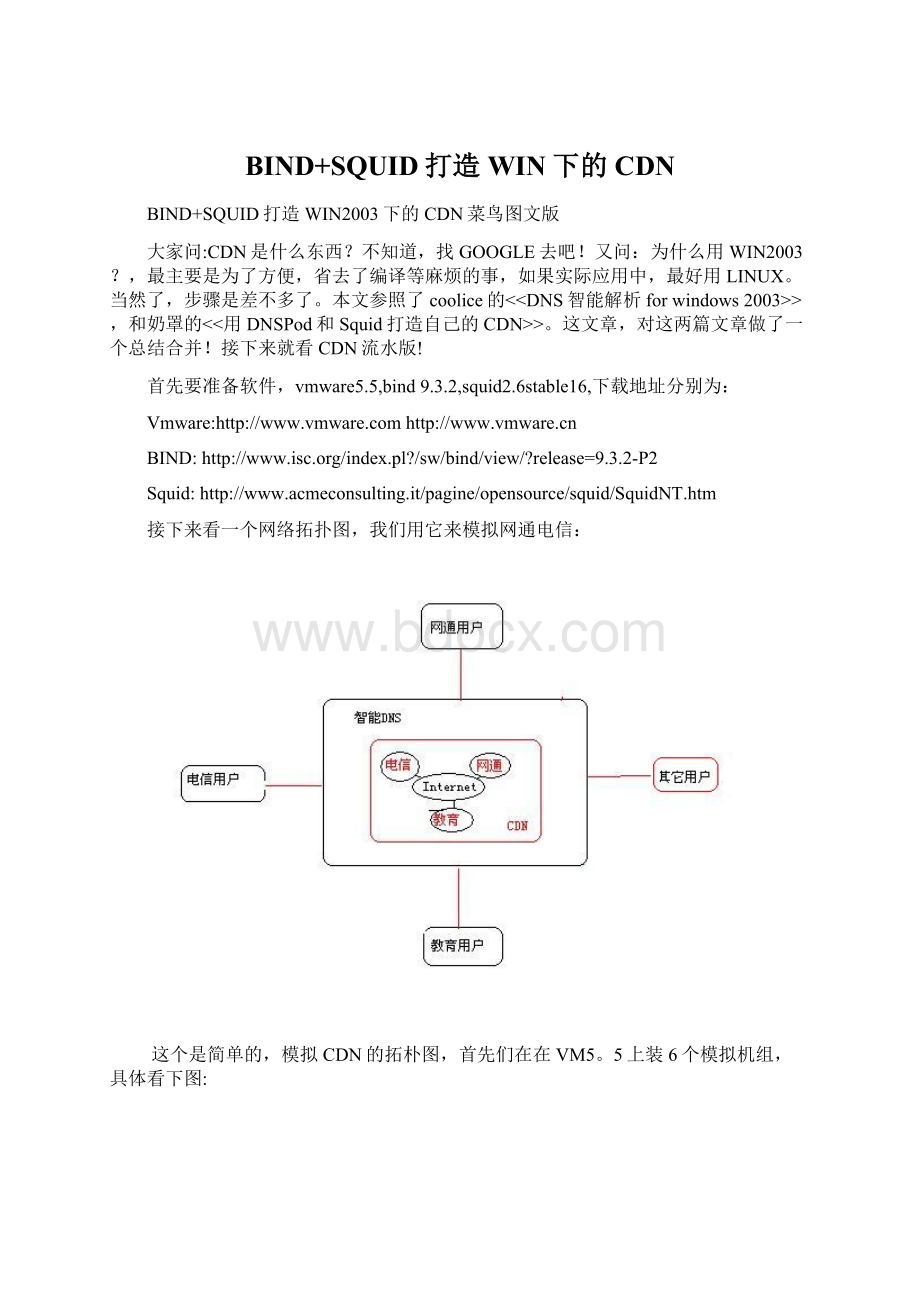
Server2
192.168.0.2
squid
Server3
172.16.0.2
Server4
10.0.0.1192.168.0.1172.16.0.2
LAN路由
Server5
192.168.0.8
测试机
Server6
192.168.0.3
DNS
首先安装server6,也就是DNS,也就是智能DNS,,下载安装包解压,用按bindinstall.exe进行安装,设置如下:
安装完后,”运行”CMD,进入c:
\windows\system32\dns\bin目录
C:
\WINDOWS\system32\dns\bin>
rndc-confgen–a
rndc-confgen>
..\etc\rndc.conf
进入etc目录,用notepad新建named.conf复制下面的内容,注意把rndc.conf中#Usewiththefollowinginnamed.conf,adjustingtheallowlistasneeded:
以后的内容复制到named.conf文件中,去掉全面的#。
==============Named.conf内容如下:
===================
acl"
trust-lan"
{127.0.0.1/8;
192.168.0.0/24;
};
options{
directory"
\WINDOWS\system32\dns\etc"
;
recursionno;
version"
0.0.0"
allow-transfer{"
allow-notify{"
};
auth-nxdomainno;
forwarders{202.106.196.115;
202.106.0.20;
#这一段内容拷贝来自rndc.conf
key"
rndc-key"
{
algorithmhmac-md5;
secret"
evrVA7eeZSMXTnnunYptCQ=="
controls{
inet127.0.0.1port953
allow{127.0.0.1;
}keys{"
#注意在C:
\WINDOWS\system32\dns\log\下建dns_warnings.txtdns_logs.txt
logging{
channelwarning
{file"
\WINDOWS\system32\dns\log\dns_warnings.txt"
versions3size1240k;
severitywarning;
print-categoryyes;
print-severityyes;
print-timeyes;
channelgeneral_dns
\WINDOWS\system32\dns\log\dns_logs.txt"
severityinfo;
categorydefault{warning;
categoryqueries{general_dns;
#将网通的地址范围数据
include"
cnc.conf"
#判断如果是网通的地址范围,则会执行此处,调用网通的解析
view"
view_cnc"
{
match-clients{CNC;
zone"
."
typehint;
file"
named.root"
0.0.127.IN-ADDR.ARPA"
typemaster;
localhost.rev"
master/cnc.def"
view_any"
match-clients{any;
master/telecom.def"
=====================named.conf======================================
=====================cnc.conf文件内空如下:
============================
#2007-11-14bybadb0y
#
CNC"
10.0.0.1/24;
========这个可以到网上找,测试,所以就加这么一段了========================
===========================named.root文件内容如下=======================
######################named.root############################
Thisfileholdstheinformationonrootnameserversneededto
initializecacheofInternetdomainnameservers
(e.g.referencethisfileinthe"
cache.<
file>
"
configurationfileofBINDdomainnameservers).
ThisfileismadeavailablebyInterNIC
underanonymousFTPas
file/domain/named.root
onserverFTP.INTERNIC.NET
-OR-RS.INTERNIC.NET
lastupdate:
Jan29,2004
relatedversionofrootzone:
2004012900
formerlyNS.INTERNIC.NET
.3600000INNSA.ROOT-SERVERS.NET.
A.ROOT-SERVERS.NET.3600000A198.41.0.4
formerlyNS1.ISI.EDU
.3600000NSB.ROOT-SERVERS.NET.
B.ROOT-SERVERS.NET.3600000A192.228.79.201
formerlyC.PSI.NET
.3600000NSC.ROOT-SERVERS.NET.
C.ROOT-SERVERS.NET.3600000A192.33.4.12
formerlyTERP.UMD.EDU
.3600000NSD.ROOT-SERVERS.NET.
D.ROOT-SERVERS.NET.3600000A128.8.10.90
formerlyNS.NASA.GOV
.3600000NSE.ROOT-SERVERS.NET.
E.ROOT-SERVERS.NET.3600000A192.203.230.10
formerlyNS.ISC.ORG
.3600000NSF.ROOT-SERVERS.NET.
F.ROOT-SERVERS.NET.3600000A192.5.5.241
formerlyNS.NIC.DDN.MIL
.3600000NSG.ROOT-SERVERS.NET.
G.ROOT-SERVERS.NET.3600000A192.112.36.4
formerlyAOS.ARL.ARMY.MIL
.3600000NSH.ROOT-SERVERS.NET.
H.ROOT-SERVERS.NET.3600000A128.63.2.53
formerlyNIC.NORDU.NET
.3600000NSI.ROOT-SERVERS.NET.
I.ROOT-SERVERS.NET.3600000A192.36.148.17
operatedbyVeriSign,Inc.
.3600000NSJ.ROOT-SERVERS.NET.
J.ROOT-SERVERS.NET.3600000A192.58.128.30
operatedbyRIPENCC
.3600000NSK.ROOT-SERVERS.NET.
K.ROOT-SERVERS.NET.3600000A193.0.14.129
operatedbyICANN
.3600000NSL.ROOT-SERVERS.NET.
L.ROOT-SERVERS.NET.3600000A198.32.64.12
operatedbyWIDE
.3600000NSM.ROOT-SERVERS.NET.
M.ROOT-SERVERS.NET.3600000A202.12.27.33
EndofFile
=================================named.root==========================
新建master文件夹并在里面新建cnc和telecom文件夹
进入masrer文件夹用notepad新建cnc.def和telecom.def
======================cnc.def========================
\WINDOWS\system32\dns\etc\master\cnc\.txt"
======================telecom.def======================
\WINDOWS\system32\dns\etc\master\telecom\.txt"
分别进入cnc和telecom文件夹建立.txt的文件,文件内空如下:
===================\cnc\.txt=====================
$TTL3600
$ORIGIN.
@INSOA..(
2006111520;
Serial
3600;
Refresh(seconds)
900;
Retry(seconds)
68400;
Expire(seconds)
15);
MinimumTTLforZone(seconds)
@INNS.
@INA10.0.0.2
wwwINA10.0.0.2
*INA10.0.0.2
end
=======================\cnc\.txt========================
====================\telecom\.txt========================
@INA192.168.0.2
@INA172.16.0.2
wwwINA192.168.0.2
wwwINA172.16.0.2有两个IP,做平衡,163就是这么做的
*INA192.168.0.2
======================\telecom\.txt==========================
设置安后,目录显示如下:
然后进入到服务,开启DNS,将登录用户改成本地系统用户,再启动:
如果有什么错误,看日志,排除错误!
到此,智能DNS就安装好了,所有的服务器都加这个DNS,我们在SERVER5上测试如下:
运行nslookup
Server:
UnKnown
Address:
192.168.0.3
Name:
Addresses:
192.168.0.2,172.16.0.2
接下来我们开如装SQUID,,首先在server2上安装!
将下载来的squid-2.6.STABLE16-bin-SSL.zip解压到C盘squid目录里面,装system32里面的文件复制到C:
\WINDOWS\SYSTEM32目录里面,再进入c:
\squid\etc目录中,将将里面的本个文件,去掉.default的后缀!
修改squid.conf文件,修改后文件内容如下:
=================squid.conf用的是奶罩的,把他改成WIN上的=============
http_port80vhostvport=80
cache_dirufsC:
\squid\var\cache25616256
cache_mem32MB
cache_store_lognone
cache_access_logC:
\squid\var\logs\access.log
cache_logC:
\squid\var\logs\cache.log
error_directoryC:
\squid\share\errors\Simplify_Chinese
hosts_fileC:
\WINDOWS\system32\drivers\etc\hosts
aclapacherep_headerServer^Apache
broken_vary_encodingallowapache
refresh_pattern^ftp:
144020%10080
refresh_pattern^gopher:
14400%1440
refresh_pattern-i240100%1440ignore-reload
refresh_pattern-i.gif18020%10080override-expireignore-reloadreload-into-ims
refresh_pattern-i.jpg18020%10080override-expireignore-reloadreload-into-ims
refresh_pattern.12050%1440
acld-domainsdstdomain
aclallsrc0.0.0.0/0.0.0.0
aclp-managerprotocache_object
acls-localhostsrc127.0.0.1/255.255.255.255
acld-localhostdst127.0.0.0/8
aclp-sslport443563
aclp-safeport80443563
aclm-connmethodCONNECT
aclm-purgemethodPURGE
acln-maxconnmaxconn15
http_accessallowp-managers-localhost
http_accessallowm-purge
http_accessallowp-manager
http_accessallowd-domains
http_accessdeny!
p-safe
http_accessdenym-conn!
p-ssl
http_accessdenyn-maxconn
http_accessdenyall
http_reply_accessallowall
aclr-urlurlpath_regexrealtime
cachedenyr-url
icp_accessallowall
visible_hostname
logfile_rotate0
always_directallowall
cache_mgrakin@
===============================squid.conf========================
想要看注解,可以去看一下奶罩的,他的上面写的非常清楚!
接下来就是修改hosts文件,把它指向到内容服务器上:
10.0.0.2
然后再运行cmd,进入到c:
\squid\sbin目录
\squid\sbin>
squid–z
再运行
squid–d1
这样一台SQUID就完成了,但是这里可能还不成,因为DNS的原因,可能会出错,所以运行不起来,错误如下:
我们做跳过DNS检测,,所以改用
squid–D
大字的d,不要搞错了,但是这个没有日志输出,可以看cache.log,说明是运行成功的,然后我们测试一下我们的SQUID!
在测试squid前,我们先对SERVER1,也就是IIS服务器进行一下设置,,建立一个首页index.htm,内容为:
server1网页测试
我们先到server5,,,,ping一下,,,可以看出,返回的是192.168.0.2这台
证明智能DNS是成功的,接下来就是测试网页是不是被缓冲,,,下一个curl来测,,可以清楚的看出!
\>
curl-Ihttp:
//192.168.0.2
HTTP/1.0403Forbidden
squid/2.6.STABLE16
Date:
Wed,14Nov200701:
56:
36GMT
Content-Type:
text/html
Content-Length:
1139
Expires:
X-Squid-Error:
ERR_ACCESS_DENIED0
X-Cache:
MISSfrom
X-Cache-Lookup:
NONEfrom:
80
Via:
1.0:
80(squid/2.6.STABLE16)
Connection:
close
curl-I
HTTP/1.0200OK
15
Content-Location:
Last-Modified:
Tue,13Nov200702:
04:
13GMT
Accept-Ranges:
bytes
ETag:
"
d6ad117d9925c81:
220"
Microsoft-IIS/6.0
Tue,13Nov200706:
42:
00GMT
HITfrom
HITfrom:
证明是可以的,再从IE里面