SpringMVC详解文档格式.docx
《SpringMVC详解文档格式.docx》由会员分享,可在线阅读,更多相关《SpringMVC详解文档格式.docx(25页珍藏版)》请在冰豆网上搜索。

org.springframework.web.servlet.DispatcherServlet<
/servlet-class>
init-param>
param-name>
contextConfigLocation<
/param-name>
param-value>
classpath:
springmvc-servlet.xml<
/param-value>
/init-param>
--<
load-on-startup>
1<
/load-on-startup>
-->
/servlet>
servlet-mapping>
url-pattern>
/<
/url-pattern>
/servlet-mapping>
3.在src下添加springmvc-servlet.xml配置文件
16
17
18
19
20
21
22
23
24
25
26
27
?
xmlversion="
1.0"
encoding="
UTF-8"
>
beansxmlns="
http:
//www.springframework.org/schema/beans"
xmlns:
xsi="
//www.w3.org/2001/XMLSchema-instance"
context="
//www.springframework.org/schema/context"
mvc="
//www.springframework.org/schema/mvc"
xsi:
schemaLocation="
//www.springframework.org/schema/beanshttp:
//www.springframework.org/schema/beans/spring-beans.xsd
//www.springframework.org/schema/contexthttp:
//www.springframework.org/schema/context/spring-context-4.1.xsd
//www.springframework.org/schema/mvchttp:
//www.springframework.org/schema/mvc/spring-mvc-4.1.xsd"
--scanthepackageandthesubpackage-->
context:
component-scanbase-package="
test.SpringMVC"
/>
--don'
thandlethestaticresource-->
mvc:
default-servlet-handler/>
--ifyouuseannotationyoumustconfigurefollowingsetting-->
annotation-driven/>
--configuretheInternalResourceViewResolver-->
beanclass="
org.springframework.web.servlet.view.InternalResourceViewResolver"
id="
internalResourceViewResolver"
--前缀-->
propertyname="
prefix"
value="
/WEB-INF/jsp/"
/>
--后缀-->
suffix"
.jsp"
/bean>
/beans>
4.在WEB-INF文件夹下创建名为jsp的文件夹,用来存放jsp视图。
创建一个hello.jsp,在body中添加“HelloWorld”。
5.建立包及Controller,如下所示
6.编写Controller代码
@Controller
@RequestMapping("
/mvc"
)
publicclassmvcController{
/hello"
publicStringhello(){
return"
hello"
;
}
7.启动服务器,键入
//localhost:
8080/项目名/mvc/hello
二、配置解析
1.Dispatcherservlet
DispatcherServlet是前置控制器,配置在web.xml文件中的。
拦截匹配的请求,Servlet拦截匹配规则要自已定义,把拦截下来的请求,依据相应的规则分发到目标Controller来处理,是配置springMVC的第一步。
2.InternalResourceViewResolver
视图名称解析器
3.以上出现的注解
@Controller
负责注册一个bean到spring上下文中
@RequestMapping注解为控制器指定可以处理哪些URL请求
三、SpringMVC常用注解
@Controller
负责注册一个bean到spring上下文中
@RequestMapping
注解为控制器指定可以处理哪些URL请求
@RequestBody
该注解用于读取Request请求的body部分数据,使用系统默认配置的HttpMessageConverter进行解析,然后把相应的数据绑定到要返回的对象上
再把HttpMessageConverter返回的对象数据绑定到controller中方法的参数上
@ResponseBody
该注解用于将Controller的方法返回的对象,通过适当的HttpMessageConverter转换为指定格式后,写入到Response对象的body数据区
@ModelAttribute
在方法定义上使用@ModelAttribute注解:
SpringMVC在调用目标处理方法前,会先逐个调用在方法级上标注了@ModelAttribute的方法
在方法的入参前使用@ModelAttribute注解:
可以从隐含对象中获取隐含的模型数据中获取对象,再将请求参数–绑定到对象中,再传入入参将方法入参对象添加到模型中
@RequestParam
在处理方法入参处使用@RequestParam可以把请求参数传递给请求方法
@PathVariable
绑定URL占位符到入参
@ExceptionHandler
注解到方法上,出现异常时会执行该方法
@ControllerAdvice
使一个Contoller成为全局的异常处理类,类中用@ExceptionHandler方法注解的方法可以处理所有Controller发生的异常
四、自动匹配参数
//matchautomatically
/person"
publicStringtoPerson(Stringname,doubleage){
System.out.println(name+"
"
+age);
五、自动装箱
1.编写一个Person实体类
packagetest.SpringMVC.model;
publicclassPerson{
publicStringgetName(){
returnname;
publicvoidsetName(Stringname){
this.name=name;
publicintgetAge(){
returnage;
publicvoidsetAge(intage){
this.age=age;
privateStringname;
privateintage;
2.在Controller里编写方法
//boxingautomatically
/person1"
publicStringtoPerson(Personp){
System.out.println(p.getName()+"
+p.getAge());
六、使用InitBinder来处理Date类型的参数
//theparameterwasconvertedininitBinder
/date"
publicStringdate(Datedate){
System.out.println(date);
//Atthetimeofinitialization,convertthetype"
String"
totype"
date"
@InitBinder
publicvoidinitBinder(ServletRequestDataBinderbinder){
binder.registerCustomEditor(Date.class,newCustomDateEditor(newSimpleDateFormat("
yyyy-MM-dd"
),
true));
七、向前台传递参数
//passtheparameterstofront-end
/show"
publicStringshowPerson(Map<
String,Object>
map){
Personp=newPerson();
map.put("
p"
p);
p.setAge(20);
p.setName("
jayjay"
);
show"
前台可在Request域中取到"
八、使用Ajax调用
//passtheparameterstofront-endusingajax
/getPerson"
publicvoidgetPerson(Stringname,PrintWriterpw){
pw.write("
hello,"
+name);
/name"
publicStringsayHello(){
name"
前台用下面的Jquery代码调用
$(function(){
$("
#btn"
).click(function(){
$.post("
mvc/getPerson"
{name:
#name"
).val()},function(data){
alert(data);
});
九、在Controller中使用redirect方式处理请求
//redirect
/redirect"
publicStringredirect(){
redirect:
十、文件上传
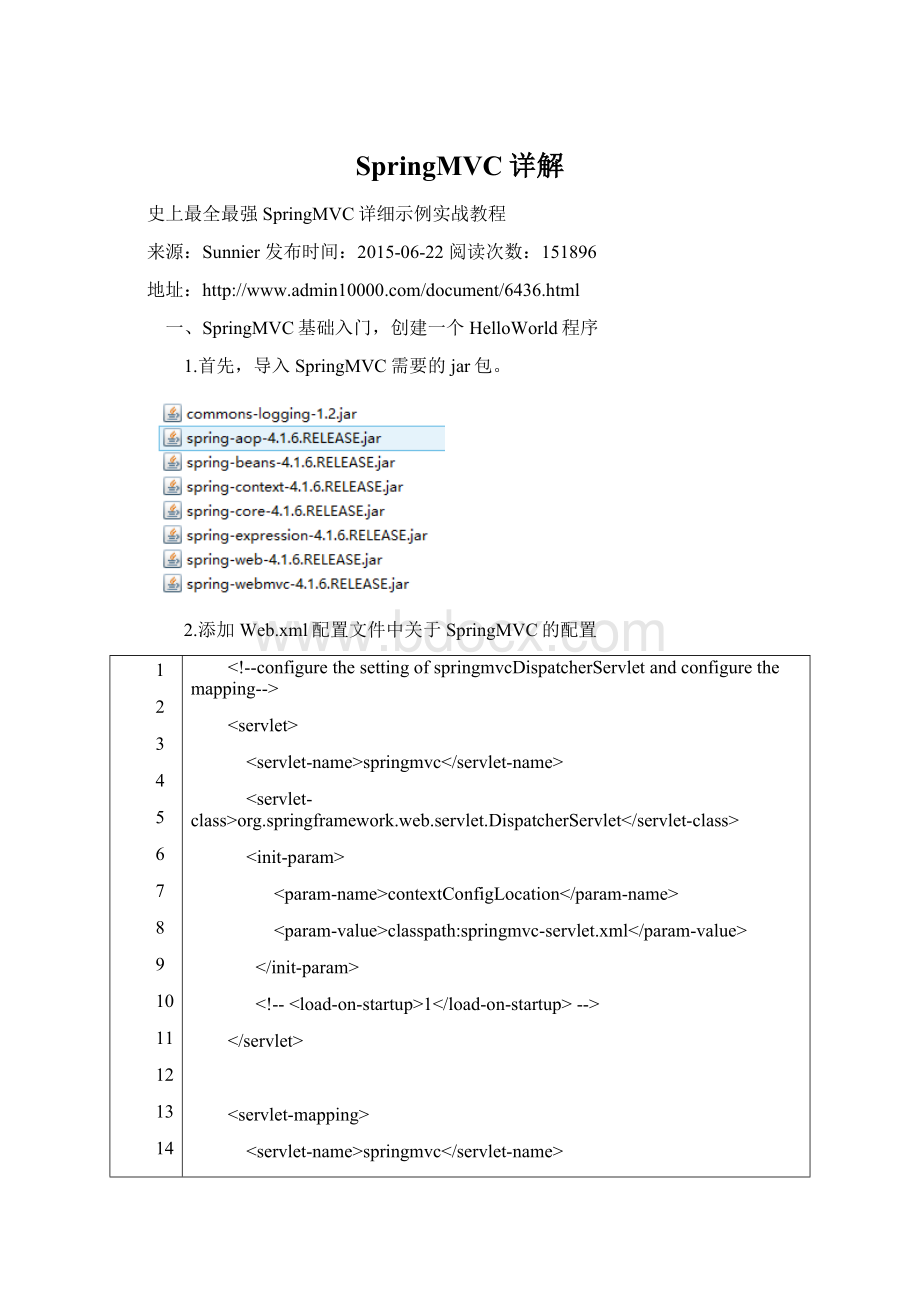
1.需要导入两个jar包
2.在SpringMVC配置文件中加入
--uploadsettings-->
beanid="
multipartResolver"
class="
mons.CommonsMultipartResolver"
maxUploadSize"
102400000"
/property>
3.方法代码
@RequestMapping(value="
/upload"
method=RequestMethod.POST)
publicStringupload(HttpServletRequestreq)throwsException{
MultipartHttpServletRequestmreq=(MultipartHttpServletRequest)req;
MultipartFilefile=mreq.getFile("
file"
StringfileName=file.getOriginalFilename();
SimpleDateFormatsdf=newSimpleDateFormat("
yyyyMMddHHmmss"
FileOutputStreamfos=newFileOutputStream(req.getSession().getServletContext().getRealPath("
/"
)+
"
upload/"
+sdf.format(newDate())+fileName.substring(fileName.lastIndexOf('
.'
)));
fos.write(file.getBytes());
fos.flush();
fos.close();
4.前台form表单
formaction="
mvc/upload"
method="
post"
enctype="
multipart/form-data"
inputtype="
name="
br>
submit"
/form>
十一、使用@RequestParam注解指定参数的name
/test"
publicclassmvcController1{
/param"
publicStringtestRequestParam(@RequestParam(value="
id"
)Integerid,
@RequestParam(value="
)Stringname){
System.out.println(id+"
}
十二、RESTFul风格的SringMVC
1.RestController
28
/rest"
publicclassRestController{
/user/{id}"
method=RequestMethod.GET)
publicStringget(@PathVariable("
)Integerid){
System.out.println("
get"
+id);
publicStringpost(@PathVariable("
method=RequestMethod.PUT)
publicStringput(@PathVariable("
put"
method=RequestMethod.DELETE)
publicStringdelete(@PathVariable("
delete"
2.form表单发送put和delete请求
在web.xml中配置
--configuretheHiddenHttpMethodFilter,convertthepostmethodtoputordelete-->
filter>
filter-name>
HiddenHttpMethodFilter<
/filter-name>
filter-class>
org.springframework.web.filter.HiddenHttpMethodFilter<
/filter-class>
/filter>
filter-mapping>
/*<
/filter-mapping>
在前台可以用以下代码产生请求
rest/user/1"
hidden"
_method"
PUT"
DELETE"
十三、返回json格式的字符串
1.导入以下jar包
2.方法代码
/json"
publicclassjsonController{
@ResponseBody
@Reque