ActionScript编程实战项目无忧数学课件.docx
《ActionScript编程实战项目无忧数学课件.docx》由会员分享,可在线阅读,更多相关《ActionScript编程实战项目无忧数学课件.docx(11页珍藏版)》请在冰豆网上搜索。
ActionScript编程实战项目无忧数学课件
ActionScript编程实战项目:
无忧数学课件
数学方法在Flash动画及脚本中有很重要的用途。
例如,执行各种解析几何的运算,以及通过方程的解集绘制各种图形。
尤其是数学中的三角函数,是绘制各种多边形、圆形所必备的方法。
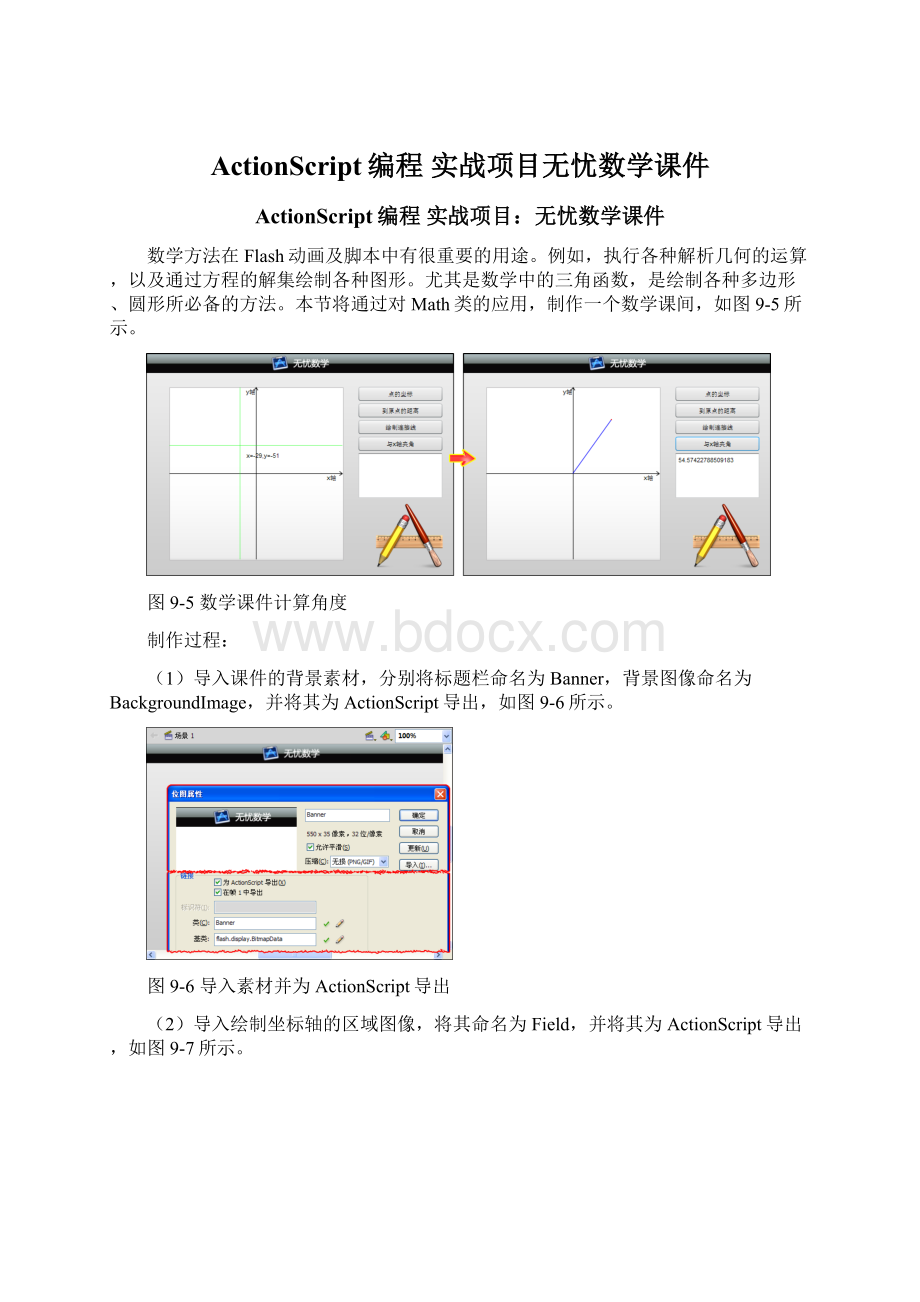
本节将通过对Math类的应用,制作一个数学课间,如图9-5所示。
图9-5数学课件计算角度
制作过程:
(1)导入课件的背景素材,分别将标题栏命名为Banner,背景图像命名为BackgroundImage,并将其为ActionScript导出,如图9-6所示。
图9-6导入素材并为ActionScript导出
(2)导入绘制坐标轴的区域图像,将其命名为Field,并将其为ActionScript导出,如图9-7所示。
图9-7导入坐标区域并为ActionScript导出
(3)保存影片,从【组件】面板中依次将Button组件、Label组件以及TextArea组件拖拽到【库】面板中,如图9-8所示。
图9-8导入组件
(4)在影片所在的目录创建classes目录,并在目录中创建ControlAxes.as文件。
在【属性】检查器中设置影片的文档类为classes.ControlAxes,然后即可在AS文件中创建包,导入外部类,如下所示。
packageclasses{
importflash.display.Sprite;
importflash.display.BitmapData;
importflash.display.Bitmap;
importflash.display.MovieClip;
importflash.geom.Point;
importflash.events.MouseEvent;
importfl.controls.Button;
importfl.controls.TextArea;
importfl.controls.Label;
importflash.utils.setInterval;
}
(5)创建名为ControlAxes的自定义类,作为影片的主类,并在主类中实例化影片使用的各种对象,如下所示。
privatevarbanner:
Bitmap=newBitmap(newBanner(550,35));
//实例化影片的标题栏
privatevarbackgroundImage:
Bitmap=newBitmap(newBackgroundImage(550,400));
//实例化影片的背景
privatevarfield:
Bitmap=newBitmap(newField(312,312));
//实例化坐标轴区域
privatevaraxesMC:
MovieClip=newMovieClip();
//实例化坐标轴所在的影片剪辑
privatevaraxesSprite:
Sprite=newSprite();
//实例化坐标轴所在的图像单元
privatevaraxesPoint:
Point=newPoint();
//实例化用户选择的坐标点
privatevardistanceLine:
Sprite=newSprite();
//实例化坐标点到坐标原点的距离
privatevarpointCircle:
Sprite=newSprite();
//实例化坐标点的红色标志
privatevaraxesBtn:
Button=newButton();
privatevardistanceBtn:
Button=newButton();
privatevardrawLineBtn:
Button=newButton();
privatevarangleBtn:
Button=newButton();
//实例化用户选择的按钮组件
privatevaroutputBox:
TextArea=newTextArea();//实例化输出信息的文本域
privatevarcurrentRotation:
Number;
privatevarxAxeLabel:
Label=newLabel();
privatevaryAxeLabel:
Label=newLabel();
privatevartipLine:
Sprite=newSprite();
//实例化参考线的图像单元
(6)自定义createUserInterface()函数,用于创建影片的标题栏、背景等图像,如下所示。
privatefunctioncreateUserInterface():
void{
with(backgroundImage){
//定义背景图像的属性
x=0;
y=0;
}
with(banner){
//定义标题栏的属性
x=0;
y=0;
}
with(stage){
addChild(backgroundImage);
addChild(banner);
//分别将两个图像添加到舞台中
}
}
(7)自定义createAxes()函数,在函数中制作坐标轴区域的影片剪辑,并绘制坐标轴,如下所示。
privatefunctioncreateAxes():
void{
with(field){
//定义坐标轴区域的背景
x=-155;
y=-155;
}
with(axesMC){
//定义坐标轴区域的影片剪辑
addChild(field);
x=196;
y=216;
addEventListener(MouseEvent.CLICK,createPoint);
addEventListener(MouseEvent.MOUSE_OVER,createToolTips);
addEventListener(MouseEvent.MOUSE_OUT,removeToolTips);
addChild(axesSprite);
addChild(distanceLine);
addChild(xAxeLabel);
addChild(yAxeLabel);
addChild(tipLine);
}
with(axesSprite.graphics){
//绘制坐标轴
lineStyle(1,0x000000,1);
moveTo(0,-155);
lineTo(0,155);
moveTo(-155,0);
lineTo(155,0);
moveTo(150,-3.5);
lineTo(155,0.5);
moveTo(150,3.5);
lineTo(155,0.5);
moveTo(-3.5,-150);
lineTo(0.5,-155);
moveTo(3.5,-150);
lineTo(0.5,-155);
}
with(xAxeLabel){
//x轴的标签文本
move(125,-1);
text="x轴";
}
with(yAxeLabel){
//y轴的标签文本
move(-20,-156);
text="y轴";
}
setInterval(toolTipsValue,100);
//调用计时函数,绘制辅助线
tipLine.visible=false;
//隐藏辅助线
stage.addChild(axesMC);
//将坐标轴区域的影片剪辑添加到舞台中
}
(8)自定义createPoint()函数,在用户单击坐标轴区域时,绘制一个半径为2px的红色圆点,标记用户单击的位置,如下所示。
privatefunctioncreatePoint(event:
MouseEvent=null):
void{
with(axesPoint){
//获取用户单击的点坐标
x=mouseX-axesMC.x;
y=mouseY-axesMC.y;
}
if(Math.abs(mouseX-axesMC.x)<=150&&Math.abs(mouseY-axesMC.y)<=150){
//判断当用户在坐标轴区域单击时
with(pointCircle.graphics){
//绘制实心圆点
clear();
beginFill(0xff0000);
drawCircle(mouseX-axesMC.x,mouseY-axesMC.y,1);
endFill();
}
axesMC.addChild(pointCircle);
//将圆点添加到坐标轴区域
}
if(axesPoint.x>=0&&axesPoint.y<0){
//判断当坐标在第4象限
currentRotation=Math.atan(-axesPoint.y/axesPoint.x)*180/Math.PI;
//求点到原点间的直线斜率
}elseif(axesPoint.x<0){
//判断当点第1、2象限
currentRotation=180+Math.atan(-axesPoint.y/axesPoint.x)*180/Math.PI;
//求点到原点间的直线斜率
}else{
//判断当点在第3象限
currentRotation=360+Math.atan(-axesPoint.y/axesPoint.x)*180/Math.PI;
//求点到原点间的直线斜率
}
}
(9)自定义createComponents()函数,创建课件所使用的各种组件,设置其属性,如下所示。
privatefunctioncreateComponents():
void{
with(axesBtn){
//定义显示点坐标的按钮属性
move(380,60);
setSize(150,25);
label="点的坐标";
addEventListener(MouseEvent.CLICK,outputText);
}
with(distanceBtn){
//定义求点到原点距离的按钮属性
move(380,90);
setSize(150,25);
label="到原点的距离";
addEventListener(MouseEvent.CLICK,outputText);
}
with(drawLineBtn){
//定义绘制点到原点连接线的按钮属性
move(380,120);
setSize(150,25);
label="绘制连接线";
addEventListener(MouseEvent.CLICK,outputText);
}
with(angleBtn){
//定义求连接线与x轴夹角的按钮属性
move(380,150);
setSize(150,25);
label="与x轴夹角";
addEventListener(MouseEvent.CLICK,outputText);
}
with(outputBox){
//定义输出结果的文本域属性
move(380,180);
 升级会员
升级会员 