huawei 0125NGFW Module配置案例.docx
《huawei 0125NGFW Module配置案例.docx》由会员分享,可在线阅读,更多相关《huawei 0125NGFW Module配置案例.docx(100页珍藏版)》请在冰豆网上搜索。
huawei0125NGFWModule配置案例
25NGFWModule配置案例
25.1NGFWModule二层双机部署,交换机集群,重定向引流
25.2NGFWModule三层双机部署,交换机集群,静态路由引流
25.3NGFWModule三层双机部署,交换机集群,策略路由引流
25.4NGFWModule三层双机部署,交换机集群,VLAN引流
25 NGFWModule配置案例
NGFWModule是交换机上的业务单板。
NGFWModule与交换机之间通过2条20GE内部以太网链路连接。
这2条内部以太网链路两端的端口,一端位于交换机上,另一端位于NGFWModule上。
需要分别在交换机侧和NGFWModule侧进行业务配置,NGFWModule才能正常工作。
与交换机配套的NGFWModule单板的最低版本如表25-1所示,交换机支持的最低版本为V200R005C00。
业务单板与交换机之间没有强制的软件版本配套关系,只需要在最低支持的版本以上。
表25-1 NGFWModule业务单板配套交换机的最低版本
业务单板
支持的最低版本
NGFWModule
V100R001C10
25.1NGFWModule二层双机部署,交换机集群,重定向引流
25.2NGFWModule三层双机部署,交换机集群,静态路由引流
25.3NGFWModule三层双机部署,交换机集群,策略路由引流
25.4NGFWModule三层双机部署,交换机集群,VLAN引流
25.1 NGFWModule二层双机部署,交换机集群,重定向引流
业务需求
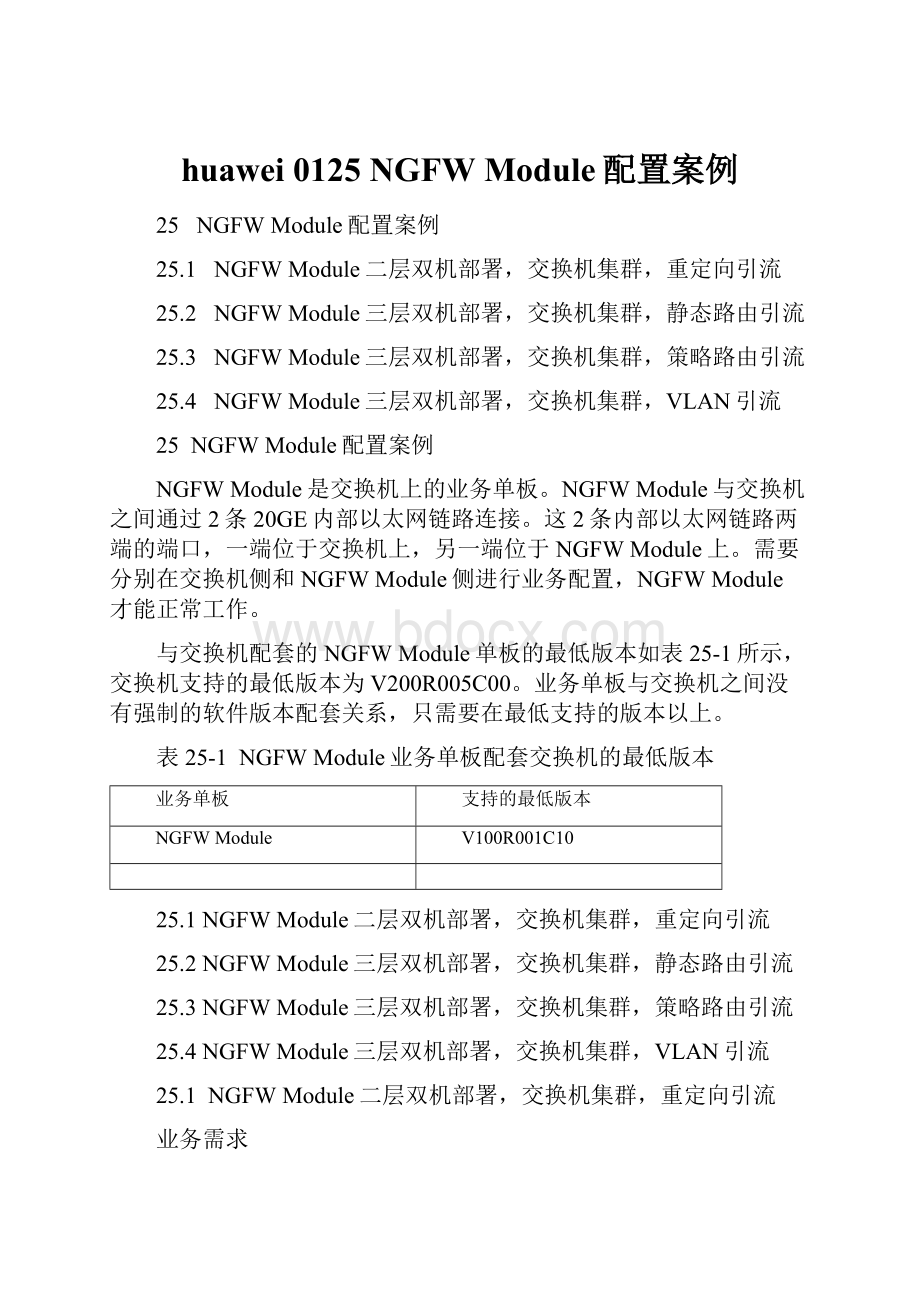
如图25-1所示,两台交换机集群组网,两块NGFWModule分别安装在两台交换机的1号槽位组成双机负载分担组网。
NGFWModule工作在二层,也就是透明接入网络。
NGFWModule对内网用户访问外网的流量进行安全检测,不同VLAN的内网流量互访不经过NGFWModule直接由交换机转发。
本案例中以NGFWModuleV100R001C30版本、交换机V200R008C00版本为例。
NGFWModule其他版本的配置案例请参见对应版本的部署指南(可以直接在搜索栏中搜索“部署指南”)。
图25-1 NGFWModule二层双机部署,交换机集群组网
说明:
在NGFWModule侧,两个内部以太网接口的编号固定为GE1/0/0~GE1/0/1。
在交换机侧,内部以太网接口的编号由NGFWModule安装的槽位号决定。
例如,当NGFWModule安装在交换机的1号槽位时,交换机侧的两个内部以太网接口编号为XGE1/1/0/0~XGE1/1/0/1。
Eth-Trunk2和Eth-Trunk3是CSS内交换机下的接口。
部署方案
总体部署方案为在交换机上将其与两块NGFWModule相连的4个接口捆绑为一个Eth-Trunk接口,然后将流量分担到两块NGFWModule上。
两块NGFWModule组成二层负载分担双机热备组网。
将两台交换机上的4个接口都加入Eth-Trunk10,分别将两块NGFWModule上的4个接口加入Eth-Trunk1。
交换机配置重定向将内网用户和外网之间的流量引导至NGFWModule,NGFWModule的Eth-Trunk1组成同进同出接口对将流量会送回交换机。
说明:
当NGFWModule工作在接口对模式时,交换机不能开启loop-detection功能。
交换机上开启了loop-detection功能后,会在接口上外发广播包。
NGFWModule配置了接口对模式,从接口收到的所有报文又从这个接口发出去。
这样就导致交换机检测到流量成环,会把接口关闭。
两块NGFWModule组成二层负载分担方式的双机热备组网,因此需要配置监控上下行接口所属VLAN。
图25-2给出了逻辑组网图,便于理解。
图25-2 NGFWModule配置双机热备
说明:
图25-2中仅给出交换机与NGFWModule有关的接口信息。
将NGFWModule面板上的GE0/0/1和GE0/0/2接口捆绑为Eth-Trunk0接口,作为心跳口和备份通道,并启用双机热备功能。
双机热备功能配置完成后,需要在NGFWModule_A上配置安全策略、IPS安全功能。
NGFWModule_A的配置会自动备份到NGFWModule_B。
操作步骤
配置NGFWModule接口,完成网络基本配置。
#在NGFWModule_A上配置设备名称。
system-view
[sysname]sysnameModule_A
#在NGFWModule_A上创建VLAN。
[Module_A]vlanbatch200301to302
[Module_A-vlan-302]quit
#在NGFWModule_A上创建二层Eth-Trunk1接口,允许上下行VLAN通过。
[Module_A]interfaceEth-Trunk1
[Module_A-Eth-Trunk1]descriptionTo_SwitchA_trunk10
[Module_A-Eth-Trunk1]portswitch
[Module_A-Eth-Trunk1]portlink-typetrunk
[Module_A-Eth-Trunk1]porttrunkpermitvlan200301to302
[Module_A-Eth-Trunk1]quit
#在NGFWModule_A上将内联物理接口加入Eth-Trunk1。
[Module_A]interfaceGigabitEthernet1/0/0
[Module_A-GigabitEthernet1/0/0]portswitch
[Module_A-GigabitEthernet1/0/0]Eth-Trunk1
[Module_A-GigabitEthernet1/0/0]quit
[Module_A]interfaceGigabitEthernet1/0/1
[Module_A-GigabitEthernet1/0/1]portswitch
[Module_A-GigabitEthernet1/0/1]Eth-Trunk1
[Module_A-GigabitEthernet1/0/1]quit
#在NGFWModule_A上创建Eth-Trunk1接口对。
[Module_A]pair-interfaceEth-Trunk1Eth-Trunk1
#在NGFWModule_A上将面板上的两个接口加入Eth-Trunk0。
[Module_A]interfaceEth-Trunk0
[Module_A-Eth-Trunk0]descriptionhrp_interface
[Module_A-Eth-Trunk0]ipaddress10.10.0.124
[Module_A-Eth-Trunk0]quit
[Module_A]interfaceGigabitEthernet0/0/1
[Module_A-GigabitEthernet0/0/1]Eth-Trunk0
[Module_A-GigabitEthernet0/0/1]quit
[Module_A]interfaceGigabitEthernet0/0/2
[Module_A-GigabitEthernet0/0/2]Eth-Trunk0
[Module_A-GigabitEthernet0/0/2]quit
#在NGFWModule_A上配置接口加入安全区域。
[Module_A]firewallzonetrust
[Module_A-zone-trust]addinterfaceEth-Trunk1
[Module_A-zone-trust]quit
[Module_A]firewallzonenamehrp
[Module_A-zone-hrp]setpriority75
[Module_A-zone-hrp]addinterfaceEth-Trunk0
[Module_A-zone-hrp]quit
#在NGFWModule_B上配置设备名称。
system-view
[sysname]sysnameModule_B
#在NGFWModule_B上创建VLAN。
[Module_B]vlanbatch200301to302
[Module_B-vlan-302]quit
#在NGFWModule_B上创建二层Eth-Trunk1接口,允许上下行VLAN通过。
[Module_B]interfaceEth-Trunk1
[Module_B-Eth-Trunk1]descriptionTo_SwitchB_trunk10
[Module_B-Eth-Trunk1]portswitch
[Module_B-Eth-Trunk1]portlink-typetrunk
[Module_B-Eth-Trunk1]porttrunkpermitvlan200301to302
[Module_B-Eth-Trunk1]quit
#在NGFWModule_B上将内联物理接口加入Eth-Trunk1。
[Module_B]interfaceGigabitEthernet1/0/0
[Module_B-GigabitEthernet1/0/0]portswitch
[Module_B-GigabitEthernet1/0/0]Eth-Trunk1
[Module_B-GigabitEthernet1/0/0]quit
[Module_B]interfaceGigabitEthernet1/0/1
[Module_B-GigabitEthernet1/0/1]portswitch
[Module_B-GigabitEthernet1/0/1]Eth-Trunk1
[Module_B-GigabitEthernet1/0/1]quit
#在NGFWModule_B上创建Eth-Trunk1接口对。
[Module_B]pair-interfaceEth-Trunk1Eth-Trunk1
#在NGFWModule_B上将面板上的两个接口加入Eth-Trunk0。
[Module_B]interfaceEth-Trunk0
[Module_B-Eth-Trunk0]descriptionhrp_interface
[Module_B-Eth-Trunk0]ipaddress10.10.0.224
[Module_B-Eth-Trunk0]quit
[Module_B]interfaceGigabitEthernet0/0/1
[Module_B-GigabitEthernet0/0/1]Eth-Trunk0
[Module_B-GigabitEthernet0/0/1]quit
[Module_B]interfaceGigabitEthernet0/0/2
[Module_B-GigabitEthernet0/0/2]Eth-Trunk0
[Module_B-GigabitEthernet0/0/2]quit
#在NGFWModule_B上配置接口加入安全区域。
[Module_B]firewallzonetrust
[Module_B-zone-trust]addinterfaceEth-Trunk1
[Module_B-zone-trust]quit
[Module_B]firewallzonenamehrp
[Module_B-zone-hrp]setpriority75
[Module_B-zone-hrp]addinterfaceEth-Trunk0
[Module_B-zone-hrp]quit
配置NGFWModule双机热备功能。
#在NGFWModule_A上启用会话快速备份功能。
[Module_A]hrpmirrorsessionenable
#在NGFWModule_A上指定心跳接口,启用双机热备。
[Module_A]hrpinterfaceEth-Trunk0
[Module_A]hrpenable
[Module_A]hrploadbalance-device//V100R001C30SPC300之前版本需要配置该命令,V100R001C30SPC300及之后版本不需要配置该命令
#在NGFWModule_B上启用会话快速备份功能。
[Module_B]hrpmirrorsessionenable
#在NGFWModule_B上指定心跳接口,启用双机热备。
[Module_B]hrpinterfaceEth-Trunk0
[Module_B]hrpenable
[Module_B]hrploadbalance-device//V100R001C30SPC300之前版本需要配置该命令,V100R001C30SPC300及之后版本不需要配置该命令
说明:
双机热备功能配置完成后,主用设备的配置和会话会自动备份到备用设备上,因此以下功能只需在NGFWModule_A上配置即可。
配置入侵防御功能前,需要保证已经加载License、入侵防御特征库已升级至最新的版本。
配置入侵防御功能时,通常使用默认存在的入侵防御配置文件default即可。
配置NGFWModule安全业务。
#在NGFWModule_A上配置安全策略,允许内网用户访问外网并进行入侵防御。
HRP_A[Module_A]security-policy
HRP_A[Module_A-policy-security]rulenamepolicy_to_wan
HRP_A[Module_A-policy-security-rule-policy_to_wan]source-address10.1.0.024
HRP_A[Module_A-policy-security-rule-policy_to_wan]source-address10.2.0.024
HRP_A[Module_A-policy-security-rule-policy_to_wan]profileipsdefault
HRP_A[Module_A-policy-security-rule-policy_to_wan]actionpermit
HRP_A[Module_A-policy-security-rule-policy_to_wan]quit
HRP_A[Module_A-policy-security]quit
说明:
本文以内网用户访问外网为例配置安全策略,如果有外网主动访问内网需求,需要再配置一条目的地址是内网地址的规则rule。
#在NGFWModule_A上配置ASPF,此处以FTP协议为例。
HRP_A[Module_A]firewallzonetrust
HRP_A[Module_A-zone-trust]detectftp
HRP_A[Module_A-zone-trust]quit
#分别在NGFWModule_A和NGFWModule_B上保存配置。
HRP_Asave
Thecurrentconfigurationswillbewrittentothedevice.
Areyousure?
[Y/N]y
Nowsavingthecurrentconfigurationtothedevice......
Info:
TheCurrentConfigurationwassavedtothedevicesuccessfully
HRP_Ssave
Thecurrentconfigurationswillbewrittentothedevice.
Areyousure?
[Y/N]y
Nowsavingthecurrentconfigurationtothedevice......
Info:
TheCurrentConfigurationwassavedtothedevicesuccessfully
配置核心层交换机组成CSS。
安装硬件,连接集群线缆,请参考“交换机集群安装指导”。
配置集群连接方式(此处以集群卡集群为例)、集群ID及集群优先级
#在SwitchA上配置集群。
集群连接方式为集群卡集群,集群ID为1,集群优先级为100。
system-view
[HUAWEI]sysnameSwitchA
[SwitchA]setcssmodecss-card//配置集群卡集群,缺省为集群卡集群
[SwitchA]setcssid1//配置集群ID,缺省值为1
[SwitchA]setcsspriority100//配置集群优先级,缺省值为1
#在SwitchB上配置集群。
集群连接方式为集群卡集群,集群ID为2,集群优先级为10。
system-view
[HUAWEI]sysnameSwitchB
[SwitchB]setcssmodecss-card
[SwitchB]setcssid2
[SwitchB]setcsspriority10
使能集群功能
#为使SwitchA成为主交换机,先使能SwitchA的集群功能并重新启动SwitchA。
[SwitchA]cssenable
Warning:
TheCSSconfigurationwilltakeeffectonlyafterthesystemisrebooted.T
henextCSSmodeisCSScard.Rebootnow?
[Y/N]:
y
#再使能SwitchB的集群功能并重新启动SwitchB。
[SwitchB]cssenable
Warning:
TheCSSconfigurationwilltakeeffectonlyafterthesystemisrebooted.T
henextCSSmodeisCSScard.Rebootnow?
[Y/N]:
y
检查集群组建是否成功
#通过任意主控板上的Console口本地登录集群,使用命令行查看集群系统的状态。
displaycssstatus
CSSEnableswitchOn
ChassisIdCSSEnableCSSStatusCSSModePriorityMasterForce
------------------------------------------------------------------------------
1OnMasterCSScard100Off
2OnStandbyCSScard10Off
以上显示信息中,能够查看到两台成员交换机的集群ID、集群优先级、集群使能状态和集群状态,此处表明集群已建立成功。
为了防止集群系统分裂导致出现多主,建议给集群系统配置多主检测,此处略。
集群系统重命名为CSS
system-view
[SwitchA]sysnameCSS
[CSS]
配置交换机接口和VLAN。
此处仅介绍了交换机和NGFWModule对接部分的配置。
创建VLAN
[CSS]vlanbatch200301to302
配置上下行接口,并将上下行接口与Eth-Trunk1单向隔离。
将物理接口加入Eth-Trunk接口的步骤略。
[CSS]interfaceeth-trunk2
[CSS-Eth-Trunk2]portlink-typetrunk
[CSS-Eth-Trunk2]undoporttrunkallow-passvlan1
[CSS-Eth-Trunk2]porttrunkallow-passvlan301
[CSS-Eth-Trunk2]amisolateEth-Trunk1
[CSS-Eth-Trunk2]quit
[CSS]interfaceeth-trunk3
[CSS-Eth-Trunk3]portlink-typetrunk
[CSS-Eth-Trunk3]undoporttrunkallow-passvlan1
[CSS-Eth-Trunk3]porttrunkallow-passvlan302
[CSS-Eth-Trunk3]amisolateEth-Trunk1
[CSS-Eth-Trunk3]quit
[CSS]interfaceeth-trunk5
[CSS-Eth-Trunk5]portlink-typeaccess
[CSS-Eth-Trunk5]portdefaultvlan200
[CSS-Eth-Trunk5]amisolateEth-Trunk1
[CSS-Eth-Trunk5]quit
配置VLANIF接口分别作为上下行网关。
[CSS]interfacevlanif301
[CSS-Vlanif301]ipaddress10.1.0.124
[CSS-Vlanif301]quit
[CSS]interfacevlanif302
[CSS-Vlanif302]ipaddress10.2.0.124
[CSS-Vlanif302]quit
[CSS]interfacevlanif200
[CSS-Vlanif200]ipaddress10.3.0.124
[CSS-Vlanif200]quit
将与NGFWModule连接的4个接口加入Eth-Trunk10。
[CSS]interfaceeth-trunk10
[CSS-Eth-Trunk10]descriptionTo_Module
[CSS-Eth-Trunk10]portlink-typetrunk
[CSS-Eth-Trunk10]trunkportxgigabitethernet1/1/0/0to1/1/0/1
[CSS-Eth-Trunk10]trunkportxgigabitethernet2/1/0/0to2/1/
 升级会员
升级会员 