eclipse下快速整合struts1+spring+hibernate.docx
《eclipse下快速整合struts1+spring+hibernate.docx》由会员分享,可在线阅读,更多相关《eclipse下快速整合struts1+spring+hibernate.docx(13页珍藏版)》请在冰豆网上搜索。
eclipse下快速整合struts1+spring+hibernate
快速整合struts+spring+hibernate
操作平台:
Eclipse3.2、MyEclipse5.1.1GA
三个框架在MyEclipse下添加顺序为:
Struts、Spring、Hibernate
首先新建一个WebProject。
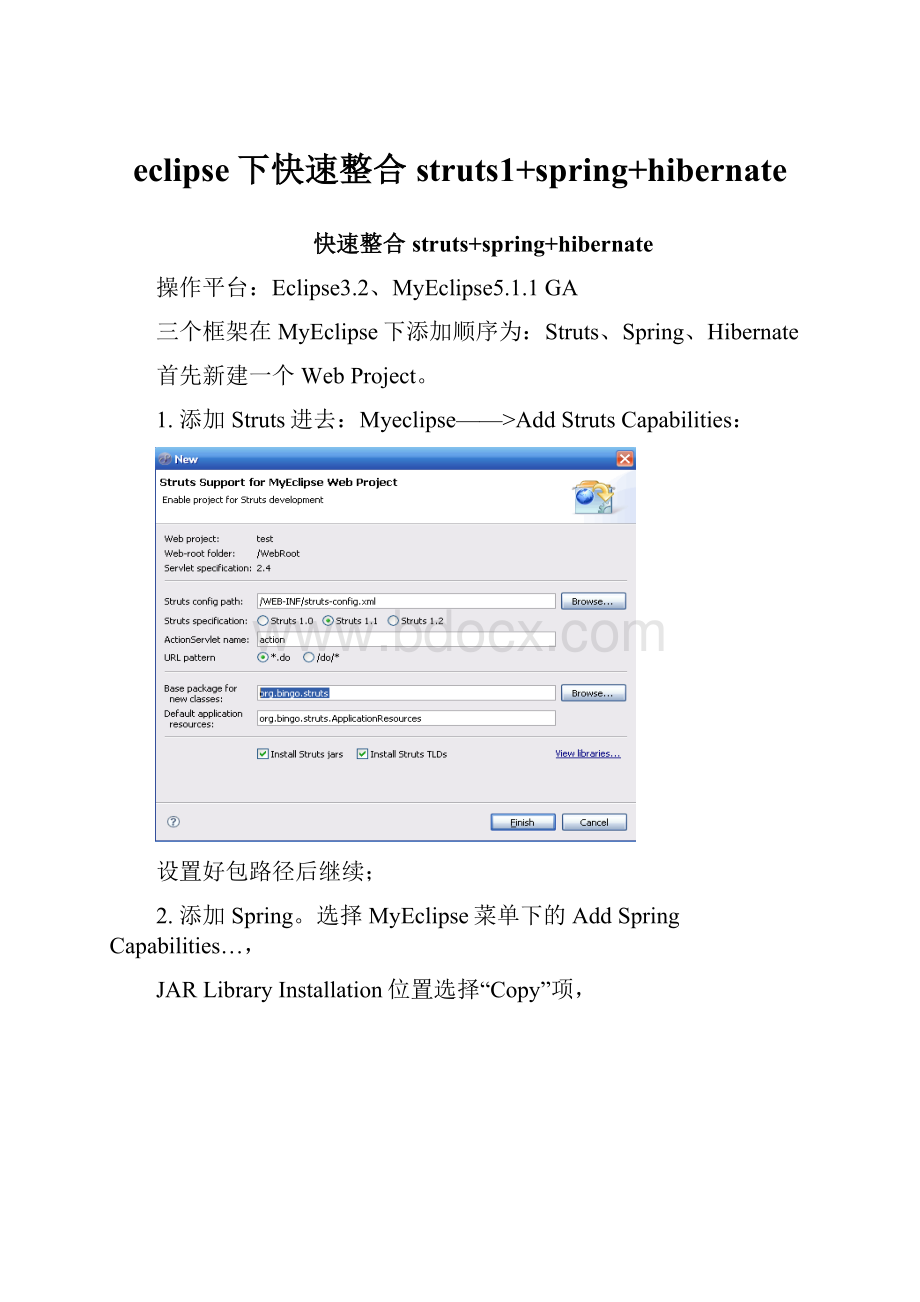
1.添加Struts进去:
Myeclipse——>AddStrutsCapabilities:
设置好包路径后继续;
2.添加Spring。
选择MyEclipse菜单下的AddSpringCapabilities…,
JARLibraryInstallation位置选择“Copy”项,
下一步,设置SpringBean配置文件位置,我们选择工程的WEB-INF目录,点击完成,就添加了Spring。
3.继续,切换到MyEclipseDatabaseExplorer(数据库浏览器视图),添加一
个数据连接。
测试连接成功后继续,这一步是为了给下面添加Hibernate框架准备的,因为它在建立过程中需要指定一个有效连接数据库的连接;
4.添加Hibernate。
选择MyEclipse菜单下的AddHibernateCapabilities…选择所有的标签库,包括Spring的。
JARLibraryInstallation位置还是选择“Copy”项,
下一步,因为之前添加了Spring框架,所以这里就会自动识别到,并询问你使用Hibernate的配置文件“hibernate.cfg.xml”还是使用Spring的配置文件“applicationContext.xml”,这里选择Spring来统一配置,下一步;
此处是定义Spring配置文件是需要新建还是使用已存在的Spring配置文件,这里选择ExistingSpringconfigurationfile,即使用已存在的Spring配置文件“WebRoot/WEB-INF/applicationContext.xml”,下方需要指定Hibernate的SessionFactory在Spring配置文件中的BeanID,使用“sessionFactory”即可,下一步;
在DBProfile的下拉列表中选择刚刚建立的连接,并在BeanID处设置这个DataSource在Spring配置文件中的BeanID名,这里使用“datasource”,下一步;
接下来的DefineSessionFactoryproperties界面是配置Hibernate的SessionFactory工具类存放位置,不用选择即可,点击Finish,就完成了对Struts、Spring、Hibernate三个框架的设置。
这里还需要配置Log4J(日志工具),只需将以下两个文件复制到SRC目录下即可
commons-loggingproperties.properties
log4j.properties
至于这两文件里的具体配置就不再多说。
5.把Spring集成到Struts。
需要在Struts-config.xml文件里添加以下字段:
"org.springframework.web.struts.ContextLoaderPlugIn">
"contextConfigLocation"value="/WEB-INF/classes/applicationContext.xml"/>
Value值就指定了Spring配置文件applicationContext.xml文件具体包位置。
6.再就是为数据表添加持久化类。
过程是在MyEclipseDataBaseExplorer中打开连接,找到所需的表后,鼠标右键点击表名,选择“HibernateReverseEngineering…”,
设置了包路径后,依次钩选“HibernateMappingFile”、“JavaDataObject”(取消钩选“Createabstractclass”)以及“JavaDataAccessObject(DAO)”,在“JavaDataAccessObject(DAO)”下会自动钩选“Generateprecisefindbymethods”,以及选择“SpringDAO”选项,使用“SpringDAO”后。
下一步,IDGenerator选择“native”:
再下一步默认即可,点击Finish即可完成。
生成的持久化类可以在选择的目录里找到。
至此,Struts,Spring,Hibernate已经在Myeclipse里整合完成了。
附:
一些简便的操作,比如在建立Jsp-form-action时,可以在struts-config.xml中的design视图下建立,如图:
添加Properties(属性):
确定Jsp:
下一步,完成即可。
同理可以添加几个forward,
最后效果如图:
 升级会员
升级会员 