利用halcon进行图像拼接的基本教程.docx
《利用halcon进行图像拼接的基本教程.docx》由会员分享,可在线阅读,更多相关《利用halcon进行图像拼接的基本教程.docx(15页珍藏版)》请在冰豆网上搜索。
利用halcon进行图像拼接的基本教程
一、什么是图像拼接(略)
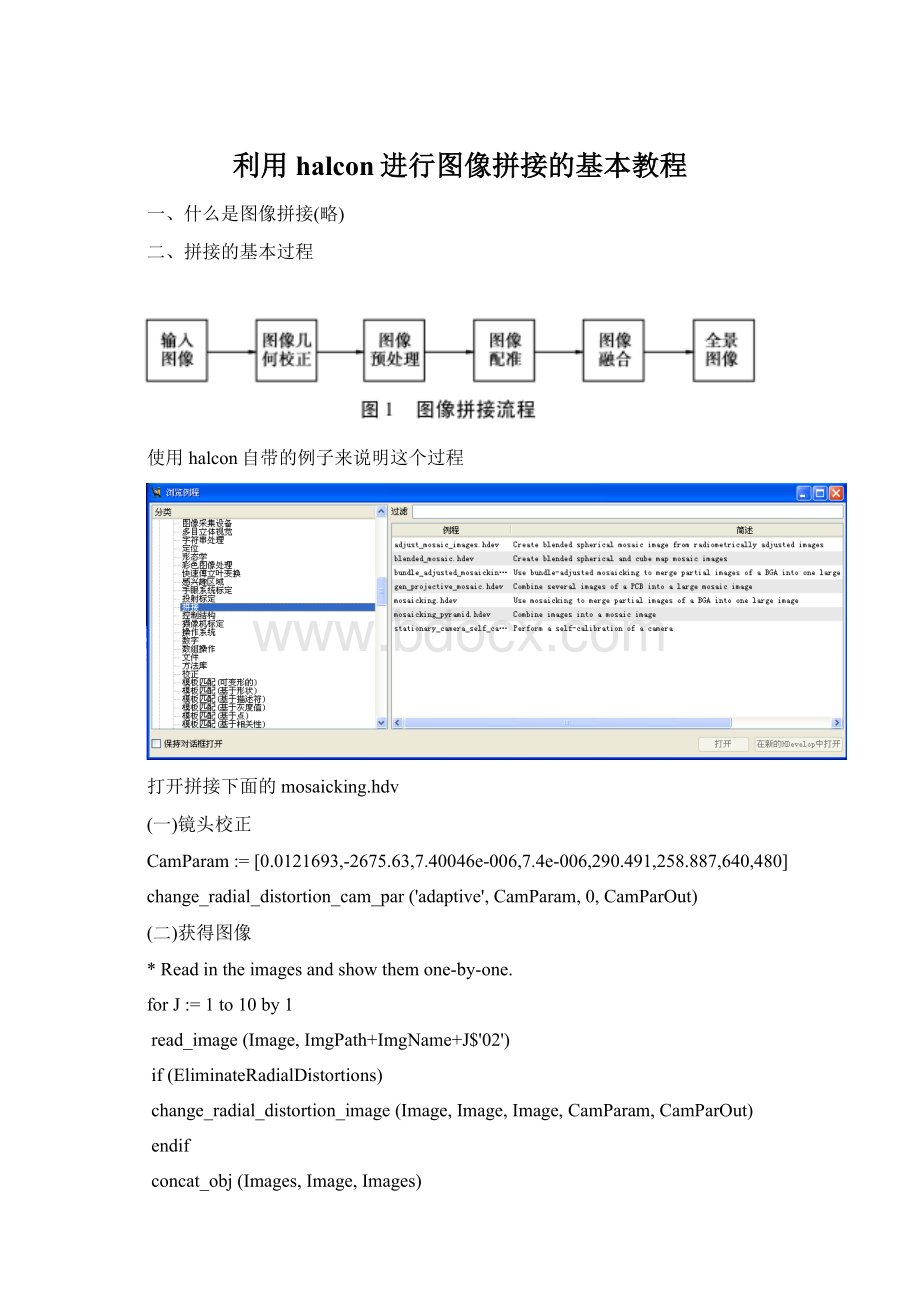
二、拼接的基本过程
使用halcon自带的例子来说明这个过程
打开拼接下面的mosaicking.hdv
(一)镜头校正
CamParam:
=[0.0121693,-2675.63,7.40046e-006,7.4e-006,290.491,258.887,640,480]
change_radial_distortion_cam_par('adaptive',CamParam,0,CamParOut)
(二)获得图像
*Readintheimagesandshowthemone-by-one.
forJ:
=1to10by1
read_image(Image,ImgPath+ImgName+J$'02')
if(EliminateRadialDistortions)
change_radial_distortion_image(Image,Image,Image,CamParam,CamParOut)
endif
concat_obj(Images,Image,Images)
dev_display(Image)
disp_message(WindowHandle1,'Image'+J$'d','window',-1,-1,'green','false')
wait_seconds(0.5)
endfor
(三)图像配准
tile_images_offset(Images,TiledImage,[0,0,0,0,0,500,500,500,500,500],[0,660,1320,1980,2640,0,660,1320,1980,2640],[-1,-1,-1,-1,-1,-1,-1,-1,-1,-1],[-1,-1,-1,-1,-1,-1,-1,-1,-1,-1],[-1,-1,-1,-1,-1,-1,-1,-1,-1,-1],[-1,-1,-1,-1,-1,-1,-1,-1,-1,-1],3280,980)
(四)图像拼接,获得全军图像
gen_projective_mosaic(Images,MosaicImage,StartImage,From,To,ProjMatrices,StackingOrder,'false',MosaicMatrices2D)
除了镜头校正以外,其他几个函数在拼接中是常见的,通过查看帮助获得了解。
使用连铸拼接来说明这个问题,首先可以查看下面的原图和拼接后的图像
(一)获得图像,可以采用帮助工具,直接产生代码
(二)镜头校正projective_trans_image
read_image(Image000003,'datacode/ecc200/ecc200_to_preprocess_001')
hom_vector_to_proj_hom_mat2d([131,225,291,63],[102,97,291,274],[1,1,1,1],[63,291,291,63],[102,102,291,291],[1,1,1,1],'normalized_dlt',HomMat2D)
projective_trans_image(Image000003,TransImage,HomMat2D,'bilinear','false','false')
(三)图像配准,这个例子是居于模板匹配的
(四)图像融和,这里采用了一种简单的融和方法。
(五)得到了结果。
可以看出,整改图像拼接两个重点,也是难点:
一个是如何通过识别的方法,得到准确的偏移;二个是如何将不同图片之间由于光照等造成的差异融和到最小。
下面首先看halcon提供了那些工具和没有提供那些工具。
三、halcon为拼接提供了那些工具
(一)模板识别工具
(二)专门的拼接算子
这里做一个比较,模板匹配的用途很广泛,用于拼接只是其中的一种用法,而拼接算子就是专门用来拼接使用的;由于模板匹配提供了工具,所以比较适于实验的使用使用,而拼接算子能够直接得到变换矩阵,应该说功能很强;对于效果来说,模板匹配需要的特征点比专门的算子多,适合纹理比较多的情况。
两者互为补充。
Halcon没有提供的工具
融和的基本算法:
《基于Halcon的图像拼接算法研究_谭杰.pdf》,采用如下加权渐变方法
:
细节自己看论文,融和的结果显示.
仔细观察图片相交处,可以看到在光度变换比较大的地方略有模糊,在光照比较好的地方拼接非常好。
拼接的结果得到了客户的好评。
细节在实验中说明,这里说明这就是融和。
四、实验
(一)基于模板的最基本拼接
将
和
拼接到一起。
注意这两张图片不是分别照的,是一张图片切割的,也正是因此,这个拼接是不需要融和的。
下面全部代码和解释
*拼接方法1,使用模板匹配
set_system('border_shape_models','false')
*获取图形
read_image(Image1,'F:
/不紧急/拼接最基本/1.jpg')
read_image(Image2,'F:
/不紧急/拼接最基本/2.jpg')
read_image(ImageBlack,'F:
/不紧急/拼接最基本/3.JPG')
*获得图片的大小
get_image_pointer1(Image1,Pointer,Type,Width,Height)
*Matching01:
buildtheROIfrombasicregions
gen_rectangle1(ModelRegion,1180.05,1207.55,1304.15,1959.45)
*Matching01:
reducethemodeltemplate
reduce_domain(Image1,ModelRegion,TemplateImage)
*Matching01:
createtheshapemodel
create_shape_model(TemplateImage,5,rad(0),rad(360),rad(0.2213),['point_reduction_high','no_pregeneration'],'use_polarity',[6,11,5],4,ModelId)
*Matching01:
storethemodelcontourfordisplayingthesearchresultslater
*重点,分别从两张图片中获得模板的坐标,做差运算就可以获得偏移
get_shape_model_contours(ModelContours,ModelId,1)
find_shape_model(TemplateImage,ModelId,rad(0),rad(360),0.5,1,0.5,'least_squares',5,0.75,Row1,Col1,Angle1,Score1)
dev_display_shape_matching_results(ModelId,'red',Row1,Col1,Angle1,1,1,0)
find_shape_model(Image2,ModelId,rad(0),rad(360),0.5,1,0.5,'least_squares',5,0.75,Row2,Col2,Angle2,Score2)
dev_display_shape_matching_results(ModelId,'green',Row2,Col2,Angle2,1,1,0)
vector_angle_to_rigid(Row1,Col1,0,Row2,Col2,0,HomMat2D)
*拼接两张图片
gen_empty_obj(Images)
concat_obj(Images,Image1,Images)
concat_obj(Images,Image2,Images)
tile_images_offset(Images,Imageresult,[0,(Row1-Row2)],[0,(Col2-Col1)],[-1,-1],[-1,-1],[-1,-1],[-1,-1],Width,Height*2)
(三)基于特征点的最基本拼接,为看懂halcon的例子做准备
需求同上。
采用的方法完全不同。
Halcon中拼接的方法目前我就掌握这两种。
*拼接方法2,使用foerstner方法
set_system('border_shape_models','false')
*获取图形
read_image(Image1,'F:
/不紧急/拼接最基本/1.jpg')
read_image(Image2,'F:
/不紧急/拼接最基本/2.jpg')
read_image(ImageBlack,'F:
/不紧急/拼接最基本/3.JPG')
get_image_pointer1(Image1,Pointer,Type,Width,Height)
gen_empty_obj(Images)
concat_obj(Images,Image1,Images)
concat_obj(Images,Image2,Images)
tile_images_offset(Images,TiledImage,[0,Height+100],[0,0],[-1,-1],[-1,-1],[-1,-1],[-1,-1],Width,Height*2+100)
stop()
ProjMatrices:
=[]
Rows1:
=[]
Cols1:
=[]
Rows2:
=[]
Cols2:
=[]
NumMatches:
=[]
*获得特征点
points_foerstner(Image1,1,2,3,200,0.3,'gauss','false',RowJunctionsF,ColJunctionsF,CoRRJunctionsF,CoRCJunctionsF,CoCCJunctionsF,RowAreaF,ColAreaF,CoRRAreaF,CoRCAreaF,CoCCAreaF)
points_foerstner(Image2,1,2,3,200,0.3,'gauss','false',RowJunctionsT,ColJunctionsT,CoRRJunctionsT,CoRCJunctionsT,CoCCJunctionsT,RowAreaT,ColAreaT,CoRRAreaT,CoRCAreaT,CoCCAreaT)
*Determinethepointmatchesandthetransformationforthecurrent
*imagepair.
*特征点拼接。
细节自己看例子
proj_match_points_ransac(Image1,Image2,RowJunctionsF,ColJunctionsF,RowJunctionsT,ColJunctionsT,'ncc',21,0,0,1332,3168,0,0.5,'gold_standard',1,4364537,ProjMatrix,Points1,Points2)
*Accumulatethetransformationmatrix.
ProjMatrices:
=[ProjMatrices,ProjMatrix]
*Accumulatethepointmatchesandnumberofpointmatches.
stop()
Rows1:
=[Rows1,subset(RowJunctionsF,Points1)]
Cols1:
=[Cols1,subset(ColJunctionsF,Points1)]
Rows2:
=[Rows2,subset(RowJunctionsT,Points2)]
Cols2:
=[Cols2,subset(ColJunctionsT,Points2)]
NumMatches:
=[NumMatches,|Points1|]
*Generatecrossesthatrepresenttheextractedpointsinthetiledimage.
*Notethatwehavetotaketherowoffsetsoftheimagesinthetiledimage
*intoaccount.
gen_cross_contour_xld(PointsF,RowJunctionsF,ColJunctionsF,6,rad(45))
gen_cross_contour_xld(PointsT,RowJunctionsT+Height+100,ColJunctionsT,6,rad(45))
*Generatearepresentationofthematchedpointpairsaslines.Wecreate
*XLDcontoursfromthelinessothatwecanzoomintothegraphicswindow
*totakeacloserlookatthematches.
RowF:
=subset(RowJunctionsF,Points1)
ColF:
=subset(ColJunctionsF,Points1)
RowT:
=subset(RowJunctionsT,Points2)+Height+100
ColT:
=subset(ColJunctionsT,Points2)
gen_empty_obj(Matches)
forK:
=0to|RowF|-1by1
gen_contour_polygon_xld(Match,[RowF[K],RowT[K]],[ColF[K],ColT[K]])
concat_obj(Matches,Match,Matches)
endfor
stop()
*Nowdisplaytheextracteddata.
dev_set_color('blue')
dev_display(Matches)
dev_set_color('green')
dev_display(PointsF)
dev_display(PointsT)
From:
=[1]
To:
=[2]
*拼接
gen_projective_mosaic(Images,MosaicImage,1,From,To,ProjMatrices,'default','false',MosaicMatrices2D)
(三)连铸拼接
原图
dev_set_draw('margin')
read_image(ImageTemplete,'519590cb6d9ea/image000004.jpg')
hom_vector_to_proj_hom_mat2d([0,1080,1080,0],[472,327,1705,1543],[1,1,1,1],[0,1080,1080,0],[472,472,1546,1546],[1,1,1,1],'normalized_dlt',HomMat2D)
get_image_pointer1(ImageTemplete,Pointer,Type,Width,Height)
*校正
*CodegeneratedbyImageAcquisition01
list_files('F:
/不紧急/连铸拼接/519590cb6d9ea',['files','follow_links','recursive'],ImageFiles)
tuple_regexp_select(ImageFiles,['\\.(tif|tiff|gif|bmp|jpg|jpeg|jp2|png|pcx|pgm|ppm|pbm|xwd|ima)$','ignore_case'],ImageFiles)
*forIndex:
=5to|ImageFiles|-2by1
*endfor
Index:
=2
*read_image(Image1,'519590cb6d9ea/image000003')
*read_image(Image2,'519590cb6d9ea/image000004')
read_image(Image1,ImageFiles[Index])
read_image(Image2,ImageFiles[Index+1])
projective_trans_image(Image1,Image11,HomMat2D,'bilinear','false','false')
projective_trans_image(Image2,Image22,HomMat2D,'bilinear','false','false')
crop_part(Image22,Image22,100,0,Width,Height)
crop_part(Image11,Image11,100,0,Width,Height)
*write_image(Image22,'jpeg',0,'F:
/不紧急/连铸/22.jpg')
*write_image(Image11,'jpeg',0,'F:
/不紧急/连铸/11.jpg')
*scale_image_max(Image22,ImageScaleMax)
*拼接
set_system('border_shape_models','false')
gen_rectangle1(ModelRegion,421.374,1309.12,521.374,1415.2)
gen_rectangle1(_TmpRegion,902.23,1041.53,977.66,1333.17)
union2(ModelRegion,_TmpRegion,ModelRegion)
*Matching02:
reducethemodeltemplate
reduce_domain(Image11,_TmpRegion,TemplateImage)
*Matching02:
createtheshapemodel
create_shape_model(TemplateImage,4,rad(0),rad(360),rad(0.7706),['point_reduction_high','no_pregeneration'],'use_polarity',[21,33,5],16,ModelId)
*Matching02:
storethemodelcontourfordisplayingthesearchresultslater
get_shape_model_contours(ModelContours,ModelId,1)
find_shape_model(Image11,ModelId,rad(0),rad(0),0.5,1,0.5,'least_squares',4,0.75,Row1,Col1,Angle1,Score1)
*dev_display(Image11)
*dev_display_shape_matching_results(ModelId,'red',Row1,Col1,Angle1,1,1,0)
find_shape_model(Image22,ModelId,rad(0),rad(0),0.1,1,0.5,'least_squares',4,0.75,Row2,Col2,Angle2,Score2)
*dev_display(Image22)
*dev_display_shape_matching_results(ModelId,'red',Row2,Col2,Angle2,1,1,0)
gen_empty_obj(Images1)
gen_empty_obj(Images2)
gen_image_const(Black,'byte',Width,Height)
concat_obj(Images1,Image11,Images1)
concat_obj(Images1,Image22,Images1)
tile_images_offset(Images1,Imageresult0,[0,(Row1-Row2)],[0,0],[-1,-1],[-1,-1],[-1,-1],[-1,-1],Width,Height*2)
*tile_images_offset(Image22,Imageresult2,[0,(Row1-Row2)],[0,0],[-1,-1],[-1,-1],[-1,-1],[-1,-1],Width,Height*2)
tile_images_offset(Image11,Imageresult1,[0],[0],[-1],[-1],[-1],[-1],Width,Height*2)
tile_images_offset(Image22,Imageresult2,[Row1-Row2],[0],[-1],[-1],[-1],[-1],Width,Height*2)
stop()
fori:
=500to1600by1
H:
=Row1
forj:
=int(Row1-Row2)toHby1
a:
=1.0*(H-j)/abs(Row1-Row2-(H))
b:
=1.0*(j-(Row1-Row2))/abs(Row1-Row2-(H))
get_grayval(Imageresult1,j,i,Grayval1)
get_grayval(Imageresult2,j,i,Grayval2)
grayval:
=Grayval1*a+Grayval2*b
grayval:
=int(grayval)
set_grayval(Imageresult0,j,i,grayval)
endfor
endfor
*median_
 升级会员
升级会员 