net推送证书脚本.docx
《net推送证书脚本.docx》由会员分享,可在线阅读,更多相关《net推送证书脚本.docx(16页珍藏版)》请在冰豆网上搜索。
net推送证书脚本
.net推送证书脚本
opensslx509-inaps_developer_identity.cer-informDER-outaps_developer_identity.pem-outformPEM
opensslpkcs12-nocerts-outPushChat_Noenc.pem-inPushChatKey.p12
opensslpkcs12-export-inaps_developer_identity.pem-inkeyPushChat_Noenc.pem-certfilePushChat.certSigningRequest-name"aps_developer_identity"-outaps_developer_identity.p12
--------------------------------------
opensslx509-inaps_production_identity.cer-informDER-outaps_production_identity.pem-outformPEM
opensslpkcs12-nocerts-outPushChat_Noenc.pem-inPushChatKey.p12
opensslpkcs12-export-inaps_production_identity.pem-inkeyPushChat_Noenc.pem-certfilePushChat.certSigningRequest-name"aps_production_identity"-outaps_production_identity.p12
推送证书for.net
Push的原理:
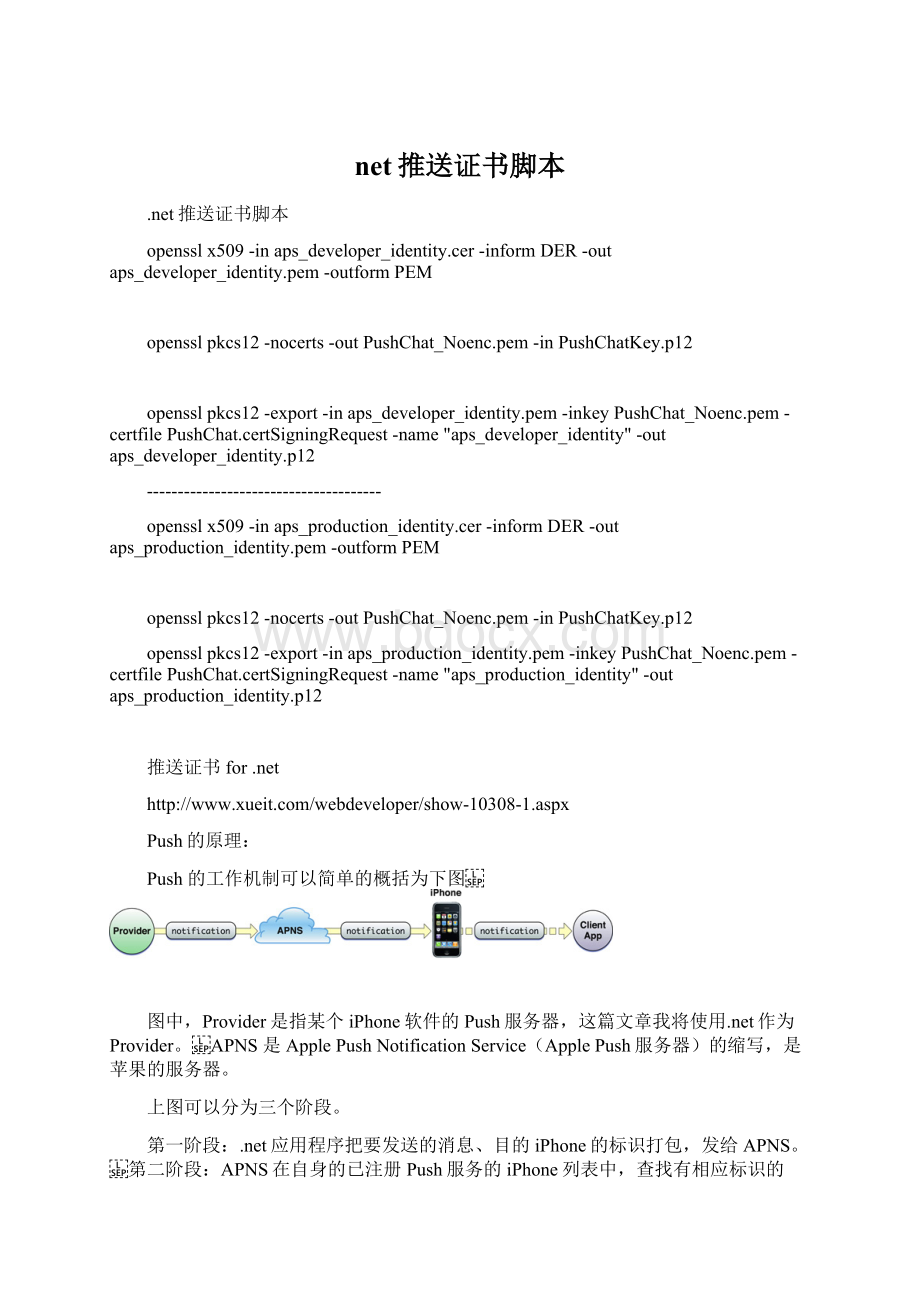
Push的工作机制可以简单的概括为下图
图中,Provider是指某个iPhone软件的Push服务器,这篇文章我将使用.net作为Provider。
APNS是ApplePushNotificationService(ApplePush服务器)的缩写,是苹果的服务器。
上图可以分为三个阶段。
第一阶段:
.net应用程序把要发送的消息、目的iPhone的标识打包,发给APNS。
第二阶段:
APNS在自身的已注册Push服务的iPhone列表中,查找有相应标识的iPhone,并把消息发到iPhone。
第三阶段:
iPhone把发来的消息传递给相应的应用程序,并且按照设定弹出Push通知。
从上图我们可以看到。
1、首先是应用程序注册消息推送。
2、IOS跟APNSServer要deviceToken。
应用程序接受deviceToken。
3、应用程序将deviceToken发送给PUSH服务端程序。
4、服务端程序向APNS服务发送消息。
5、APNS服务将消息发送给iPhone应用程序。
无论是iPhone客户端跟APNS,还是Provider和APNS都需要通过证书进行连接的。
下面我介绍一下几种用到的证书。
几种证书:
一、*.certSigningRequest文件
1、生成CertificateSigningRequest(CSR):
2、填写你的邮箱和CommonName,这里填写为PushChat。
选择保存到硬盘。
这样就在本地生成了一个PushChat.certSigningRequest文件。
二、生成*.p12文件
1、导出密钥,并输入你的密码。
输入你的密码:
这样就生成了一个PushChatKey.p12文件。
三、新建一个AppID和SSLcertificate文件
1、用你的付过费的apple帐号登录到iOSProvisioningPortal。
新建一个AppID。
Description:
中输入PushChat
BundleSeedID:
默认选择GenerateNew
BundleIdentifier:
输入com.mysoft.PushChat
点击提交
这样就会生成下面这条记录:
点击配置:
出现下面界面,点击继续:
这里我们选择前面生成好的PushChat.certSigningRequest文件,点击生成。
正在生成
生成完毕,我们把它下载下来。
命名为aps_developer_identity.cer。
点击完成,你会发现状态变成Enabled。
到现在为止,我们已经生成了3个文件。
1、PushChat.certSigningRequest
2、PushChatKey.p12
3、aps_developer_identity.cer
现在我们创建一个简单的iPhone应用程序。
1、打开Xcode,选择创建一个View-basedApplication。
命名如下图:
2、在PushChatAppDelegate中的didFinishLaunchingWithOptions方法中加入下面代码:
-(BOOL)application:
(UIApplication*)applicationdidFinishLaunchingWithOptions:
(NSDictionary*)launchOptions
{
self.window.rootViewController=self.viewController;
[self.windowmakeKeyAndVisible];
//Letthedeviceknowwewanttoreceivepushnotifications
[[UIApplicationsharedApplication]registerForRemoteNotificationTypes:
(UIRemoteNotificationTypeBadge|UIRemoteNotificationTypeSound|UIRemoteNotificationTypeAlert)];
returnYES;
}
通过registerForRemoteNotificationTypes方法,告诉应用程序,能接受push来的通知。
3、在xcode中运行,会弹出下面的提示框:
选择OK。
表示此应用程序开启消息通知服务。
在 PushChatAppDelegate.m代码中添加下面方法获取deviceToken :
-(void)application:
(UIApplication*)applicationdidRegisterForRemoteNotificationsWithDeviceToken:
(NSData*)deviceToken
{
NSLog(@"Mytokenis:
%@",deviceToken);
}
-(void)application:
(UIApplication*)applicationdidFailToRegisterForRemoteNotificationsWithError:
(NSError*)error
{
NSLog(@"Failedtogettoken,error:
%@",error);
}
获取到的deviceToken,我们可以通过webservice服务提交给.net应用程序,这里我简单处理,直接打印出来,拷贝到.net应用环境中使用。
发送通知的.net应用程序出来需要知道deviceToken之外,还需要一个与APNS连接的证书。
这个证书可以通过我们前面生成的两个文件中得到。
使用OpenSSL生成.net和APNS通信的证书文件。
1、将aps_developer_identity.cer转换成aps_developer_identity.pem格式。
opensslx509-inaps_developer_identity.cer-informDER-outaps_developer_identity.pem-outformPEM
2、将p12格式的私钥转换成pem,需要设置4次密码,这里密码都设置为:
abc123。
opensslpkcs12-nocerts-outPushChat_Noenc.pem-inPushChat.p12
3、用certificate和thekey 创建PKCS#12格式的文件。
opensslpkcs12-export-inaps_developer_identity.pem-inkeyPushChat_Noenc.pem-certfilePushChat.certSigningRequest-name"aps_developer_identity"-outaps_developer_identity.p12
这样我们就得到了在.net应用程序中使用的证书文件:
aps_developer_identity.p12。
在.net应用程序中发送通知。
有个开源的类库:
apns-sharp。
地址是:
我们下载源代码,对里面的JdSoft.Apple.Apns.Notifications做相应的调整就能用了。
我们根据DeviceToken和p12File对JdSoft.Apple.Apns.Notifications.Test代码做相应的调整,如下图。
这样就OK了。
效果:
通知的代码:
for(inti=1;i<=count;i++)
{
//Createanewnotificationtosend
NotificationalertNotification=newNotification(testDeviceToken);
alertNotification.Payload.Alert.Body=string.Format("Testing{0}...",i);
alertNotification.Payload.Sound="default";
alertNotification.Payload.Badge=i;
//Queuethenotificationtobesent
if(service.QueueNotification(alertNotification))
Console.WriteLine("NotificationQueued!
");
else
Console.WriteLine("NotificationFailedtobeQueued!
");
//Sleepinbetweeneachmessage
if(i{
Console.WriteLine("Sleeping"+sleepBetweenNotifications+"millisecondsbeforenextNotification...");
System.Threading.Thread.Sleep(sleepBetweenNotifications);
}
}
用手机拍的ipad上面的显示:
总结:
这篇文章主要是详细的讲述了ios消息推送机制的实现,如何通过.net应用程序发送消息给ios应用程序。
 升级会员
升级会员 