Linux驱动笔记基础.docx
《Linux驱动笔记基础.docx》由会员分享,可在线阅读,更多相关《Linux驱动笔记基础.docx(39页珍藏版)》请在冰豆网上搜索。
Linux驱动笔记基础
【说明】:
该系列笔记均是看韦东山视频教程的记录。
Linux驱动学习笔记
(1)
====================================================================================
当我们着手写一个驱动的时候,并不需要从0开始,而是可以在内核源码里面找到别人成熟的类似的驱动进行修改,移植。
这也是一个非常高效的过程。
首先,我们要明白自己的目标,要的是什么.
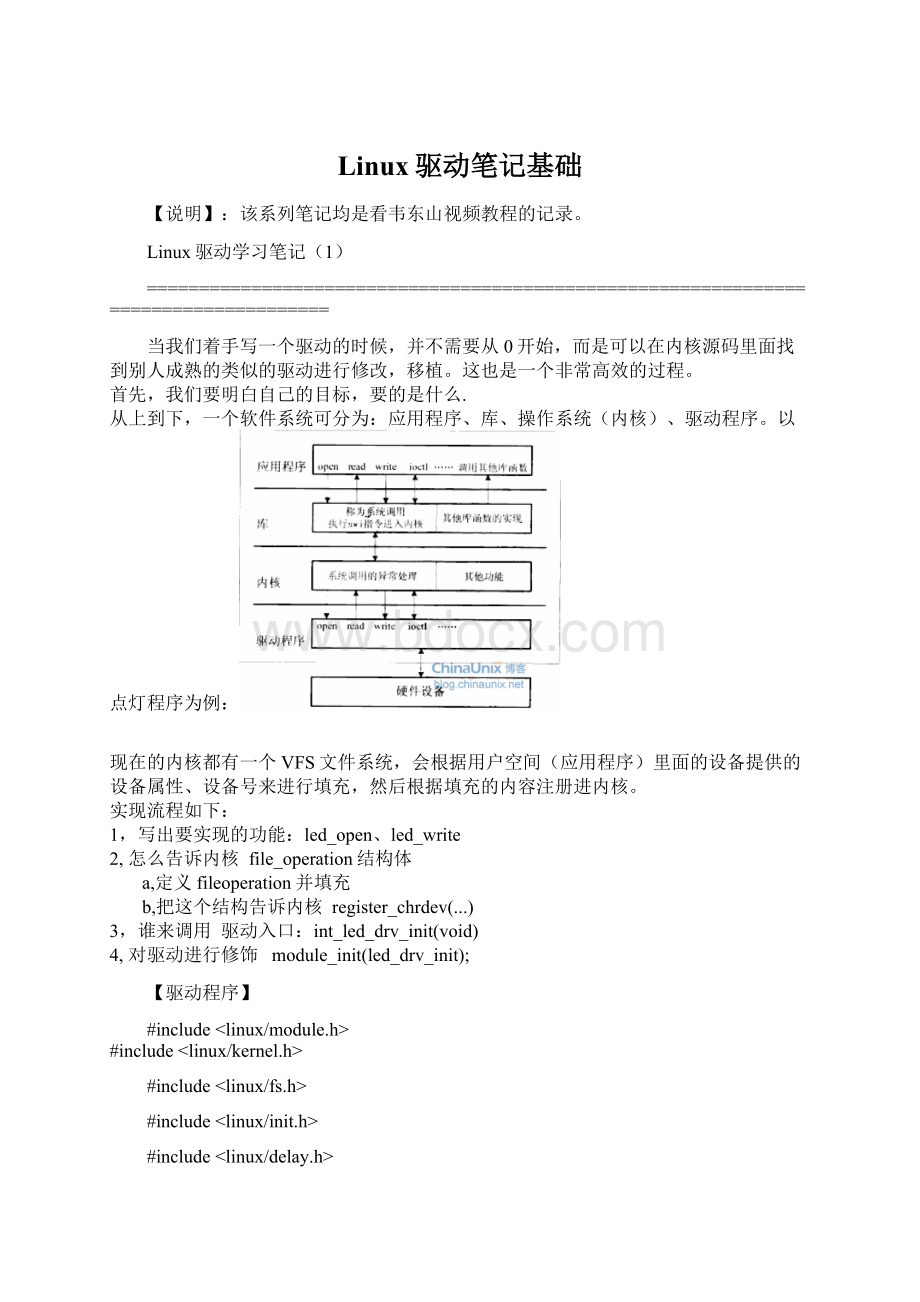
从上到下,一个软件系统可分为:
应用程序、库、操作系统(内核)、驱动程序。
以点灯程序为例:
现在的内核都有一个VFS文件系统,会根据用户空间(应用程序)里面的设备提供的设备属性、设备号来进行填充,然后根据填充的内容注册进内核。
实现流程如下:
1,写出要实现的功能:
led_open、led_write
2,怎么告诉内核file_operation结构体
a,定义fileoperation并填充
b,把这个结构告诉内核 register_chrdev(...)
3,谁来调用驱动入口:
int_led_drv_init(void)
4,对驱动进行修饰 module_init(led_drv_init);
【驱动程序】
#include
#include
#include
#include
#include
#include
#include
#include
#include
#include
staticstruct class *leddrv_class;
staticstructclass_device *leddrv_class_dev;
volatileunsignedlong *gpfcon = NULL;
volatileunsignedlong *gpfdat = NULL;
static int led_drv_open(structinode *inode, structfile *file)
{
printk("led_drv_open\n");
gpfcon &= ~((0x3<<(4*2)) | (0x3<<(5*2)) | (0x3<<(6*2)); //清零
gpfcon |= ((0x1<<(4*2)) | (0x1<<(5*2)) | (0x1<<(6*2)); //输出
return0;
}
ssize_tled_drv_write(structfile *file, char__user *buf,size_tcount, loff_t * ppos)
{
int val;
copy_from_user(&val, buf, count); //copy to user
if (val == 1)
{
//open_led
gpfdat &= ~((1<<4) | (1<<5) | (1<<6));
}
else
{
// close_led
gpfdat |= (1<<4) | (1<<5) | (1<<6);
}
printk("led_drv_write\n");
return0;
}
staticstructfile_operationsled_drv_fops =
{
.owner = THIS_MODULE,
.open = led_drv_open,
.write = led_drv_write,
};
int major;
int led_drv_init(void)
{
major = register_chrdev(0,"led_drv",&led_drv_fops); //调用register_chrdev向内核注册设备
leddrv_class = class_create(THIS_MODULE, "leddrv");
if(IS_ERR(leddrv_class))returnPTR_ERR(leddrv_class);
leddrv_class_dev = class_device_creat(leddrv_class, NULL, MKDEV(major,0),NULL,"led");
if(unlikely(IS_ERR(leddrv_class_dev)))returnPTR_ERR(leddrv_class_dev);
gpfcon = (volatileunsignedlong *)ioremap(0x56000050, 16);//将物理地址映射为虚拟地址
gpfdat = gpfcon + 1; //加1是以(volatileunsignedlong *)的长度为单位,即为4字节
return0;
}
voidled_drv_exit(void)
{
unregister_chrdev(major,"led_drv");
class_device_unregister(leddrv_class_dev);
class_destroy(leddrv_class);
iounmap(gpfcon);//释放gpfcon的虚拟地址
return0;
}
module_init(led_drv_init);
module_exit(led_drv_exit);
MODULE_LICENSE("GPL");
当然,以上代码并不是很完善,只是为了说明一些问题。
驱动程序可以自动或手动分配主设备号,上面的代码register_chrdev中major=0,说明是自动分配主设备号;设备文件也可以自动创建或手工创建(mkdev),上面的例子中通过linuxudev机制,通过classclass_device两个类实现自动创建。
当insmod模块时,就会自动在/dev下创建led设备文件(/dev/led),当卸载模块时,自动卸载dev下的led设备文件。
Open函数配置引脚,wirte函数返回引脚状态。
file_operation里面的结构有很多,根据需要找到要用到的进行填充。
还有就是驱动程序里面用到的是虚拟地址,通过ioremap/iounmap来映射/释放虚拟地址。
【测试程序】:
#include
#include
#include
#include
int main (int argc, char **argv)
{
int fd;
int val = 1;
fd = open ("/dev/led", O_RDWR);
if (fd<0)
printf("can'topen!
\n");
if (argc !
= 2)
{
printf("Usage:
\n");
printf("%s\n", argv[0]);
return0;
}
if (strcmp(argv[1], "on") == 0)
{
val = 1;
}
else
{
val = 0;
}
write(fd, &val, 4);
return0;
}
代码中通过if (argc !
= 2)来对输入的参数进行判断,如果输入的参数不等于2,则打印出正确的使用方法。
把val写入驱动程序中的val就可以控制灯的亮灭。
strcmp函数是比较两个字符串的大小, strcpy函数用于实现两个字符串的拷贝。
【Makefile】
Makefile文件:
用来编译led_drv.c
KERN_DIR=/xxx/linux-2.6.22.6//内核源码目录
all:
make-C$(KERN_DIR)M=`pwd`modules
clean:
make-C$(KERN_DIR)M=`pwd`modulesclean
rm-rfmodules.order
obj-m+=led_drv.o
第一行是存放的编译好的内核源码目录,根据自己实际情况而定。
这里要注意的是内核的源码要和驱动程序版本相同,不然可能会出现一些问题。
Linux驱动学习笔记
(2)
====================================================================================
现在来说下第二个驱动程序,先看代码以查询方式来检测按键是否被按下(读取相关引脚)。
【驱动程序】
#include
#include
#include
#include
#include
#include
#include
#include
#include
#include
staticstruct class *seconddrv_class; //添加两个类是为了自动创建设备节点(文件设备)
staticstructclass_device *seconddrv_class_dev;
volatileunsignedlong *gpfcon;
volatileunsignedlong *gpfdat;
volatileunsignedlong *gpgcon;
volatileunsignedlong *gpgdat;
static int second_drv_open(structinode *inode, structfile *file)
{
*gpfcon &= ~((0x3<<(0*2)) | (0x3<<(2*2)));/* 配置GPF0,2为输入引脚 */
*gpgcon &= ~((0x3<<(3*2)) | (0x3<<(11*2)));/* 配置GPG3,11为输入引脚 */
return0;
}
ssize_tsecond_drv_read(structfile *file, char__user *buf, size_tsize, loff_t *ppos)
{
unsignedcharkey_vals[4];/* 返回4个引脚的电平 */
int regval;
if (size !
= sizeof(key_vals))
return -EINVAL;
/* 读GPF0,2 */
regval = *gpfdat;
key_vals[0] = (regval & (1<<0)) ?
1 :
0;
key_vals[1] = (regval & (1<<2)) ?
1 :
0;
/* 读GPG3,11 */
regval = *gpgdat;
key_vals[2] = (regval & (1<<3)) ?
1 :
0;
key_vals[3] = (regval & (1<<11)) ?
1 :
0;
copy_to_user(buf, key_vals, sizeof(key_vals));
returnsizeof(key_vals);
}
staticstructfile_operationssencod_drv_fops =
{
.owner = THIS_MODULE, /* 这是一个宏,指向编译模块时自动创建的__this_module变量 */
.open = second_drv_open,
.read = second_drv_read,
};
int major;
static int second_drv_init(void)
{
major = register_chrdev(0, "second_drv", &sencod_drv_fops); //major=0,让系统分配主设备号。
seconddrv_class = class_create(THIS_MODULE, "second_drv");
seconddrv_class_dev = class_device_create(seconddrv_class, NULL, MKDEV(major, 0), NULL, "buttons"); /*/dev/buttons */
gpfcon = (volatileunsignedlong *)ioremap(0x56000050, 16);
gpfdat = gpfcon + 1;
gpgcon = (volatileunsignedlong *)ioremap(0x56000060, 16);
gpgdat = gpgcon + 1;
return0;
}
staticvoidsecond_drv_exit(void)
{
unregister_chrdev(major, "second_drv");
class_device_unregister(seconddrv_class_dev);
class_destroy(seconddrv_class);
iounmap(gpfcon);
iounmap(gpgcon);
return0;
}
module_init(second_drv_init);
module_exit(second_drv_exit);
MODULE_LICENSE("GPL");
整体编写过程也是根据需求写出框架1,file_operation结构休、open、write2,入口函数里注册,出口函数里卸载3,给sysfs提供更多的信息,本例中即udev机制自动创建设备节点;4,接下来就是硬件上的操作了,根据原理图确定相应的引脚,看芯片数据手册确定相应的寄存器,然后就可以写代码了。
入口函数将物理地址映射为虚拟地址,出口函数将映射虚拟地址释放。
【测试程序】:
#include
#include
#include
#include
/* seconddrvtest */
int main(int argc, char **argv)
{
int fd;
unsignedcharkey_vals[4];
int cnt = 0;
fd = open("/dev/buttons", O_RDWR);
if (fd < 0)
{
printf("can'topen!
\n");
}
while
(1)
{
read(fd, key_vals, sizeof(key_vals));
if (!
key_vals[0] || !
key_vals[1] || !
key_vals[2] || !
key_vals[3])
{
printf("%04dkeypressed:
%d%d%d%d\n", cnt++, key_vals[0], key_vals[1], key_vals[2], key_vals[3]);
}
}
return0;
}
其中cnt用来统计按键被按下的次数。
Makefile和上一节的基本一样,稍做修改就可以了。
在单板上运行测试程序,然后在命令行输入top会发现CPU资料占用严重,只是一个简单的程序,就占用那么多的资源,也太浪费了。
主要是原因是测试程序里面用的是一个死循环,程序一直占着CPU在那里不停地检测是否有按键被按下。
显然,这种情况是不合理的。
所以还有另一种方式,中断查询方式。
Linux驱动学习笔记(3)
====================================================================================
从之前的查表方式检测按键是否被按下的情况来看,完全霸占着CPU,不能让CPU干其他的事。
如果用中断检测的方式来检测按键则可以避免这个问题,当有按键被按下的时候,就会产生中断。
【驱动程序】
#include
#include
#include
#include
#include
#include
#include
#include
#include
#include
#include
staticstruct class *thirddrv_class;
staticstructclass_device *thirddrv_class_dev;
volatileunsignedlong *gpfcon;
volatileunsignedlong *gpfdat;
volatileunsignedlong *gpgcon;
volatileunsignedlong *gpgdat;
staticDECLARE_WAIT_QUEUE_HEAD(button_waitq);
/* 中断事件标志, 中断服务程序将它置1,third_drv_read将它清0 */
staticvolatile int ev_press = 0;
structpin_desc{
unsigned int pin;
unsigned int key_val;
};
/* 键值:
按下时, 0x01, 0x02, 0x03, 0x04 */
/* 键值:
松开时, 0x81, 0x82, 0x83, 0x84 */
staticunsignedcharkey_val;
structpin_descpins_desc[4] = {
{S3C2410_GPF0, 0x01},
{S3C2410_GPF2, 0x02},
{S3C2410_GPG3, 0x03},
{S3C2410_GPG11, 0x04},
};
/*确定按键值*/
staticirqreturn_tbuttons_irq(int irq, void *dev_id)
{
structpin_desc * pindesc = (structpin_desc *)dev_id;
unsigned int pinval;
pinval = s3c2410_gpio_getpin(pindesc->pin);
if (pinval)
{
key_val = 0x80 | pindesc->key_val;/* 松开 */
}
else
{
key_val = pindesc->key_val;/* 按下 */
}
ev_press = 1; /* 表示中断发生了 */
wake_up_interruptible(&button_waitq); /* 唤醒休眠的进程 */
returnIRQ_RETVAL(IRQ_HANDLED);
}
static int third_drv_open(structinode *inode, structfile *file)
{
/*有中断请求时,会自动将能设置为中断模式的引脚设为中断模式,所以这里不用配置引脚模式,都自动配置成了中断模式,request_irq参数可以参考Linux源代码里面的其他代码,其中IRQT_BOTHEDGE表示是双边沿触发*/
request_irq(IRQ_EINT0, buttons_irq, IRQT_BOTHEDGE, "S2", &pins_desc[0]);
request_irq(IRQ_EINT2, buttons_irq, IRQT_BOTHEDGE, "S3", &pins_desc[1]);
request_irq(IRQ_EINT11, buttons_irq, IRQT_BOTHEDGE, "S4", &pins_desc[2]);
request_irq(IRQ_EINT19, buttons_irq, IRQT_BOTHEDGE, "S5", &pins_desc[3]);
return0;
}
ssize_tthird_drv_read(structfile *file, char__user *buf, size_tsize, loff_t *ppos)
{
if (size !
= 1)//强制为1
return -EINVAL;
/* 如果没有按键动作, 休眠 */
wait_event_interruptible(button_waitq, ev_press);
/* 如果有按键动作, 返回键值 */
copy_to_user(buf, &key_val, 1);
ev_press = 0; //清零
return1;
}
int third_drv_close(structinode *inode, structfile *file)
{
free_irq(IRQ_EINT0, &pins_desc[0]); //释放中断,两个参数,中断号和引脚描述
free_irq(IRQ_EINT2, &pins_desc[1]);
free_irq(IRQ_EINT11, &pins_desc[2]);
free_irq(IRQ_EINT19, &pins_desc[3]);
return0;
}
staticstructfile_operationssencod_drv_fops =
{
.owner = THIS_MODULE, /* 这是一个宏,指向编译模块时自动创建的__this_module变量 */
.open = third_drv_open,
.read = third_drv_read,
.release = third_drv_close,
};
int major;
static int third_drv_init(void)
{
major = register_chrdev(0, "third_drv", &sencod_drv_fops); //自动分配主设备号
thirddrv_class = class_create(THIS_MODULE, "third_drv");
thirddrv_class_dev = class_device_create(thirddrv_class, NULL, MKDEV(
 升级会员
升级会员 