RCP.docx
《RCP.docx》由会员分享,可在线阅读,更多相关《RCP.docx(21页珍藏版)》请在冰豆网上搜索。
RCP
透视图Perspective的布局控制
1.在RCPproject中,Perspective.java主要负责view们的布局,一般分为left,right,top,bottom,
代码如下:
importorg.eclipse.ui.IPageLayout;
importorg.eclipse.ui.IPerspectiveFactory;
importcom.webex.myrcp.views.ConsoleView;
importcom.webex.myrcp.views.VisualEditorView;
importcom.webex.myrcp.views.PropertiesView;
importcom.webex.myrcp.views.EntityListView;
publicclassPerspectiveimplementsIPerspectiveFactory{
publicvoidcreateInitialLayout(IPageLayoutlayout){
StringeditorArea=layout.getEditorArea();
layout.addStandaloneView(EntityListView.ID,true,IPageLayout.LEFT,0.25f,editorArea);
layout.addStandaloneView(ConsoleView.ID,true,IPageLayout.BOTTOM,0.8f,editorArea);
layout.addStandaloneView(VisualEditorView.ID,true,IPageLayout.RIGHT,0.8f,editorArea);
}
}
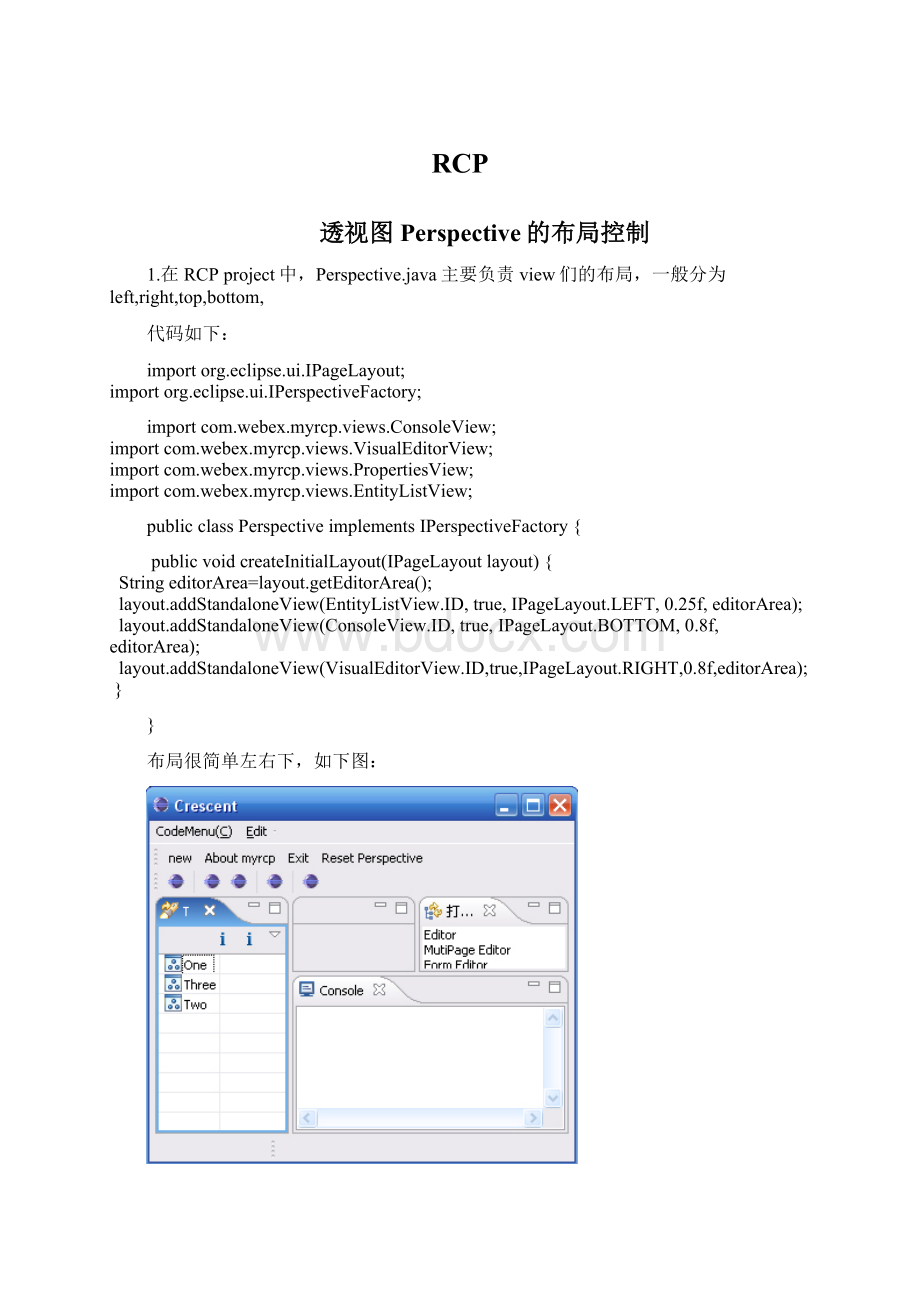
布局很简单左右下,如下图:
如果加上这一句(蓝色文字):
StringeditorArea=layout.getEditorArea();
layout.addStandaloneView(EntityListView.ID,true,IPageLayout.LEFT,0.25f,editorArea);
layout.addStandaloneView(PropertiesView.ID,true,IPageLayout.BOTTOM,0.6f,EntityListView.ID);
layout.addStandaloneView(ConsoleView.ID,true,IPageLayout.BOTTOM,0.8f,editorArea);
layout.addStandaloneView(VisualEditorView.ID,true,IPageLayout.RIGHT,0.8f,editorArea);
复杂的布局就出现了,请注意第2个view的布局是相对于第一个view的相对位置来的,请看效果:
2,如果想让两个view占据一个位置(如IPageLayout.RIGHT),在Perspective类中的createInitialLayout用如下方法:
IFolderLayoutfolder=layout.createFolder("messages",IPageLayout.RIGHT,
0.75f,IPageLayout.ID_EDITOR_AREA);
folder.addPlaceholder(View1.ID+":
*");
folder.addView(View1.ID);
folder.addPlaceholder(View2.ID+":
*");
folder.addView(View2.ID);
要使得一开始view不可见,只当用户点击触发showView的时候才显示,可以如下:
folder.addPlaceholder(View1.ID+":
*");
不要加上folder.addView(View1.ID)就可以了。
如果要使得Editor消失不可见,可以在Perspective类中的createInitialLayout加上一句,如下:
layout.setEditorAreaVisible(false);
如果要使得某个view不能关闭,可以在Perspective类中的createInitialLayout加上一句,如下:
layout.getViewLayout(View.ID).setCloseable(false);
EclipseRCP中设置视图标题栏的弧线形外观
大家肯定都喜欢界面中弧线形的标题栏,这种风格的标题栏涉及到工作台UI属性(org.eclipse.uiPreference):
SHOW_TRADITIONAL_STYLE_TABS。
可以通过三种方法进行设置:
1、 硬编码实现:
硬编码实现是指通过直接编写代码实现。
打开ApplicationWordbechAdvisor.java文件,修改initialize()方法。
Publicvoidinitialize(IWorkbenchConfigurerconfigurer){
super.initialize(configurer);
configurer.setSaveAndRestore(false);
PlatformUI.getPreferenceStroe().setValue(IWokbenchPreferenceConstants.
SHOW_TRADITIONAL_STYLE_TABS);
}
相关的属性很多,具体可以查看IWorkbenchPreferenceConstants接口文件。
这里先简单介绍几个常用属性。
1)EDITOR_MINIMUN_CHARACTERS——在很多编辑器重叠时,设置编辑器标题文字的最短长度,默认为8个字符
2)SHOW_PROGRESS_ON_STARTUP——设置启动时是否显示进度条,默认为false
3)DOCK_PERSPECTIVE_BAR——设置透视图标题栏停泊位置,默认值为TOP_RIGHT,还可以设置为TOP_LEFT、LEFT
4)SHOW_TEXT_ON_PERSPECTIVE_BAR——设置透视图是否显示标题文本,默认为true
5)SHOW_INTRO——启动时是否显示欢迎画面,默认值为true
2、 修改产品默认配置文件
可以创建一个初始化配置文件,使用默认的配置文件名plugin_customization.ini。
在项目名称上大家鼠标右键,选择New→File,在Filename后输入plugin_customization.ini,单击Finish按钮,输入以下内容:
//设置视图标题栏的弧线形外观
org.eclipse.ui/SHOW_TRADITIONAL_STYLE_TABS=false
//设置编辑器标题栏提示文字最短长度
org.eclipse.ui/EDITOR_MINIMUM_CHARACTERS=12
3、自定义配置文件
如果你不喜欢默认的配置文件,完全可以更改配置文件名,具体步骤如下:
1)双击plugin.xml文件,再单击”Extensions”页。
2)展开org.eclipse.core.runtime.products,在项目的Product上单击鼠标右键,选择New→property。
3)在ExtensionElementDetail下的name后的文本框中输入属性名perferenceCustomization(属性名不能更改),value后的文本框中输入AppPref.ini(可任意命名)。
若要查看org.eclipse.core.runtime.products有哪些可供配置的属性,则只需要单击org.eclipse.core.runtime.products名,然后再单击右边的Openextensionpointdescription,Eclipse将打开关于Products扩展点的属性描述。
注意到该属性默认的文件正是前面所说的plugin_customization.ini。
4)在项目名称上单击鼠标右键,选择New→File,在Filename后输入AppPref.ini,单击Finish按钮,输入配置内容即可。
如果做了很多设置,而运行时似乎没有生效,这是由于Eclipse缓存了旧配置信息。
解决方法:
选择系统菜单的Run→Run…,弹出Run对话框,先单击”EclipseApplication”,再单击要运行的项目,勾选”Cleanworkspacedatabeforelaunching”,不要勾选”Askforconfirmationbeforecleaning”。
这样可以保证每次运行都是最新结果。
SHOW_INTRO比较特别。
如果使用ini配置文件的方式,无论使用默认配置文件还是自定义配置文件,产品打包发布后只是首次启动时出现欢迎画面,这是因为Eclipse在运行结束时会修改工作空间目录中org.eclipse.ui.prefs文件的showIntro=false,所以下次启动时将不会出现欢迎画面。
如果希望程序每次启动都出现欢迎画面,需要采取硬编码的方式!
Perspective的定义和相关问题
在RCP中,使用Perspective来描述View的组合以及位置。
Perspective描述了一个View的初始布局,此布局定义了一个Perspective第一次被显示时,需要显示的View,以及View需要显示的位置,大小,以及View可能出现的位子。
Perspective由org.eclipse.ui.perspective扩展点所定义。
对应的实现类,应该实现了IPerspectiveFactory接口。
此接口中定义的:
publicvoidcreateInitialLayout(IPageLayoutlayout)
方法,用来在layout中定义View的显示布局。
IPageLayout提供了定义布局的方法,主要的方法有:
∙getEditorArea():
返回Editor区域所对应的ID。
一般View被安排在Editor的周围,因此通常需要得到此ID值,在定义View的位置时予以引用。
Editor区域可以通过IPageLayout的setEditorAreaVisible()方法予以显示或者关闭。
∙createFolder():
创建一个IFolderLayout。
IFolderLayout定义了一个组合框的位置,在此组合框内,可以按照TabFolder的形式显示多个View。
IFolderLayout的addView()方法可以向此组合框内添加View。
例如:
IFolderLayoutlayoutFolderLeft=layout.createFolder(
"search.perspective.folder.left",IPageLayout.LEFT, 0.35f,
editorArea);
layoutFolderLeft.addView(SCSearchView.ID);
∙另,IFolderLayout的addPlaceholder()方法,可以将一个View添加到这个组合框内弹不予显示。
当这个View需要被显示时,将自动被插到其定义为Placeholder的IFolderLayout内。
通常,我们都需要先定义IFolderLayout,然后再将View添加到IFolderLayout内,而不是直接将View添加到IPageLayout内。
对于Perspective的额外的一些属性的设置,可以在org.eclipse.ui.perspectiveExtensions中定义,具体可以设置的内容包括:
∙ActionSet:
要添加到这个Perspective 中的ActionSet。
∙ViewShortcut:
要添加到Window菜单下的ShowView子菜单中的View。
如果不添加这个扩展点的话,则在这个Perspective活动的情况下,ShowView子菜单中找不到对应的View,必须点Others之后才能够看到。
∙PerspectiveShortcut:
要添加到Window菜单下ShowPerspective子菜单中的Perspective。
∙NewWizardShortcut:
要添加到File菜单下的New子菜单下的新建向导。
此外,还可以通过这个扩展点用声明(而非编程)的方式添加View到一个Perspective中去。
通过这样的方式可以为现有的Perspective添加新的View。
在RCP中实现系统托盘功能
在RCP中实现系统托盘功能
在RCP中加入系统托盘功能,类似msn和QQ。
功能就不说了。
在RCP的WorkbenchWindowAdvisor的postWindowOpen()中创建系统托盘,另外要overridepreWindowShellClose()方法,否则按程序右上角的X,整个程序就会被关闭,重写后实现程序最小化的功能。
ApplicationWorkbenchWindowAdvisor.java
/**
* ApplicationWorkbenchWindowAdvisor.java
*/
package com.mi.pwdgate;
import org.eclipse.swt.graphics.Point;
import org.eclipse.ui.IWorkbenchPreferenceConstants;
import org.eclipse.ui.PlatformUI;
import org.eclipse.ui.application.ActionBarAdvisor;
import org.eclipse.ui.application.IActionBarConfigurer;
import org.eclipse.ui.application.IWorkbenchWindowConfigurer;
import org.eclipse.ui.application.WorkbenchWindowAdvisor;
import com.mi.pwdgate.util.SystemTrayMaster;
public class ApplicationWorkbenchWindowAdvisor extends WorkbenchWindowAdvisor {
private SystemTrayMaster trayMaster;
/*
* (non-Javadoc)
*
* @see org.eclipse.ui.application.WorkbenchWindowAdvisor#postWindowOpen()
*/
public void postWindowOpen() {
createSystemTray();
}
private void createSystemTray() {
trayMaster = new SystemTrayMaster();
trayMaster.createSystemTray();
}
/*
* (non-Javadoc)
*
* @see org.eclipse.ui.application.WorkbenchWindowAdvisor#preWindowShellClose()
*/
public boolean preWindowShellClose() {
trayMaster.minimizeWindow();
return false;
}
}
/**
* SystemTrayMaster.java
*/
package com.mi.pwdgate.util;
import org.eclipse.swt.SWT;
import org.eclipse.swt.events.SelectionAdapter;
import org.eclipse.swt.events.SelectionEvent;
import org.eclipse.swt.events.SelectionListener;
import org.eclipse.swt.graphics.Image;
import org.eclipse.swt.widgets.Display;
import org.eclipse.swt.widgets.Event;
import org.eclipse.swt.widgets.Listener;
import org.eclipse.swt.widgets.Menu;
import org.eclipse.swt.widgets.MenuItem;
import org.eclipse.swt.widgets.Shell;
import org.eclipse.swt.widgets.Tray;
import org.eclipse.swt.widgets.TrayItem;
import org.eclipse.ui.PlatformUI;
/**
* @author moneyice 2006-5-9
*/
public class SystemTrayMaster implements SelectionListener, Listener {
private final class RestoreWindowListener extends SelectionAdapter {
public void widgetSelected(SelectionEvent e) {
restoreWindow();
}
}
private Menu menu;
private MenuItem[] menuItems = newMenuItem[0];
private RestoreWindowListener restoreWindowListener;
public SystemTrayMaster() {
this.restoreWindowListener = new RestoreWindowListener();
}
// Closes the Application
protected void closeApplication() {
PlatformUI.getWorkbench().close();
}
// click the tray
public void widgetSelected(SelectionEvent e) {
}
// double click the tray
public void widgetDefaultSelected(SelectionEvent e) {
restoreWindow();
}
// Gets system shell
private Shell getShell() {
return PlatformUI.getWorkbench().getActiveWorkbenchWindow().getShell();
}
// Minimizes the Window
public void minimizeWindow() {
getShell().setMinimized(true);
getShell().setVisible(false);
}
// Restores the window
protected void restoreWindow() {
Shell shell = PlatformUI.getWorkbench().getActiveWorkbenchWindow()
.getShell();
shell.open();
shell.setMinimized(false);
shell.forceActive();
shell.forceFocus();
}
public void showMenu() {
clearItems();
MenuItem openItem;
MenuItem closeItem;
openItem = new MenuItem(this.menu, SWT.PUSH);
closeItem = new MenuItem(this.menu, SWT.NONE);
closeItem.setText("Close");
closeItem.addSelectionListener(new SelectionAdapter() {
public void widgetSelected(SelectionEvent e) {
closeApplication();
}
});
this.menuItems = new MenuItem[] { openItem, closeItem };
openItem.setText("Open Password Gate");
openItem.addSelectionListener(this.restoreWindowListener);
this.menu.setVisible(true);
}
private void clearItems() {
for (int i = 0; i < this.menuItems.length; i++) {
MenuItem item = this.menuItems[i];
item.removeSelectionListener(this.restoreWindowListener);
this.menuItems[i].dispose();
}
}
public void handleEvent(Event event) {
showMenu();
}
public void createSystemTray() {
// Gets system tray
Tray tray = Display.getDefault().getSystemTray();
// Creates tray item
TrayItem item = ne
 升级会员
升级会员 