Particle Replacement Tutorial.docx
《Particle Replacement Tutorial.docx》由会员分享,可在线阅读,更多相关《Particle Replacement Tutorial.docx(11页珍藏版)》请在冰豆网上搜索。
ParticleReplacementTutorial
EDEMTutorial:
BondedParticles
NotethistutorialusestheEDEMv1.1legacyAPI
Introduction
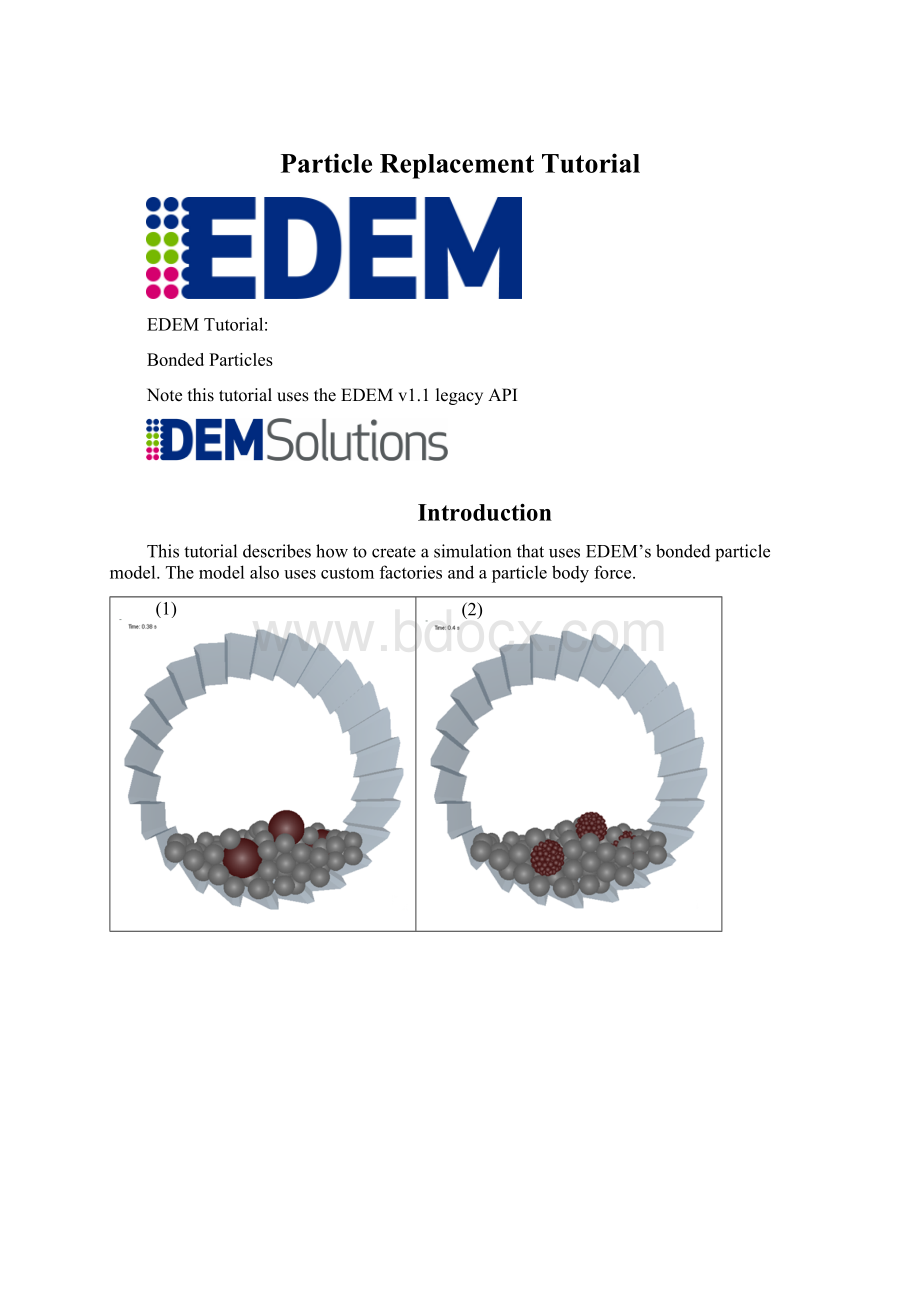
ThistutorialdescribeshowtocreateasimulationthatusesEDEM’sbondedparticlemodel.Themodelalsousescustomfactoriesandaparticlebodyforce.
(1)
(2)
(3)
(4)
(1)Solidspheresarecreatedandallowedtosettle.
(2)Thelargeparticlesarereplacedwithbondedmeta-particles.(3)Thebondedmeta-particlesaredamagedinthemill,and(4)eventuallybreakup.
1.StartEDEMthengotoFile>SaveAs…
2.Selectaworkingdirectoryonthelocalmachine(e.g.“C:
\EDEM_Tutorials”).
3.Enterafilename(e.g.“Bonded_Tutorial.dem”)andclickSave.
4.Copythefollowingtutorialfilestoyourworkingdirectory:
ParticleReplacement.dll
Particle_Replacement_prefs.txt
Particle_Cluster_Data.txt
EDEMCreator:
Settingupthemodel
Step1:
SettheGlobalModelParameters
Choosetheunits
ThefirststepincreatingthemodelistosettheunitsusedthroughoutEDEM.
1.GototheOptions>Unitsmenu.
2.Changethefollowingmeasurementunits:
▪Angularvelocitytorpm
▪Lengthtomm
Enterthemodeltitleanddescription
ThemodeltitleanddescriptionwillappearintheDataBrowserwindow.
1.ClickontheGlobalstabintheTabspane.
2.EnterthetitleGrindingmillsimulationinvolvingthebondedparticlemodelintheTitlefieldintheSimulationsection.
Editthefilelocations
SettheEDEMfilelocationstoreadthecustomlibrariesyoucopiedtoyourworkingdirectory:
1.BrowsetoOptions>FileLocations.
2.SetthedirectoryforParticleBodyForceandFactoriestoyourworkingdirectory.
Setthegravityanddefinethematerials
1.Besuregravityissetto-9.81m/s2intheZdirection.
2.IntheMaterialssection,clicktheTransferbuttontoopentheMaterial/InteractionsTransferdialog.
3.TransferHigh-stiffnessfromthematerialsdatabasetoyoursimulation.
4.ClickOKthenrenamethematerialassteel.
5.Clickthe+buttonatthetopoftheMaterialssection.Thiscreatesanewmaterial.
6.Highlightthematerialandchangeitsnametoparticle.
7.SetthePoisson'sratio,Shearmodulus,anddensityasshownbelow:
Definetheinteractionsbetweenthematerials
1.Selectparticlefromthedrop-downlistatthetopofthematerialssection.
2.Clickthe+buttonintheInteractionsection.Selectparticlewhenprompted.
3.Setthecoefficientsasfollows:
4.Addaninteractionforsteelwithcoefficientsasfollows:
Step2:
DefinetheParticles
Createfirstparticletype
1.ClickontheParticletabintheTabspane.
2.Clickthe+buttonandtypeaname10mm_spheresintheNamefield.
3.Settheradiusofthesurfaceto10mm.
1.Setthematerialtoparticle.
2.ClicktheCalculatePropertiesbuttonandpicktheSurfacesoption.
Createsecondparticletype
1.Clickthenewparticle+buttonagainandtypeanameFraction.
2.Settheradiusofthesurfaceto3mm.
3.Setthecontactradiusto4mm.
3.Setthematerialtoparticle.
4.ClicktheCalculatePropertiesbuttonandpicktheSurfacesoption.
Createthirdparticletype
1.Clickthenewparticle+buttonagainandtypeanameWhole.
2.Settheradiusofthesurfaceto20mm.
5.Setthematerialtoparticle.
6.ClicktheCalculatePropertiesbuttonandpicktheSurfacesoption.
Step3:
Setthephysicsmodels
1.SelectParticletoParticlefromtheInteractionpulldowninthePhysicssection.
2.SelectHertz-Mindlin(noslip)thenclickthexbuttontoremoveit.
3.Clickthe+buttonthenselecttheHertz-MindlinwithBondingbuilt-inmodel:
4.Clicktheconfigurebutton
todefinethebond.
5.AddaFraction+Fractionactivebondthensettheparametersasfollows:
6.SelectParticletoGeometryfromtheInteractionpulldown.
7.SelectHertz-Mindlin(noslip)thenclickthexbuttontoremoveit.
8.Clickthe+buttonthenselecttheHertz-MindlinwithBondingbuilt-inmodel.
ParticlesdonotbecomebondedtothegeometrywhenusingtheHertz-MindlinwithBondingmodel:
addingaparticle-geometryinteractionensuresthedifferencebetweenphysicalandcontactradiusistakenintoaccount.
9.SelectParticleBodyForcefromtheinteractionpulldownthenchooseParticleReplacement:
Step4:
DefinetheDomainandGeometry
Importthemillgeometry
ThemillgeometryhasbeencreatedinaCADpackagereadyforimport.
1.ClickontheGeometrytabintheTabspane.
2.ClicktheImportbuttonintheSectionssection.
3.Navigatetothefilegrinding_mill.stpandimportit.
4.WhentheGeometryImportParametersdialogappearsleaveallthesettingsatthedefaultvaluesandclickOK.
5.Whenprompted,settheunitsofmeasurementtoMilimetres(mm).
6.Renamethegeometrytomillandsetthematerialtosteel.
Configurethedynamics
1.SelectthemillthenclicktheDynamicstab.
2.Createanewlinearrotationdynamicasfollows:
Createtheparticlefactorygeometry
1.ClicktheGeometrytab.
2.Clickthe+buttontocreateanewcylindercalledfactory.
3.Clickonthepolygontabandsetthespecificationasfollows:
4.ClickontheDetailstabandsetthetypetovirtual.
Createtheoutercylinder
1.ClicktheGeometrytab.
2.Clickthe+buttontocreateanewcylindercalledouter_walls.
3.Clickonthecylindertabandsetthespecificationasfollows:
4.ClickontheDetailstabandsetthetypetophysicalandmaterialtosteel.
Step5:
CreatetheParticleFactories
Createtwoparticlefactories–oneforeachtypeofparticle.
Createthefirstparticlefactory
1.ClickontheFactoriestab.
2.Clickthe+buttontocreateNewFactory1.
3.Setfactorytypetostatic.
4.SelectCreate3particles.
Setthefactory’sinitialconditions
1.BesureNewFactory1isselectedintheSectionpulldown.
2.SettheTypetofixedandselectWhole.
3.SettheZvelocityto-1.0m/s.
Createthesecondparticlefactory
1.Clickthe+buttonagaintocreateNewFactory2.
2.Setfactorytypetostatic.
3.SelectCreate100particles.
Setthefactory’sinitialconditions
1.BesureNewFactory2isselectedintheSectionpulldown.
2.SettheTypetofixedandselect10mm_spheres.
3.SettheZvelocityto-1.0m/s.
Addthecustomfactory
SelectTransfer…andchooseParticleReplacement.(orParticleReplacementx64)
Thecustomfactoryhasalreadybeenwrittenandcompiled.TheParticleBodyForcepartofthefactoryremovesallparticlescalledWholeatasetpointintimeandreplacesthemwithameta-particlemadefromanumberparticlesoftypeFraction.
Singlesphereparticlereplacedwithamultispheremeta-particle
SettingsforthefactoryaredefinedinthefileParticle_Replacement_prefs.txt.
Thepositionsoftheindividualsphereswithinthemeta-particlearecontrolledbythefileParticle_Cluster_Data.txt.
EDEMSimulator:
RuntheSimulation
Step1:
SettheTimeOptions
Setthetimestep
1.ClickontheSimulatorbutton:
2.Setthefixedtimestepto20%.(~2.0e-05)
Setthesimulationtimeandgridoptions
Thesimulationtimeistheamountofrealtimeyoursimulationrepresents.
1.Setthetotalsimulationtimeto5s.
2.SettheTargetSaveIntervalto0.005s.
3.Setthegridsizeto6Rmin.
Step2:
RuntheSimulation
1.ClicktheStartprogressbuttonatthebottomofthesimulationwindow.
2.ClicktheRefreshViewerbuttonatanypointtoupdatetheViewerandseehowthesimulationisprogressing.
EDEMAnalyst:
AnalyzingYourResults
Step1:
ConfiguringtheDisplay
Configurethegeometry
1.SwitchtotheAnalystandclicktheModeltab.
2.ReducetheopacityoftheMillto0.8thenclickApply.
3.SelectFactory,de-selectdisplay,thenclickApply.
4.Selectouter_walls,de-selectdisplay,thenclickApply.
Step2:
ColoringElements
1.ClicktheColoringtab.
2.SelectauniquecolorfortheparticletypesWhole,Fractionand10mm_sphere.
3.ClickthePlaybuttontowatchtheparticlebreak-upinprogress.
Step3:
GraphingBonds
1.SwitchtothegraphingtoolthenclicktheLineGraphtab.
2.LeavetheXaxisastimeandsettheremainingoptionsasfollows:
3.ClickCreateGraphtocreatethegraph:
 升级会员
升级会员 