python经典实例.docx
《python经典实例.docx》由会员分享,可在线阅读,更多相关《python经典实例.docx(13页珍藏版)》请在冰豆网上搜索。

python经典实例
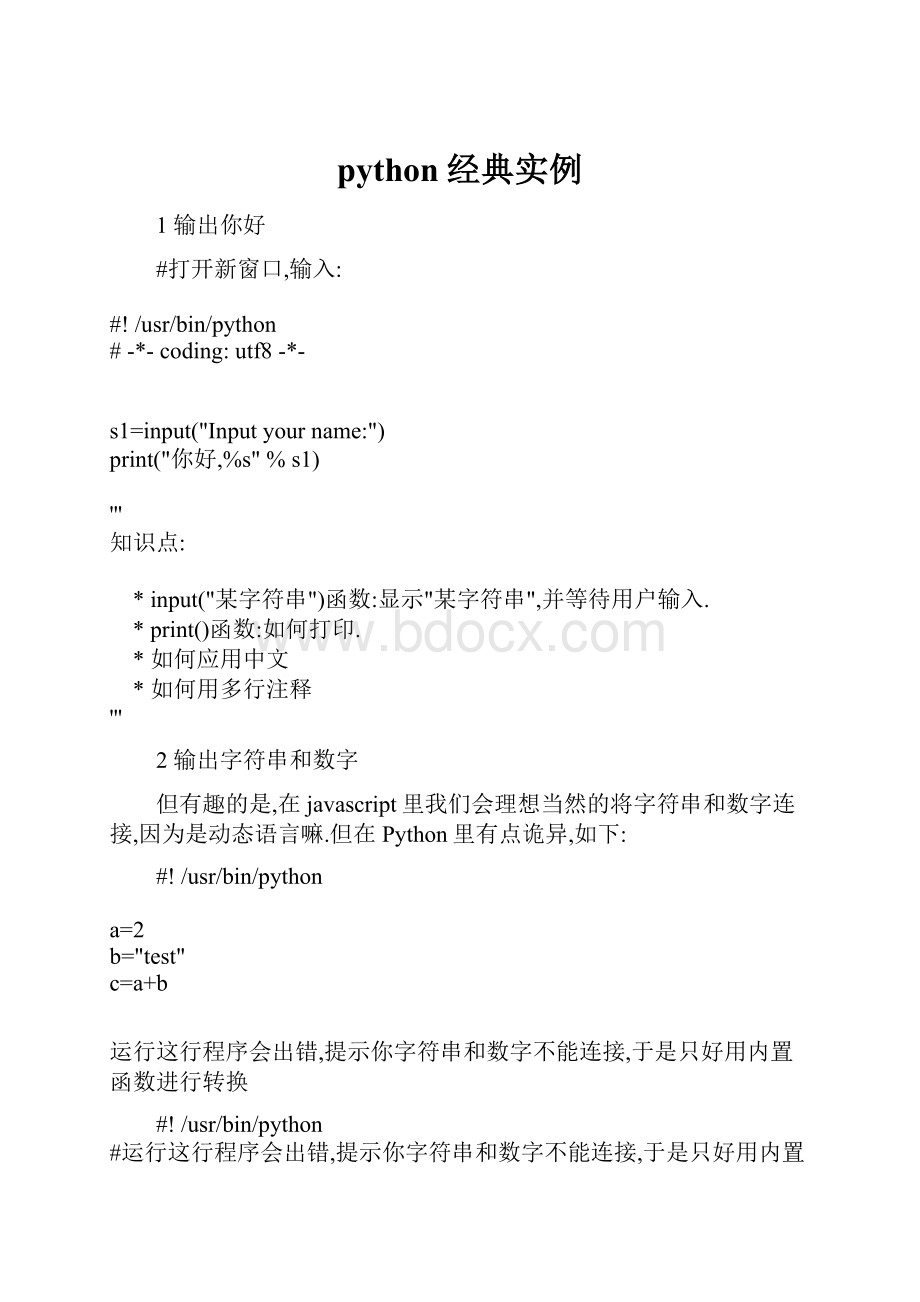
1输出你好
#打开新窗口,输入:
#!
/usr/bin/python
# -*- coding:
utf8 -*-
s1=input("Input your name:
")
print("你好,%s" % s1)
'''
知识点:
* input("某字符串")函数:
显示"某字符串",并等待用户输入.
* print()函数:
如何打印.
* 如何应用中文
* 如何用多行注释
'''
2输出字符串和数字
但有趣的是,在javascript里我们会理想当然的将字符串和数字连接,因为是动态语言嘛.但在Python里有点诡异,如下:
#!
/usr/bin/python
a=2
b="test"
c=a+b
运行这行程序会出错,提示你字符串和数字不能连接,于是只好用内置函数进行转换
#!
/usr/bin/python
#运行这行程序会出错,提示你字符串和数字不能连接,于是只好用内置函数进行转换
a=2
b="test"
c=str(a)+b
d="1111"
e=a+int(d)
#How to print multiply values
print ("c is %s,e is %i" % (c,e))
'''
知识点:
* 用int和str函数将字符串和数字进行转换
* 打印以#开头,而不是习惯的//
* 打印多个参数的方式
'''
3列表
#!
/usr/bin/python
# -*- coding:
utf8 -*-
#列表类似Javascript的数组,方便易用
#定义元组
word=['a','b','c','d','e','f','g']
#如何通过索引访问元组里的元素
a=word[2]
print ("a is:
"+a)
b=word[1:
3]
print ("b is:
")
print (b) # index 1 and 2 elements of word.
c=word[:
2]
print ("c is:
")
print (c) # index 0 and 1 elements of word.
d=word[0:
]
print ("d is:
")
print (d) # All elements of word.
#元组可以合并
e=word[:
2]+word[2:
]
print ("e is:
")
print (e) # All elements of word.
f=word[-1]
print ("f is:
")
print (f) # The last elements of word.
g=word[-4:
-2]
print ("g is:
")
print (g) # index 3 and 4 elements of word.
h=word[-2:
]
print ("h is:
")
print (h) # The last two elements.
i=word[:
-2]
print ("i is:
")
print (i) # Everything except the last two characters
l=len(word)
print ("Length of word is:
"+ str(l))
print ("Adds new element")
word.append('h')
print (word)
#删除元素
del word[0]
print (word)
del word[1:
3]
print (word)
'''
知识点:
* 列表长度是动态的,可任意添加删除元素.
* 用索引可以很方便访问元素,甚至返回一个子列表
* 更多方法请参考Python的文档
'''
4字典
#!
/usr/bin/python
x={'a':
'aaa','b':
'bbb','c':
12}
print (x['a'])
print (x['b'])
print (x['c'])
for key in x:
print ("Key is %s and value is %s" % (key,x[key]))
'''
知识点:
* 将他当Java的Map来用即可.
'''
5字符串
比起C/C++,Python处理字符串的方式实在太让人感动了.把字符串当列表来用吧.
#!
/usr/bin/python
word="abcdefg"
a=word[2]
print ("a is:
"+a)
b=word[1:
3]
print ("b is:
"+b) # index 1 and 2 elements of word.
c=word[:
2]
print ("c is:
"+c) # index 0 and 1 elements of word.
d=word[0:
]
print ("d is:
"+d) # All elements of word.
e=word[:
2]+word[2:
]
print ("e is:
"+e) # All elements of word.
f=word[-1]
print ("f is:
"+f) # The last elements of word.
g=word[-4:
-2]
print ("g is:
"+g) # index 3 and 4 elements of word.
h=word[-2:
]
print ("h is:
"+h) # The last two elements.
i=word[:
-2]
print ("i is:
"+i) # Everything except the last two characters
l=len(word)
print ("Length of word is:
"+ str(l))
中文和英文的字符串长度是否一样?
#!
/usr/bin/python
# -*- coding:
utf8 -*-
s=input("输入你的中文名,按回车继续");
print ("你的名字是 :
" +s)
l=len(s)
print ("你中文名字的长度是:
"+str(l))
知识点:
∙类似Java,在python3里所有字符串都是unicode,所以长度一致.
6条件和循环语句
#!
/usr/bin/python
#条件和循环语句
x=int(input("Please enter an integer:
"))
if x<0:
x=0
print ("Negative changed to zero")
elif x==0:
print ("Zero")
else:
print ("More")
# Loops List
a = ['cat', 'window', 'defenestrate']
for x in a:
print (x, len(x))
#知识点:
# * 条件和循环语句
# * 如何得到控制台输入
7函数
#!
/usr/bin/python
# -*- coding:
utf8 -*-
def sum(a,b):
return a+b
func = sum
r = func(5,6)
print (r)
# 提供默认值
def add(a,b=2):
return a+b
r=add
(1)
print (r)
r=add(1,5)
print (r)
一个好用的函数
#!
/usr/bin/python
# -*- coding:
utf8 -*-
# The range() function
a =range (1,10)
for i in a:
print (i)
a = range(-2,-11,-3) # The 3rd parameter stands for step
for i in a:
print (i)
知识点:
∙Python不用{}来控制程序结构,他强迫你用缩进来写程序,使代码清晰.
∙定义函数方便简单
∙方便好用的range函数
8异常处理
#!
/usr/bin/python
s=input("Input your age:
")
if s =="":
raise Exception("Input must no be empty.")
try:
i=int(s)
except Exception as err:
print(err)
finally:
# Clean up action
print("Goodbye!
")
9文件处理
对比Java,python的文本处理再次让人感动
#!
/usr/bin/python
spath="D:
/download/baa.txt"
f=open(spath,"w") # Opens file for writing.Creates this file doesn't exist.
f.write("First line 1.\n")
f.writelines("First line 2.")
f.close()
f=open(spath,"r") # Opens file for reading
for line in f:
print("每一行的数据是:
%s"%line)
f.close()
知识点:
∙open的参数:
r表示读,w写数据,在写之前先清空文件内容,a打开并附加内容.
∙打开文件之后记得关闭
10类和继承
class Base:
def __init__(self):
self.data = []
def add(self, x):
def addtwice(self, x):
self.add(x)
self.add(x)
# Child extends Base
class Child(Base):
def plus(self,a,b):
return a+b
oChild =Child()
oChild.add("str1")
print (oChild.data)
print (oChild.plus(2,3))
'''
知识点:
* self:
类似Java的this参数
'''
11包机制
每一个.py文件称为一个module,module之间可以互相导入.请参看以下例子:
#a.py
def add_func(a,b):
return a+b
# b.py
from a import add_func # Also can be :
import a
print ("Import add_func from module a")
print ("Result of 1 plus 2 is:
")
print (add_func(1,2)) # If using "import a" , then here should be "a.add_func"
module可以定义在包里面.Python定义包的方式稍微有点古怪,假设我们有一个parent文件夹,该文件夹有一个child子文件夹.child中有一个modulea.py.如何让Python知道这个文件层次结构?
很简单,每个目录都放一个名为_init_.py的文件.该文件内容可以为空.这个层次结构如下所示:
parent
--__init_.py
--child
-- __init_.py
--a.py
b.py
那么Python如何找到我们定义的module?
在标准包sys中,path属性记录了Python的包路径.你可以将之打印出来:
import sys
print(sys.path)
通常我们可以将module的包路径放到环境变量PYTHONPATH中,该环境变量会自动添加到sys.path属性.另一种方便的方法是编程中直接指定我们的module路径到sys.path中:
import sys
import os
print(sys.path)
from a import add_func
print (sys.path)
print ("Import add_func from module a")
print ("Result of 1 plus 2 is:
")
print (add_func(1,2))
知识点:
∙如何定义模块和包
∙如何将模块路径添加到系统路径,以便python找到它们
∙如何得到当前路径
12内建帮助手册
对比C++,Java的突出进步是内建Javadoc机制,程序员可以通过阅读Javadoc了解函数用法.Python也内建了一些方便函数以便程序员参考.
∙dir函数:
查看某个类/对象的方法.如果有某个方法想不起来,请敲dir.在idle里,试试dir(list)
∙help函数:
详细的类/对象介绍.在idle里,试试help(list)
1遍历文件夹和文件
import os
import os.path
# os,os.path里包含大多数文件访问的函数,所以要先引入它们.
# 请按照你的实际情况修改这个路径
rootdir = "d:
/download"
for parent, dirnames, filenames in os.walk(rootdir):
#case 1:
for dirname in dirnames:
print ("parent is:
" + parent)
print ("dirname is:
" + dirname)
#case 2
for filename in filenames:
print ("parent is:
" + parent)
print ("filename with full path :
" + , filename))
'''知识点:
* os.walk返回一个三元组.其中dirnames是所有文件夹名字(不包含路径),filenames是所有文件的名字(不包含路径).parent表示父目录.
* case1 演示了如何遍历所有目录.
* case2 演示了如何遍历所有文件.
* ,filename) :
将形如"/a/b/c"和"d.java"变成/a/b/c/d.java".
'''
2分割路径和文件名
import os.path
#常用函数有三种:
分隔路径,找出文件名.找出盘符(windows系统),找出文件的扩展名.
#根据你机器的实际情况修改下面参数.
spath="D:
/download/repository.7z"
# case 1:
p,f=;
print("dir is:
"+p)
print("file is:
"+f)
# case 2:
drv,left=;
print("driver is:
"+drv)
print("left is:
"+left)
# case 3:
f,ext=;
print("f is:
"+f)
print("ext is:
"+ext)
'''
知识点:
这三个函数都返回二元组.
* case1 分隔目录和文件名
* case2 分隔盘符和文件名
* case3 分隔文件和扩展名
'''
总结:
5个函数
∙os.walk(spath)
∙
∙
∙
∙,path2)
3复制文件
import shutil
import os
import os.path
src="d:
\\download\\test\\myfile1.txt"
dst="d:
\\download\\test\\myfile2.txt"
dst2="d:
/download/test/测试文件夹.txt"
dir1=
print("dir1 %s"%dir1)
if(==False):
os.makedirs(dir1)
f1=open(src,"w")
f1.write("line a\n")
f1.write("line b\n")
f1.close()
shutil.copyfile(src, dst)
shutil.copyfile(src, dst2)
f2=open(dst,"r")
for line in f2:
print(line)
f2.close()
#测试复制文件夹树
try:
srcDir="d:
/download/test"
dstDir="d:
/download/test2"
#如果dstDir已经存在,那么shutil.copytree方法会报错!
#这也意味着你不能直接用d:
作为目标路径.
shutil.copytree(srcDir, dstDir)
except Exception as err:
print (err)
'''
知识点:
* shutil.copyfile:
如何复制文件
*
* shutil.copytree:
如何复制目录树
'''
总结:
4个函数
∙
∙
∙shutil.copyfile(src,dst)
∙shutil.copytree(srcDir,dstDir)