16160配置文档.docx
《16160配置文档.docx》由会员分享,可在线阅读,更多相关《16160配置文档.docx(16页珍藏版)》请在冰豆网上搜索。
16160配置文档
5.16160配置
5.1设备升级
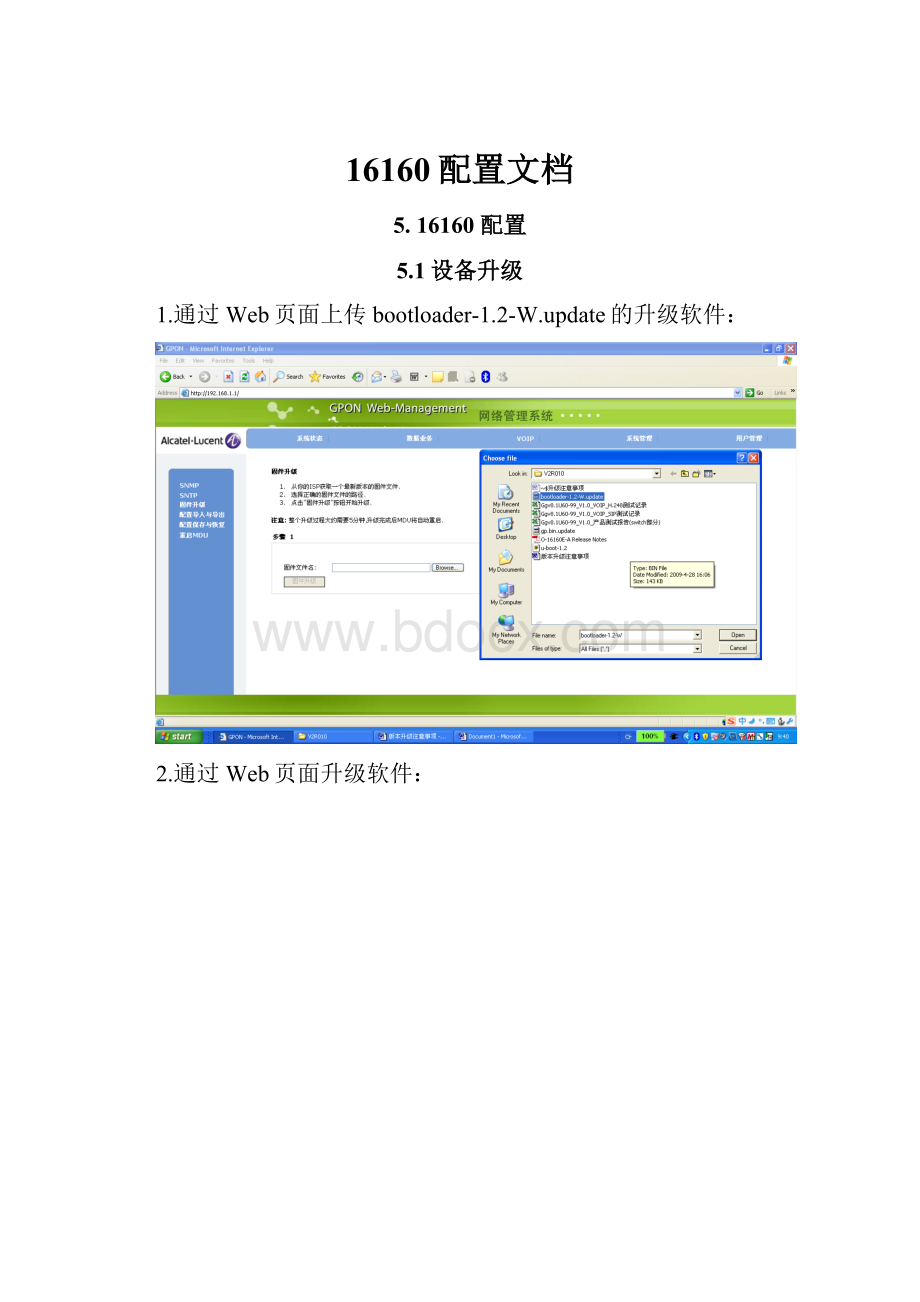
1.通过Web页面上传bootloader-1.2-W.update的升级软件:
2.通过Web页面升级软件:
5.2配置管理地址、语音地址:
1、配置管理VLAN:
2、配置管理IP:
3、配置语音VLAN/IP
5.3在16160上修改G0/G1在OAMVLAN下的模式:
localhost>enable
Password:
123456
localhost(enable)#showruntime-configsystem
systemmanagementconfig:
Vlanusermode:
Independ
systemmtu(kpbs):
1486
storm(kpbs):
0
macaddr:
00:
1F:
A3:
53:
FC:
30
broadcastfilter:
enable
multicastfilter:
disable
defaultvlanid:
3000
nextdefaultvlanid:
3000
igmprouteuplink:
G0
uplinkinfor:
uplinkin-manage-vlantagged
-----------------------------------
G0YesNo
G1YesNo
Managevlan
(1)
IDcommoninfo:
[vlanid][ipmode][dhcp-reqip][pri]
13000static0.0.0.00
netinfo:
[ipaddr][netmask][gateway][majordns][backupdns]
----------------------------------------------------------------------
current:
192.168.1.1255.255.255.00.0.0.00.0.0.00.0.0.0
static:
192.168.1.1255.255.255.00.0.0.00.0.0.00.0.0.0
localhost(enable)#net-configuplink-portg0leave-manage-vlan
localhost(enable)#net-configuplink-portg1tag
localhost(enable)#showruntime-configsystem
systemmanagementconfig:
Vlanusermode:
Independ
systemmtu(kpbs):
1486
storm(kpbs):
0
macaddr:
00:
1F:
A3:
53:
FC:
30
broadcastfilter:
enable
multicastfilter:
disable
defaultvlanid:
3000
nextdefaultvlanid:
3000
igmprouteuplink:
G0
uplinkinfor:
uplinkin-manage-vlantagged
-----------------------------------
G0No
G1YesYes
Managevlan
(1)
IDcommoninfo:
[vlanid][ipmode][dhcp-reqip][pri]
1300static0.0.0.00
netinfo:
[ipaddr][netmask][gateway][majordns][backupdns]
----------------------------------------------------------------------
current:
192.168.1.1255.255.255.00.0.0.00.0.0.00.0.0.0
static:
192.168.1.1255.255.255.00.0.0.00.0.0.00.0.0.0
Voipvlan
(1)
IDcommoninfo:
[vlanid][ipmode][dhcp-reqip][pri][voip-port][voip-type]
1400static0.0.0.00allportsig_rtp
netinfo:
[ipaddr][netmask][gateway][majordns][backupdns]
----------------------------------------------------------------------
current:
210.110.10.100255.255.255.0210.110.10.10.0.0.00.0.0.0
static:
210.110.10.100255.255.255.0210.110.10.10.0.0.00.0.0.0
5.4打开16160的下行广播包
localhost(config)#switch
localhost(switch)#broadcastfilterdowndisable
localhost(switch)#exit
localhost(config)#systemconfigsave
5.5配置FE端口数据。
操作步骤
根据指定的VLANID,查询端口的VLAN属性。
步骤1输入合法的VLANID。
步骤2点击“查找”按钮,查询VLANID对应的端口VLAN属性(通过表格中的可选框表示)。
更改指定的VLANID的端口配置。
步骤1输入合法的VLANID,并在端口列表中选定对应的模式(tag或是untagged,不能同时选)。
步骤2点击“保存”按钮,如配置成功,则出现对话框中提示“配置成功”;否则提示“配置失败”。
端口号:
当前选中的端口,用于修改配置。
使能状态:
当前接口是否启用。
流控:
当前接口是否开启流控。
端口模式:
当前端口的工作模式。
有五种模式,分别为:
自动协商、10M半双工、10M全双工、100M半双工、100M全双工。
PVID:
当前端口的VLANID,范围在1~4094之间。
端口上行限速:
当前端口的上行限速值,范围在64~100000之间(包含0),为0时表示不限速。
端口下行限速:
当前端口的下行限速值,范围在64~100000之间(包含0),为0时表示不限速。
端口隔离:
取消选择表示此端口将和其它端口隔离。
5.6配置VoIP数据
1、VOIP–>基本配置
-网关标识,也即MediaGatewayID。
通常网关标识配置为语音接口的IP地址,也可请按核心侧要求(如遇到与SBC对接时)配置成其他字符串。
-物理端点前缀,也即物理终结点,与VOIP–>高级配置中的物理端点基数配合使用,代表16160的16个物理语音端口。
通常物理端点前缀配置为aaln,物理端点基数配置为1,也可按MGC要求配置成其他格式。
-临时端点前缀,也即临时终结点,与VOIP–>高级配置中的临时端点基数配合使用,代表16160通信时所用到的内部虚拟语音端口。
通常临时端点前缀配置为rtp,临时端点基数配置为1,也可按MGC要求配置成其他格式。
-MGC1地址。
按MGC要求配置正确的MGCIP地址。
2、VOIP–>高级配置
DTMF,也即DTMF信号的发送方式,分Inband(带内,走语音RTP)和2833(带外,走2833RTPEvent)2种,通常配置为Inband。
物理端点基数,例如物理端点的格式如下:
A0000077700000,
A0000177700001,
A0000277700002,
A0000377700003,……
A0001677700016
这种情况下,物理端点前缀可以配置为A,基数配为00000;也可以分别配置为A000和00。
localhost(config)#nmm
选择MGC:
MXP>setxgcpprofile
配置短、长定时器:
MXP>setxgcpdm_short4000---->4s
MXP>setxgcpdm_long4000---->4s
配置MEGACO协议的版本:
MXP>setxgcpprot_ver<1=V1|2=V2>
MXP>activate
MXP>commit
MXP>exit
6.测试网络的连通性
6.1测试7342管理地址
isadmin>configure>system#ping218.10.180.129
=============================================================
pingtable
=============================================================
ip-addr|received|sent|loss|mean-delay|max-delay|min-delay
---------------+----------+----------+----------+----------+----------+-------------------------------------------------------------
218.10.180.129110444
218.10.180.129220444
218.10.180.129330101010
218.10.180.129440555
218.10.180.129550555
------------------------------------------------------------------------------------------------------------------------------------
pingcount:
5
=============================================================
isadmin>configure>system#
6.2测试16160OAM地址的连通性
localhost(enable)#ping218.10.180.129
PING218.10.180.129(218.10.180.129):
28databytes.
PressCtrl-EtoStop.
Replyfrom218.10.180.129:
bytes=20:
icmp_seq=0ttl=255time=14.7ms
Replyfrom218.10.180.129:
bytes=20:
icmp_seq=1ttl=255time=12.3ms
Replyfrom218.10.180.129:
bytes=20:
icmp_seq=2ttl=255time=8.6ms
Replyfrom218.10.180.129:
bytes=20:
icmp_seq=3ttl=255time=12.4ms
Replyfrom218.10.180.129:
bytes=20:
icmp_seq=4ttl=255time=11.1ms
----218.10.180.129PINGStatistics----
5packetstransmitted,5packetsreceived,0%packetloss
round-trip(ms)min/avg/max=86/118/147
localhost(enable)#
6.3测试16160VOIP到网关的连通性
localhost(enable)#ping10.40.148.1
PING10.40.148.1(10.40.148.1):
28databytes.
PressCtrl-EtoStop.
Replyfrom10.40.148.1:
bytes=20:
icmp_seq=0ttl=255time=1.8ms
Replyfrom10.40.148.1:
bytes=20:
icmp_seq=1ttl=255time=2.1ms
Replyfrom10.40.148.1:
bytes=20:
icmp_seq=2ttl=255time=1.9ms
Replyfrom10.40.148.1:
bytes=20:
icmp_seq=3ttl=255time=1.7ms
Replyfrom10.40.148.1:
bytes=20:
icmp_seq=4ttl=255time=2.0ms
----10.40.148.1PINGStatistics----
5packetstransmitted,5packetsreceived,0%packetloss
round-trip(ms)min/avg/max=17/19/21
localhost(enable)#
6.4测试16160VOIP到MGC的连通性
localhost(enable)# ping-ifnameeth0.3001-source10.40.148.210.9.35.41
@@@@@pingbindsockettointerface'eth0.3001'successfullyafter1times.
PING10.9.35.41(10.9.35.41):
28databytes.
PressCtrl-EtoStop.
Replyfrom10.9.35.41:
bytes=20:
icmp_seq=0ttl=57time=8.7ms
Replyfrom10.9.35.41:
bytes=20:
icmp_seq=1ttl=57time=12.4ms
Replyfrom10.9.35.41:
bytes=20:
icmp_seq=2ttl=57time=8.1ms
Replyfrom10.9.35.41:
bytes=20:
icmp_seq=3ttl=57time=12.7ms
Replyfrom10.9.35.41:
bytes=20:
icmp_seq=4ttl=57time=8.9ms
Replyfrom10.9.35.41:
bytes=20:
icmp_seq=5ttl=57time=12.3ms
Replyfrom10.9.35.41:
bytes=20:
icmp_seq=6ttl=57time=8.5ms
----10.9.35.41PINGStatistics----
7packetstransmitted,7packetsreceived,0%packetloss
round-trip(ms)min/avg/max=81/102/127
localhost(enable)#
7.消除7342的告警信息
7.1NT板卡无冗余配置时产生告警:
"NTA,EQPT:
MJ,LANXLINKFAIL,SA,,,,:
\"LANXpeer-to-peerlinkfailureonthisunitand/oronpeerunit\""
如遇到上述时钟告警,用如下命令进行屏蔽:
INH-SWDX-EQPT:
:
NT:
;
SET-ATTR-EQPT:
:
EQPT:
:
:
MN,LANXLINKFAIL;
7.2时钟同步产生的告警。
"CLKSRCNT,SYNCN:
MJ,FRNG,SA,,,,:
\"NEisinfree-runmodefortiming\""
如遇到上述时钟告警,用如下命令进行屏蔽:
SET-ATTR-SYNCN:
:
SYNCN:
:
:
MN,FRNG;
7.3SMAC产生的告警。
"COM,COM:
MJ,SMACERR,NSA,,,,:
\"SMACError\""
如遇到上述时钟告警,用如下命令进行屏蔽:
1>EnterthefollowingTL1commandtochecktheSMACERRalarm:
RTRV-ALM-COM:
:
:
:
:
;
2>Doesthealarmappear?
aIfyes,gotostep3.
bIfnot,gotostep10.
3>Whattypeofshelfiscausingthealarm?
aIfanOLTS-Mshelf,gotostep4.
bIfanOLTS-Lshelf,gotostep5.
TAP145-2January2009Alcatel-Lucent7342ISAMFTTUFGUR04.06.00
FaultIsolationandTroubleshootingGuideEdition013FE51990AAAATCZZA
4>PerformthefollowingtoreplacetheSMACcardonanOLTS-Mshelf.
iUseaPhillips#2screwdrivertoremovetheSMACcardscrew.
iiLightlybendbacktheivory-coloredclip,asshowninFigureTAP145-1.
iiiRemovetheSMACcard.
ivInsertanewSMACcardintheJ22connector,aligningthescrewholesothattheserialnumberisupsidedownandbackwards.
vUseaPhillips#2screwdrivertoinserttheSMACcardscrew.
viAddthenewMACaddressstickertotheshelf.
viiPerformafullsystemreset.
viiiGotostep8.
8>Doesthealarmstillexist?
aIfyes,gotostep9.
bIfnot,gotostep10.
9>Escalatetheproblemaccordingtolocalpractices.
10>STOP.Thisprocedureiscomplete.
文件结束
Endoffile
 升级会员
升级会员 