Ubuntu Linux 电池续航时间问题解决方法.docx
《Ubuntu Linux 电池续航时间问题解决方法.docx》由会员分享,可在线阅读,更多相关《Ubuntu Linux 电池续航时间问题解决方法.docx(33页珍藏版)》请在冰豆网上搜索。
UbuntuLinux电池续航时间问题解决方法
Ubuntu,CPUScaling,BatterylifeandYou
CPUScalingisafeaturebuiltintomostmodern(mobile)CPUsthatallowsthemtoscaleupordowninhowfasttheyrunandhowmuchenergytheysuckdownbasedondemand.Ifyouhaveafairlymodernmobilecomputerthere’saverygoodchancethatyourCPU(s)canhandlefrequencyscaling.
Whyshouldyoucare?
Well,youcancontrolthistotellyoucomputerhowmuchpowerandhowfastitshouldallowit’sCPU(s)tooperate.Thiscansavesomeenergyandthusbatterylifeattheexpenseofalittleperformance–whichisgreatforextendingtheusetimeofyourlaptopwhenit’sunplugged.CanyourCPU(s)handlescaling?
There’saneasywaytofindout.Openupaterminalsession(Applications->Accessories->Terminal)andtypeorpastethefollowingintoit:
cat/sys/devices/system/cpu/cpu0/cpufreq/scaling_available_frequenciesOnmymachineIgetback166700013330001000000ThoseareinHertz,somymachineiscapableof1.66Ghz,1.33Ghzand1.00Ghz.NowthatyouknowyourCPU(s)canhandlescaling,let’sseewhatmodesareavailable.Intheterminal,typeorpaste:
cat/sys/devices/system/cpu/cpu0/cpufreq/scaling_available_governorsAgain,IgetpowersaveondemanduserspaceconservativeperformancePowersavewillkeeptheCPUconstantlyatthelowestfrequency.OndemandwillsettheCPUatthelowestfrequency(inmycase,1.00Ghz)untiluseoftheCPUincreases,thenitwillautomaticallybumpituptothehighestfrequency(withme,1.66Ghz).UserspacemeansthatadifferentprogramwillbeusedtocontroltheCPU’sscaling.ConservativeiswhereyourCPUwillgoupasneeded,startingatthelowestfrequency,andthenbumpinguptothenextavailableuntilitmaxesout.PerformancesimplysetstheCPU(s)atthehighestavailablefrequencyandkeepsitthere.Theloweryourfrequency,thelesspoweryouuse.So,ifyou’rebentonextendingyourbatterylifetothemax,you’dwanttokeepyourCPU(s)attheirlowestfrequency–butyou’lldothisattheexpenseofcomputingpower.Inmycasemy1.66Ghzprocessorswouldeffectivelybe1.00Ghzprocessors.Now,howdoyouactivelycontrolthis?
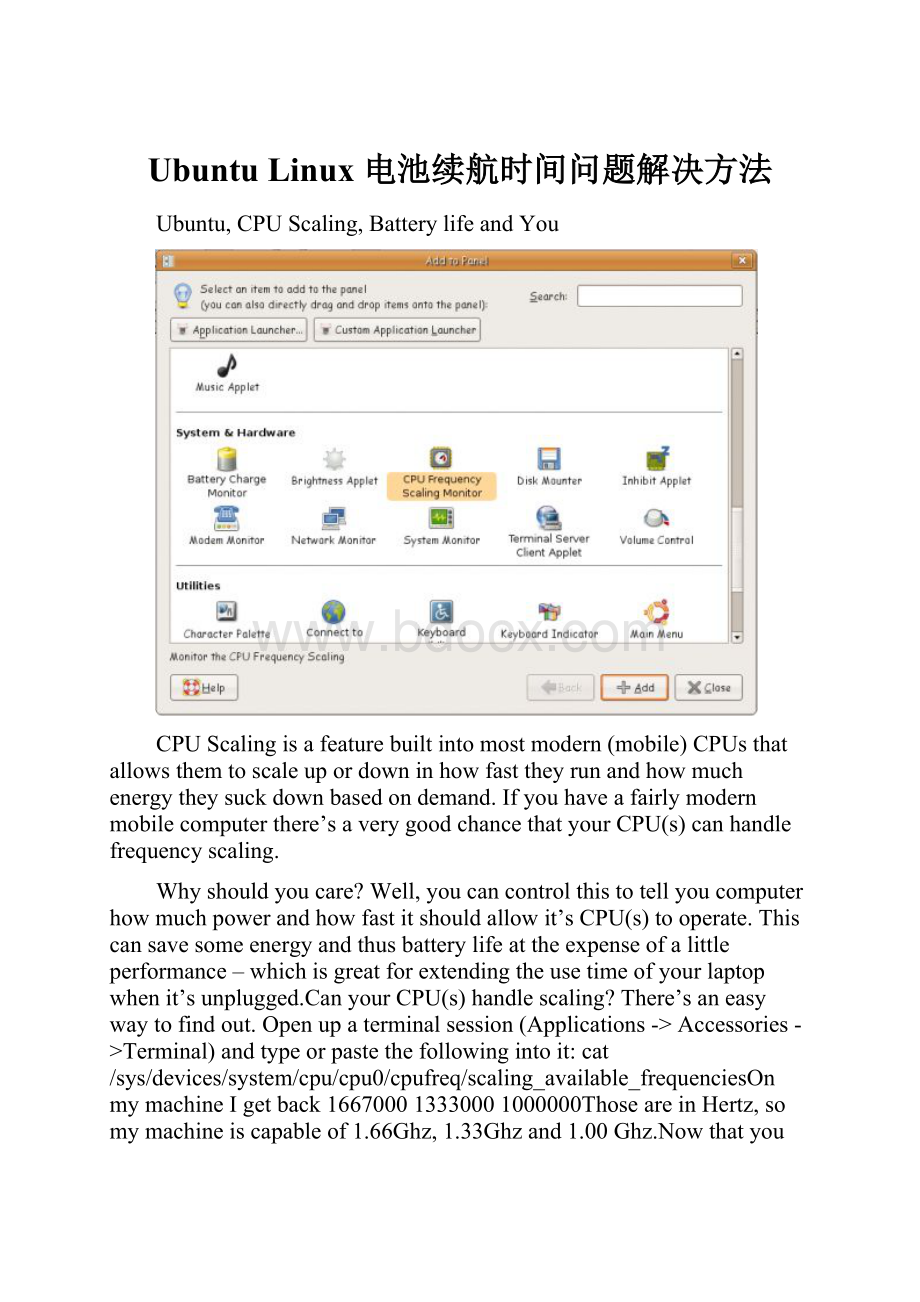
It’sfairlyeasy.Rightclickonanemptyspaceinyourtaskbar(whereyourappletsandsuchthingsasApplications,PlacesandSystemarelocated)andchoose“Addtopanel”.Fromthere,findtheCPUFrequencyScalingMonitor.Doubleclickonthisanditwillappearinyourtaskbar.RightclickonitandchoosePropertiesandyoucansetvariousoptionslikehaveitshowyourCPUfrequencyasafrequency(i.e.1.33Ghz)orasapercentage.IfyouhavemultipleCPU’soradual/quadcoremachineyoucanalsochoosewhichCPUtomonitor.ToconfigurethisapplettoactuallyallowyoutocontrolhowyourCPU(s)scale,you’llhavetohadbacktotheterminal.Typethis:
sudodpkg-reconfiguregnome-appletsThiswillthrowupaniftybluescreenaskingyoutosayYes.Doso.Thenitwillaskifyouwanttoinstallcpufreq-selectorwithSUIDroot.Sayyes.Onceyou’vedonethis,gobacktoyourCPUFrequencyScalingMonitorinyourtaskbarandleftclickit.Youshouldnowbepresentedwithabunchofoptionsfromwhichyoucanchoosetheoneyouwant.YoucanalsodirectlysetthefrequencyatwhichyourCPU(s)willrunat,whichcanbehandyifyouwanttoscaleupordownforashortbitandthenmanuallychangeitagain.Asyoucansee,I’vegotminesettoOndemand,allowingthefrequencytoscaleupthroughthreedifferentsettings(1GHz,1.33GHzor1.66GHz)asneeded.Whilethiswilltakeeffectimmediately,itwillonlybeineffectuntilyourebootatwhichtimeyourdefaultsettingswillcomeback.Tochangethedefaultheadbackintoyourterminalandtype:
gconf-editorFromthereheadtoapps->gnome-power-manager->cpufreq.Findthesettingspolicy_acandpolicy_batteryandchangethemtowhicheversettingyouwantforthedefault.Forthosewithmultiplecoresorprocessorswhohappentobeabitneedyintheinfodepartment(likemyself)youcanaddanappletforeachCPU.JustaddasmanyappletsasyouhaveCPUsandthenrightclickonthem,choosePreferencesandusethedropdowntochoosewhichCPUthatparticularappletismonitoring.NowyouknowalotmoreaboutCPUFrequencyScalingthenyoumayhavewhenyoustartedreadingthisarticleandyouknowhowtosetitonyourcomputer.
Ubuntu笔记本电源管理优化指南
看到许多朋友抱怨linux电源管理很糟糕,说什么电池使用比win下短了很多。
实际上linux提供很多电源优化的功能,只不过默认情况下的设置没有考虑电源使用罢了。
下面我以ubuntuedgy为例,系统的讨论一下笔记本电源管理优化。
目标:
最长的电池使用时间
概述
笔记本由许多不同的组件组成,各个组件的耗电不用,引用gentoopowermanagement的一张图,其耗电比重如下图所示:
PowerBudgetForEachComponent
从上图我们可以看到主要的耗电部件是液晶显示器、CPU、芯片组和硬盘。
虽然我们可以在BIOS里面设置操作系统无关的电源管理模式,但是在操作系统之上我们可以设置一些更smart的电源管理模式自动适应各种环境。
本文分下面几个部分分别讨论各个部件的电源管理优化。
0.前提
在讨论各个设备的电源管理优化之前,先确定我们是否满足下面一些前提条件。
BOIS
首先你要检查一下你的BOIS的电源管理设置,先关闭所有bois支持的电源管理方式,只通过操作系统设置电源管理,然后再恢复BOIS的电源管理。
kernel
acpi支持,edgy默认内核是支持acpi的,如果你自定义编译了内核,记住要把电源管理相关的模块选上
PowerManagementOptions--->
[*]PowerManagementSupport
[]SoftwareSuspend
ACPI(AdvancedConfigurationandPowerInterface)Support--->
[*]ACPISupport
[]SleepStates
[]/proc/acpi/sleep(deprecated)
[*]ACAdapter
[*]BatteryButtonVideo[]GenericHotkeyFanProcessorThermalZone<>ASUS/MedionLaptopExtras<>IBMThinkPadLaptopExtras<>ToshibaLaptopExtras(0)DisableACPIforsystemsbeforeJan1stthisyear[]DebugStatements[*]PowerManagementTimerSupport<>ACPI0004,PNP0A05andPNP0A06ContainerDriver(EXPERIMENTAL)CPUFrequencyScaling--->[*]CPUFrequencyscaling[]EnableCPUfreqdebugging<>CPUfrequencytranslationstatistics[]CPUfrequencytranslationstatisticsdetailsDefaultCPUFreqgovernor(userspace)<*>'performance'governor<*>'powersave'governor<*>'ondemand'cpufreqpolicygovernor<*>'conservative'cpufreqgovernor<*>CPUfrequencytablehelpersACPIProcessorP-Statesdriver<*>CPUFreqdriverforyourprocessor
1.显示器
如上图所示,LCD是最耗电的部件,这一节我们讨论如何降低LCD的耗电
首先,尽可能调低亮度,这个不多说手动调节就可以了;
然后设置DPMS(DisplayPowerManagementSignaling)
修改sudovi/etc/X11/xorg.conf文件
Section"ServerLayout"
Identifier[...]
[...]
Option"BlankTime""5"#Blankthescreenafter5minutes(Fake)
Option"StandbyTime""10"#Turnoffscreenafter10minutes(DPMS)
Option"SuspendTime""20"#Fullsuspendafter20minutes
Option"OffTime""30"#Turnoffafterhalfanhour
[...]
EndSection
[...]
Section"Monitor"
Identifier[...]
Option"DPMS""true"
[...]
EndSection
但似乎xorg的dpms有bug不能关闭LCD,只能把屏幕变黑
google搜索了一下发现是和acpi冲突只要重新启动acpi就可以了
手动设置屏幕关闭,
sudo/etc/init.d/acpidrestart
xsetdpmsforceoff
2.cpu
移动版本的CPU支持频率和电压的动态调整,在大多数情况下你的CPU是没必要全速运行的,尤其在电池支持下,我们可以强制使CPU运行在最低频率。
在linux2.6以后的内核就支持cpu频率的动态调整,有下面5种模式
performance将CPU频率设定在支持的最高频率,而不动态调节。
powersave将CPU频率设置为最低
ondemand快速动态调整CPU频率,PentuimM的CPU可以使用
conservative与ondemand不同,平滑地调整CPU频率,适合于用电池工作时。
userspace用户模式,也就是长期以来都在用的那个模式。
可以通过手动编辑配置文件进行配置
先安装相关软件cpufrequtils
sudoapt-getinstallcpufrequtils
查看你的cpu所支持的频率
cpufreq-info
cpufrequtils002:
cpufreq-info(C)DominikBrodowski2004-2006
Reporterrorsandbugstolinux@brodo.de,please.
analyzingCPU0:
driver:
powernow-k8
CPUswhichneedtoswitchfrequencyatthesametime:
0
hardwarelimits:
800MHz-1.60GHz
availablefrequencysteps:
1.60GHz,800MHz
availablecpufreqgovernors:
userspace,powersave,ondemand,conservative,performance
currentpolicy:
frequencyshouldbewithin800MHzand1.60GHz.
Thegovernor"ondemand"maydecidewhichspeedtouse
withinthisrange.
currentCPUfrequencyis800MHz.
需要进入那个模式直接修改proc文件,比如要进入powersave模式
sudo-s
echopowersave>/sys/devices/system/cpu/cpu0/cpufreq/scaling_governor
其实有个实用程序laptop-mode可以方便的设置,在后面硬盘一节统一介绍
如果是用迅驰cpu,支持多个频率,你可以用powernowd更细化的调节cpu频率
3.显卡
各类显卡有自己的电源管理方式,我这里主要介绍atipowerplay,
首先要安装ati的fgrlx,请参考论坛wiki
运行aticonfig——lsp显示显卡可以运行的频率,选最低的就行了
我的输出:
aticonfig--lsp
core/mem[flags]
-----------------
*1:
100/150MHz
2:
301/200MHz[defaultstate]
aticonfig--set-powerstate=0
使显卡运行在最低频率上
也可以设置显卡动态调整频率
修改sudovi/etc/X11/xorg.conf
Section"Device"
[...]
Option"DynamicClocks""on"
EndSection
4.硬盘
我们先做一个粗略的计算,你的笔记本如果硬盘在节能模式下运行,能延长多少时间。
cat/proc/acpi/battery/BATx/info
present:
yes
designcapacity:
6000mAh
lastfullcapacity:
3808mAh
batterytechnology:
rechargeable
designvoltage:
14800mV
designcapacitywarning:
209mAh
designcapacitylow:
133mAh
capacitygranularity1:
10mAh
capacitygranularity2:
25mAh
modelnumber:
JM-6
serialnumber:
xxxxxxxxxxxxxxx
batterytype:
LION
OEMinfo:
Hewlett-Packard
电池功率为3808mAhx14800mV=56.3584Wh==56wh
电池支持时间4小时
移动硬盘正常功率:
2.4w
移动硬盘standby功率:
0.25w
(根据自己型号google自己搜索)
56/4=14w
14-(2.4-0.25)=11.85w
56/11.85=4.725738397小时
延长了0.73小时,大约44分钟
硬盘是不可能一直处于standby状态的,实际的情况肯定会短一些。
下面我们讨论如何使硬盘更长时间的处于standby模式下
我们可以laptop-mode软件达到这个效果,
首先我们启动laptop-mode,edgy默认设置是禁止laptop-mode运行的
修改/etc/default/acpi-support
ENABLE_LAPTOP_MODE=true
sudo/etc/init.d/laptop-modestart
好了现在我们来详细配置,有中文注释的地方是我修改过的地方
修改/etc/laptop-mode/laptop-mode.conf
#Enablelaptopmodewhenonbatterypower.
#在电池模式下启动laptop_mode
ENABLE_LAPTOP_MODE_ON_BATTERY=1
#Disablealldatalosssensitivefeatureswhenthebatterylevel(in%ofthe
#batterycapacity)reachesthisvalue.
#在低电量的情况下禁止laptop-mode
MINIMUM_BATTERY_CHARGE_PERCENT=10
#Disabledatalosssensitivefeatureswhenthebatteryreportsitsstate
#as"critical".
#在极底电量下禁止laptop_mode
DISABLE_LAPTOP_MODE_ON_CRITICAL_BATTERY_LEVEL=8
#Thedrivesthatlaptopmodecontrols.
#Separatethembyaspace,e.g.HD="/dev/hda/dev/hdb".Thedefaultisa
#wildcard,whichwillgetyouallyourIDEandSCSI/SATAdrives.
#HD="/dev/[hs]d[abcdefgh]"
#设定需要控制的硬盘
HD="/dev/hda"
#Shouldlaptopmodetoolscontrolreadahead?
#启动readahead
CONTROL_READAHEAD=1
#Read-ahead,inkilobytes.Youc
 升级会员
升级会员 