sshMyEclipse65整合Word下载.docx
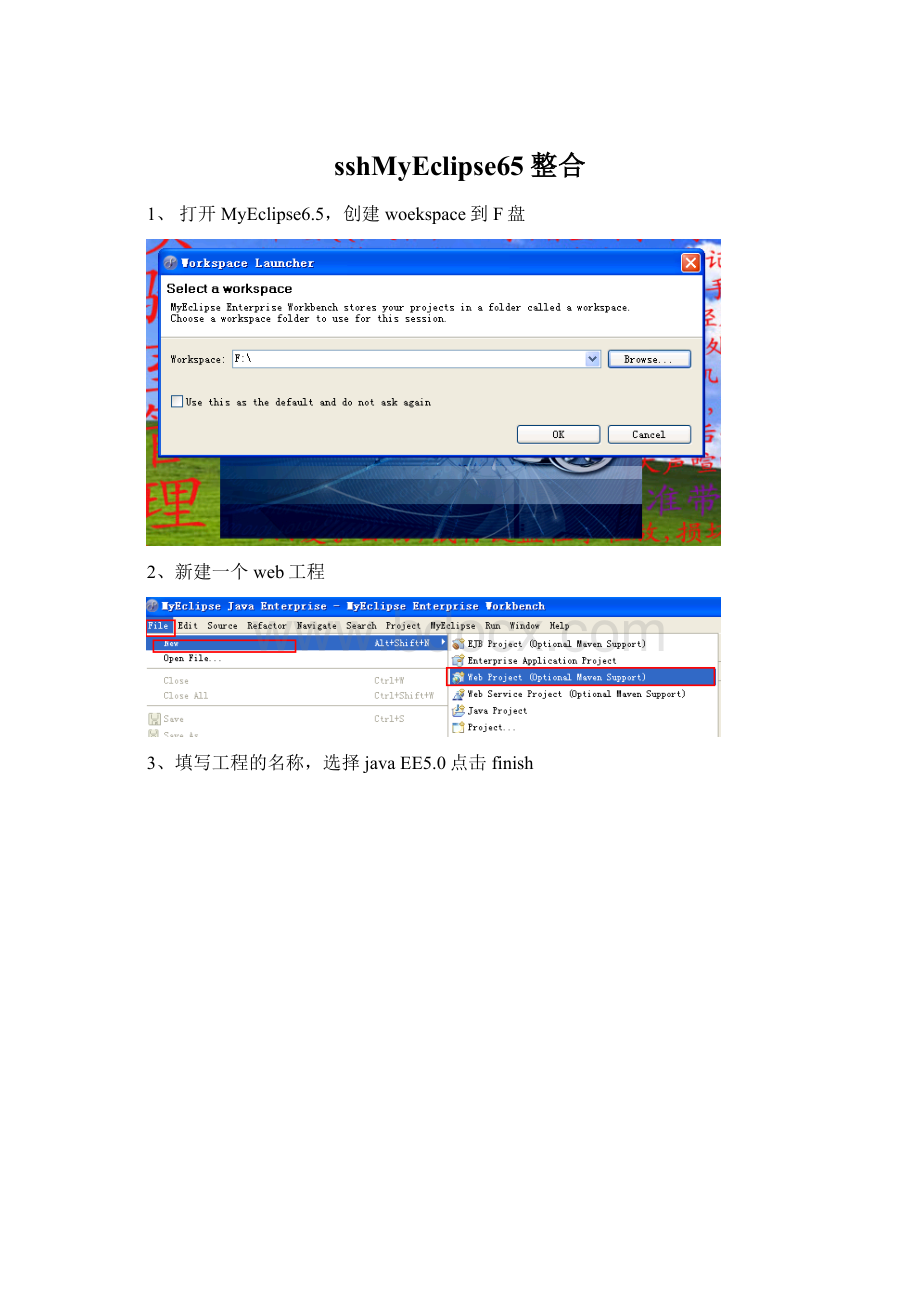
《sshMyEclipse65整合Word下载.docx》由会员分享,可在线阅读,更多相关《sshMyEclipse65整合Word下载.docx(18页珍藏版)》请在冰豆网上搜索。
解压struts2-blank.war到struts2-blank
4.3打开struts2-blankWEB-INF下的web.xml文件。
将选中部分添加到SSHDemo项目中的web.xml文件中
此时SSHDemo下的web.xml文件如下
<
?
xmlversion="
1.0"
encoding="
UTF-8"
>
web-appversion="
3.0"
xmlns="
xmlns:
xsi="
http:
//www.w3.org/2001/XMLSchema-instance"
xsi:
schemaLocation="
<
display-name>
/display-name>
welcome-file-list>
<
welcome-file>
index.jsp<
/welcome-file>
/welcome-file-list>
filter>
filter-name>
struts2<
/filter-name>
filter-class>
org.apache.struts2.dispatcher.ng.filter.StrutsPrepareAndExecuteFilter<
/filter-class>
/filter>
filter-mapping>
url-pattern>
/*<
/url-pattern>
/filter-mapping>
/web-app>
4.4进入到struts2-blankWEB-INFlib文件夹下,将所有jar文件复制到SSHDemo的lib目录下
4.5复制struts2-blankWEB-INFclasses下的struts.xml到SSHDemo的src目录下,修改内容如下
得到struts.xml文件内容如下
!
DOCTYPEstrutsPUBLIC
"
-//ApacheSoftwareFoundation//DTDStrutsConfiguration2.3//EN"
//struts.apache.org/dtds/struts-2.3.dtd"
struts>
packagename="
default"
namespace="
/"
extends="
struts-default"
actionname="
userHello"
result>
/hello.jsp<
/result>
/action>
/package>
--Addpackageshere-->
/struts>
4.6在WebRoot目录下添加hello.jsp文件。
选中SSHDemo右键。
Runasmyeclipseserverapplication,在浏览器中访问http:
//localhost:
8080/SSHDemo/userHello到达hello.jsp文件即成功添加struts2支持
5、添加spring、hibernate支持
在工程上面点击鼠标右键,选择myeclipse,打开对话框,选择Springcatapilities
6、打开applicationContext.xml
xmlversion="
encoding="
beans
xmlns="
//www.springframework.org/schema/beans"
//www.springframework.org/schema/beanshttp:
//www.springframework.org/schema/beans/spring-beans-2.5.xsd"
beanid="
dataSource"
class="
mons.dbcp.BasicDataSource"
propertyname="
driverClassName"
value="
com.mysql.jdbc.Driver"
/property>
url"
jdbc:
mysql:
3306/dbname"
username"
value="
root"
/bean>
sessionFactory"
org.springframework.orm.hibernate3.annotation.AnnotationSessionFactoryBean"
<
refbean="
/>
hibernateProperties"
props>
<
propkey="
hibernate.dialect"
org.hibernate.dialect.MySQLDialect
/prop>
hibernate.hbm2ddl.auto"
update<
/props>
/beans>
7、创建数据库dbname,创建对应的数据表
8、打开myeclipse的MyecliupseDatabaseExplorer窗口:
9、创建一个数据库连接
10、打开连接
11、打开applicationContext.xml,找到SessionFactory添加如下信息:
mappingResources"
list>
value>
DO/Student.hbm.xml<
/value>
/list>
 升级会员
升级会员 