路由交换机命令大全.docx
《路由交换机命令大全.docx》由会员分享,可在线阅读,更多相关《路由交换机命令大全.docx(9页珍藏版)》请在冰豆网上搜索。

路由交换机命令大全
路由/交换机命令大全~!
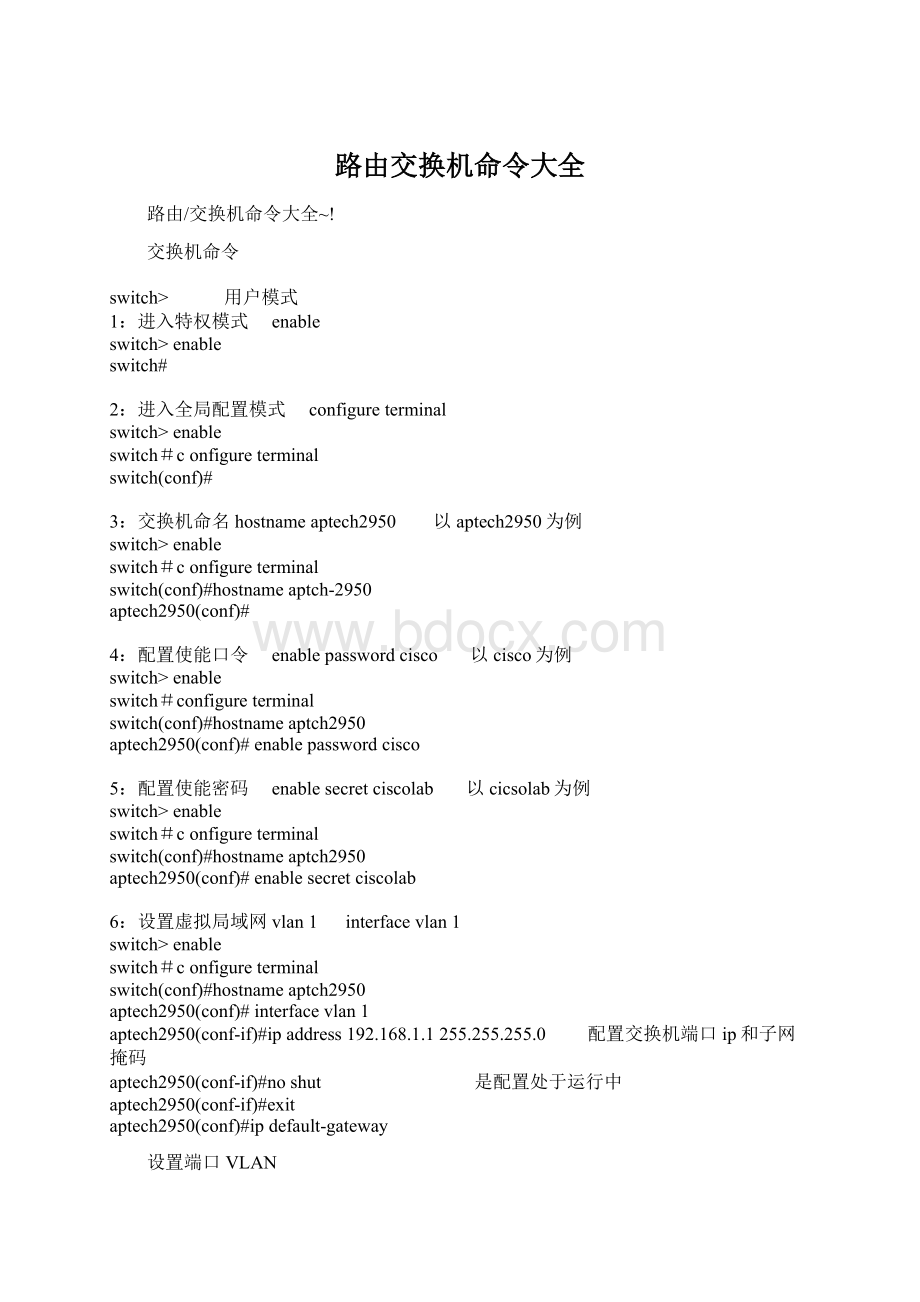
交换机命令
switch> 用户模式
1:
进入特权模式 enable
switch>enable
switch#
2:
进入全局配置模式 configureterminal
switch>enable
switch#configureterminal
switch(conf)#
3:
交换机命名hostnameaptech2950 以aptech2950为例
switch>enable
switch#configureterminal
switch(conf)#hostnameaptch-2950
aptech2950(conf)#
4:
配置使能口令 enablepasswordcisco 以cisco为例
switch>enable
switch#configureterminal
switch(conf)#hostnameaptch2950
aptech2950(conf)#enablepasswordcisco
5:
配置使能密码 enablesecretciscolab 以cicsolab为例
switch>enable
switch#configureterminal
switch(conf)#hostnameaptch2950
aptech2950(conf)#enablesecretciscolab
6:
设置虚拟局域网vlan1 interfacevlan1
switch>enable
switch#configureterminal
switch(conf)#hostnameaptch2950
aptech2950(conf)#interfacevlan1
aptech2950(conf-if)#ipaddress192.168.1.1255.255.255.0 配置交换机端口ip和子网掩码
aptech2950(conf-if)#noshut 是配置处于运行中
aptech2950(conf-if)#exit
aptech2950(conf)#ipdefault-gateway
设置端口VLAN
Switch>conft
Switch(sonfig)#vlan1name**(命名**)
Switch(config)#inte0/2(进入端口)
Switch(config)#vlan-menbershipstatic(静态)1
192.168.254 设置网关地址
如何在交换机上配置VLAN责任编辑:
admin 更新日期:
2005-8-6
1.设置VLAN名称
2.应用到端口
我们先设置VLAN的名称。
使用vlanvlan号namevlan名称。
在特权配置模式下进行配置:
1900Switch(config)#vlan2nameaccounting
1900Switch(config)#vlan3namemarketing
我们新配置了2个VLAN,为什么VLAN号从2开始呢?
这是因为默认情况下,所有的端口否放在VLAN1上,所以要从2开始配置。
1900系列的交换机最多可以配置1024个VLAN,但是,只能有64个同时工作,当然了,这是理论上的,我们应该根据自己网络的实际需要来规划VLAN的号码。
配置好了VLAN名称后我们要进入每一个端口来设置VLAN。
在交换机中,要进入某个端口比如说第4个端口,要用interfaceEthernet0/4,好的,结合上面给出的图我们让端口2、3、4和5属于VLAN2,端口17---22属于VLAN3。
命令是vlan-membershipstatic/dynamicVLAN号。
静态的或者动态的两者必须选择一个,后面是刚才配置的VLAN号。
好的,我们看结果:
1900Switch(config)#interfaceethernet0/2
1900Switch(config-if)#vlan-membershipstatic2
1900Switch(config-if)#inte0/3
1900Switch(config-if)#vlan-membershipstatic2
1900Switch(config-if)#inte0/4
1900Switch(config-if)#vlan-membershipstatic2
1900Switch(config-if)#inte0/5
1900Switch(config-if)#vlan-membershipstatic2
1900Switch(config-if)#inte0/17
1900Switch(config-if)#vlan-membershipstatic3
。
。
。
。
。
。
1900Switch(config-if)#inte0/22
1900Switch(config-if)#vlan-membershipstatic3
1900Switch(config-if)#
好的,我们已经把VLAN都定义到了交换机的端口上了。
这儿,我们只是配置的静态的,关于动态的,我们在后面会有提及的。
到现在为止,我们已经把交换机的VLAN配置好了,怎么样,没有你想象的那么复杂吧:
)。
为了验证我们的配置,我们在特权模式使用showvlan命令。
输出如下:
7:
进入交换机某一端口interfacefastehernet0/17 以17端口为例
switch>enable
switch#configureterminal
switch(conf)#hostnameaptch2950
aptech2950(conf)#interfacefastehernet0/17
aptech2950(conf-if)#
8:
查看命令 show
switch>enable
switch#showversion 察看系统中的所有版本信息
showinterfacevlan1 查看交换机有关ip协议的配置信息
showrunning-configure查看交换机当前起作用的配置信息
showinterfacefastethernet0/1 察看交换机1接口具体配置和统计信息
showmac-address-table 查看mac地址表
showmac-address-tableaging-time 查看mac地址表自动老化时间
9:
交换机恢复出厂默认恢复命令
switch>enable
switch#erasestartup-configure
switch#reload
10:
双工模式设置
switch>enable
switch#configureterminal
switch2950(conf)#hostnameaptch-2950
aptech2950(conf)#interfacefastehernet0/17 以17端口为例
aptech2950(conf-if)#duplexfull/half/auto 有full,half,auto三个可选项
11:
cdp相关命令
switch>enable
switch#showcdp 查看设备的cdp全局配置信息
showcdpinterfacefastethernet0/17 查看17端口的cdp配置信息
showcdptraffic 查看有关cdp包的统计信息
showcdpnerghbors 列出与设备相连的cisco设备
12:
csico2950的密码恢复
拔下交换机电源线。
用手按着交换机的MODE键,插上电源线
在switch:
后执行flash_ini命令:
switch:
flash_ini
查看flash中的文件:
switch:
dirflash:
把“config.text”文件改名为“config.old”:
switch:
renameflash:
config.textflash:
config.old
执行boot:
switch:
boot
交换机进入是否进入配置的对话,执行no:
进入特权模式察看flash里的文件:
showflash:
把“config.old”文件改名为“config.text”:
switch:
renameflash:
config.oldflash:
config.text
把“config.text”拷入系统的“running-configure”:
copyflash:
config.textsystem:
running-configure
把配置模式重新设置密码存盘,密码恢复成功。
13:
交换机telnet远程登录设置:
switch>en
switch#configureterminal
switch(conf)#hostnameaptech-2950
aptech2950(conf)#enablepasswordcisco 以cisco为特权模式密码
aptech2950(conf)#interfacefastethernet0/1 以17端口为telnet远程登录端口
aptech2950(conf-if)#ipaddress192.168.1.1255.255.255.0
aptech2950(conf-if)#noshut
aptech2950(conf-if)#exit
aptech2950(conf)linevty04 设置0-4个用户可以telnet远程登陆
aptech2950(conf-line)#login
aptech2950(conf-line)#passwordedge 以edge为远程登录的用户密码
主机设置:
ip 192.168.1.2 主机的ip必须和交换机端口的地址在同一网络段
netmask 255.255.255.0
gate-way 192.168.1.1 网关地址是交换机端口地址
运行:
telnet192.168.1.1
进入telnet远程登录界面
password:
edge
aptech2950>en
password:
cisco
aptech#
14:
交换机配置的重新载入和保存
设置完成交换机的配置后:
aptech2950(conf)#reload
是否保存(y/n) y:
保存设置信息 n:
不保存设置信息
路由器命令
router>