JunipervipWord文档下载推荐.docx
《JunipervipWord文档下载推荐.docx》由会员分享,可在线阅读,更多相关《JunipervipWord文档下载推荐.docx(12页珍藏版)》请在冰豆网上搜索。
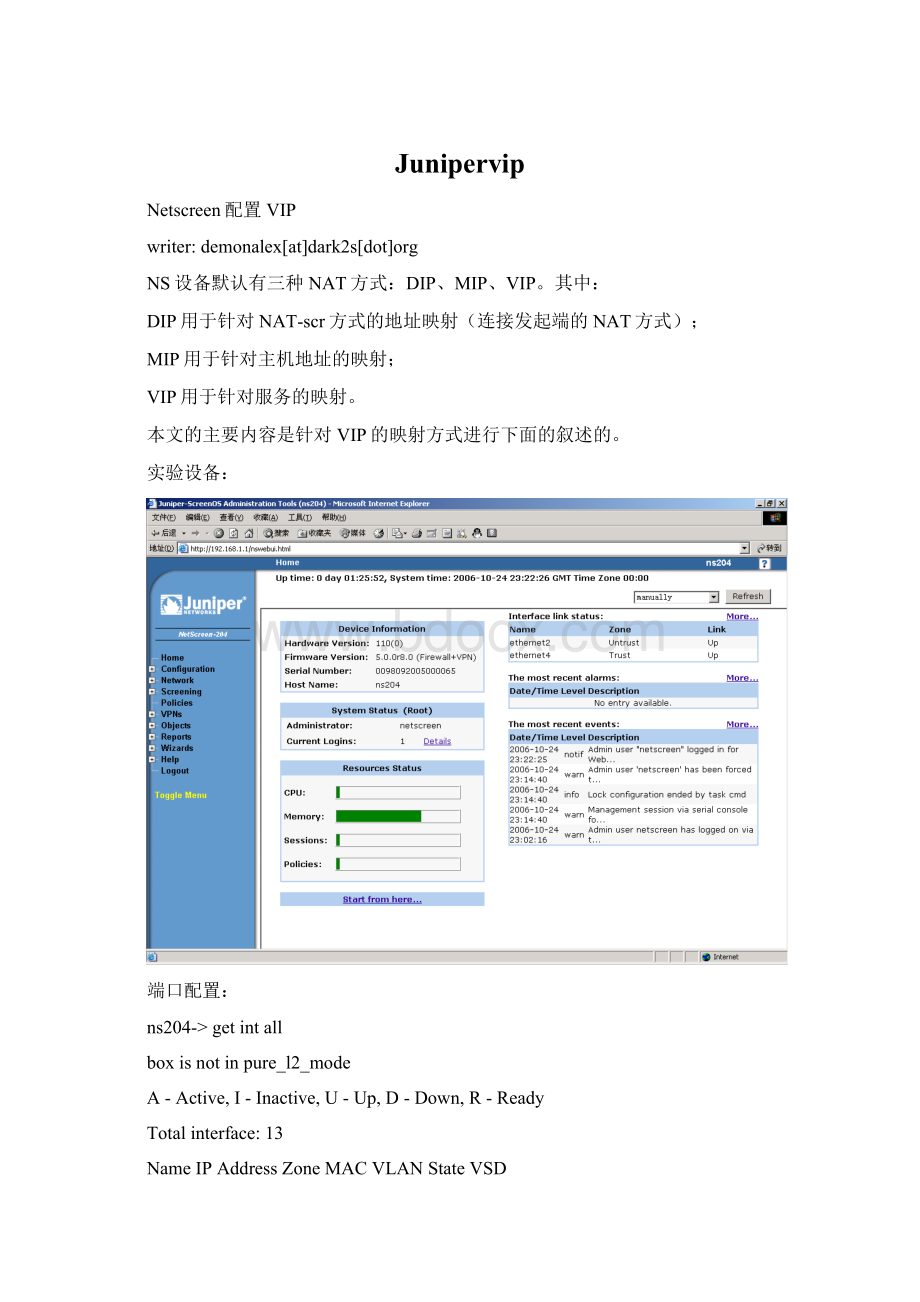
Totalinterface:
13
NameIPAddressZoneMACVLANStateVSD
eth10.0.0.0/0Trust0012.1ea0.0ae0-D-
eth2192.168.2.1/24Untrust0012.1ea0.0ae5-U-
eth30.0.0.0/0Untrust0012.1ea0.0ae6-D-
eth4192.168.1.1/24Trust0012.1ea0.0ae7-U-
vlan10.0.0.0/0VLAN0012.1ea0.0aef1D-
具体操作步骤:
1)首先登陆WEBUI,进入Network->
Interfaces界面:
2)选定Untrust区域的网络接口—本例是eth2,进入其Basic页面:
3)切换至VIP分页,在VirtualIPAddress栏输入VIPNAT后的地址(注意:
这个地址一定要与你的NAT出口同一网段,但系统默认不支持使用与NAT出口同一地址,具体内容请参照本文最后的“小技巧”部分),本例使用的是192.168.2.3,按Add按钮添加:
4)添加完成后可以在主页面偏下方看到我们添加的VIP记录,设置VIP---在主页面右上角有一个NewVIPService的按钮,点击它…
5)在VirtualIP中选定我们刚新建好的、VIPNAT后的地址;
VirtualPort中输入VIPNAT后的传输层端口;
MaptoService是我们需要映射的传输层端口(这个可以在NetScreen设备的Objects->
Services->
Custom中自行定义);
MaptoIP中输入我们要映射的主机IP地址;
ServerAutoDetection用于防火墙以PING的方式检测该MaptoIP的主机是否‘存在’的功能(作用不大…);
按OK按钮进入下一步操作…
6)现在我们回到VIP的主界面后就可以观赏到一条完整的VIP记录了:
7)建立了VIP后需要定义一条策略使其生效,进入Policies页面,建立一条Untrust到Global的策略:
SourceAddress=Any;
DestinationAddress=VIP(192.168.2.3);
Service=Any;
Application=None;
Action=Permit;
(忽略其它通用的选项)…
8)建立后我们可以在Policies主界面看到该策略:
9)现在我们重新回到eth2的VIP界面,可以看到我们原来新建的那条VIP记录的Status了吧?
J
下面提供一个我在项目实施中的具体案例:
拓扑:
cfg配置:
setclocktimezone0
setvroutertrust-vrsharable
unsetvrouter"
trust-vr"
auto-route-export
setservice"
20"
protocoltcpsrc-port0-65535dst-port20-20
21"
protocoltcpsrc-port0-65535dst-port21-21
8023"
protocoltcpsrc-port0-65535dst-port8023-8023
80"
protocoltcpsrc-port0-65535dst-port80-80
+udpsrc-port0-65535dst-port80-80
6633"
protocoltcpsrc-port0-65535dst-port6633-6633
+udpsrc-port0-65535dst-port6633-6633
1554"
protocoltcpsrc-port0-65535dst-port1554-1554
+udpsrc-port0-65535dst-port1554-1554
3389"
protocoltcpsrc-port0-65535dst-port3389-3389
+udpsrc-port0-65535dst-port3389-3389
setauth-server"
Local"
id0
server-name"
setauthdefaultauthserver"
setadminname"
netscreen"
setadminpassword"
nKVUM2rwMUzPcrkG5sWIHdCtqkAibn"
setadminauthtimeout10
setadminauthserver"
setadminformatdos
setzone"
Trust"
vrouter"
Untrust"
DMZ"
VLAN"
tcp-rst
block
unsetzone"
MGT"
screentear-drop
screensyn-flood
screenping-death
screenip-filter-src
screenland
V1-Untrust"
setinterface"
ethernet1"
zone"
ethernet2"
ethernet3"
ethernet4"
unsetinterfacevlan1ip
setinterfaceethernet1ip211.139.236.75/29
setinterfaceethernet1route
setinterfaceethernet2ip10.250.188.141/24
setinterfaceethernet2nat
setinterfaceethernet4ip9.9.9.9/24
setinterfaceethernet4route
unsetinterfacevlan1bypass-others-ipsec
unsetinterfacevlan1bypass-non-ip
setinterfaceethernet1ipmanageable
setinterfaceethernet2ipmanageable
setinterfaceethernet1manageping
unsetinterfaceethernet2managesnmp
unsetinterfaceethernet2managessl
setinterfaceethernet1vip211.139.236.7880"
HTTP"
10.250.188.11
setinterfaceethernet1vip211.139.236.78+20"
setinterfaceethernet1vip211.139.236.78+21"
setinterfaceethernet1vip211.139.236.78+8023"
setinterfaceethernet1vip211.139.236.78+6633"
setinterfaceethernet1vip211.139.236.78+1554"
10.250.188.12
setinterfaceethernet1vip211.139.236.78+3389"
10.250.188.10
sethostnamens204
setikerespond-bad-spi1
setpolicyid3from"
to"
"
Any"
VIP(211.139.236.78)"
ANY"
permitlog
setpolicyid3disable
setpolicyid1from"
setpolicyid2from"
Global"
setpkiauthoritydefaultscepmode"
auto"
setpkix509defaultcert-pathpartial
setlogmodulesystemlevelemergencydestinationconsole
setlogmodulesystemlevelalertdestinationconsole
setlogmodulesystemlevelcriticaldestinationconsole
setlogmodulesystemlevelerrordestinationconsole
setlogmodulesystemlevelwarningdestinationconsole
setlogmodulesystemlevelnotificationdestinationconsole
setlogmodulesystemlevelinformationdestinationconsole
setlogmodulesystemleveldebuggingdestinationconsole
setlogmodulesystemlevelerrordestinationwebtrends
setlogmodulesystemlevelwarningdestinationwebtrends
setlogmodulesystemlevelinformationdestinationwebtrends
setlogmodulesystemleveldebuggingdestinationwebtrends
setfirewalllog-self
setsshversionv2
setconfiglocktimeout5
setsnmpportlisten161
setsnmpporttrap162
setvrouter"
untrust-vr"
exit
unsetadd-default-route
setroute0.0.0.0/0interfaceethernet1gateway211.139.236.73
*小技巧
正常来讲,NetScreen防火墙的中高端型号(NS204或以上)是不支持将VIP映射后的IP地址绑定在该接口的物理接口IP上的(只允许与该IP同一网段),但最近一次偶然的机会让我和我的同事发现到就算是中高端型号的设备也能达成这样的效果:
打个比方,我们的需求是将内网的192.168.1.2的TCP80端口映射到防火墙外网接口192.168.2.1的TCP80端口,首先我们将防火墙的外网接口设置为192.168.2.2(与192.168.2.1同一网段,让VIP绑定在192.168.2.1能顺利进行),然后设置该接口的VIP---将192.168.1.2的TCP80端口映射到192.168.2.1的TCP80端口,保存这些设置后重新进入外网接口的设置界面,将其IP修改为192.168.2.1,再次保存…整个过程完成。
 升级会员
升级会员 