利用felix和struts2实现osgi webWord文档格式.docx
《利用felix和struts2实现osgi webWord文档格式.docx》由会员分享,可在线阅读,更多相关《利用felix和struts2实现osgi webWord文档格式.docx(30页珍藏版)》请在冰豆网上搜索。
通过该示例,可以体现出基于OSGi开发的项目具有良好的模块化以及OSGi的bundle动态部署的能力,从而说明了OSGi适用于开发持续运行且需要动态更新的系统。
在这个示例中,一共包括五个工程,一个WebApplication工程和四个OSGibundle工程。
WebApplication工程是用于Web部署。
四个OSGibundle中,包括一个Webbundle,用于Web交互;
一个timeservicebundle,包含一个获取时间信息的接口服务;
一个localtimeservicebundle,实现接口服务,用于获取本地时间信息;
一个utctimeservicebundle,用于获取世界标准时间(UniversalTimeCoordinated,UTC)信息。
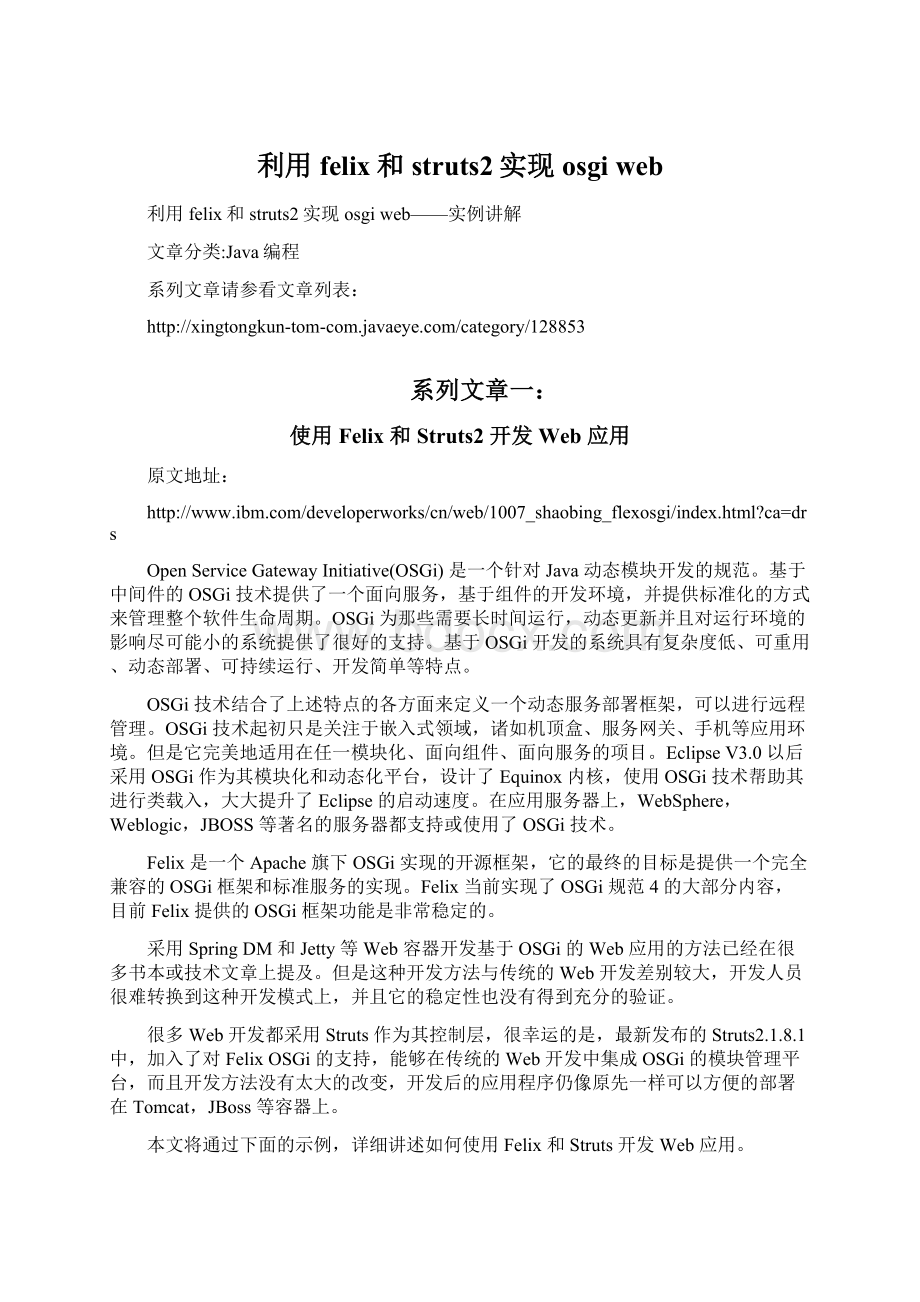
本示例的结构原理如图1所示。
在WebContainer中注册了StrutsOSGi的监听器,该监听器会去启动或停止ApacheFelixHost,ApacheFelixHost是StrutsOSGiPlugin和FelixFramework的连接点。
FelixHost会去创建和初始化FelixFramework,FelixFramework负责管理系统中的其余的所有bundle,StrutsOSGiPlugin会监听bundle的变化,如果发生变化的bundle是一个Strutsbundle,则会去加载Struts的配置。
图1.示例结构原理图
建立OSGi的Web开发环境
本文示例使用的Web开发环境包括如下组件,部分框架可以参考资料中下载。
∙Eclipse3.5forJavaEEDevelopers
∙SunJDK1.6.0
∙Tomcat6.0.24
∙Struts2.1.8.1(EssentialDependenciesOnly)
∙spring-osgi-1.1.2-with-dependencies(OnlyNeedwhenaddingSpringSupport)
WebApplication工程的创建方式与通常的Web工程类似,但是需要加入Felix的支持和Struts2OSGiPlugin.Felix是OSGi的平台,用于管理整个系统中的所有的bundle,而Struts2OSGiPlugin是Struts2和OSGi连接的桥梁,通过Struts2OSGiPlugin将Felix融入到Struts2框架中。
另外,还需要加入Struts2OSGiAdminbundle,这个bundle向管理人员提供基于Web的管理OSGi平台中的bundle的操作入口。
同时在web.xml中需要加入StrutsOSGi监听器,这样OSGi平台中的bundle发生变化时,会触发该监听器去做一些与Struts相关测操作,例如增加Action或使Action失效。
web.xml中过滤器和监听器部分的配置内容如清单1:
清单1.web.xml过滤器和监听器配置
<
filter>
filter-name>
struts2-prepare<
/filter-name>
filter-class>
org.apache.struts2.dispatcher.ng.filter.StrutsPrepareFilter<
/filter-class>
/filter>
struts2-execute<
org.apache.struts2.dispatcher.ng.filter.StrutsExecuteFilter
filter-mapping>
url-pattern>
/*<
/url-pattern>
/filter-mapping>
listener>
listener-class>
org.apache.struts2.osgi.StrutsOsgiListener<
/listener-class>
/listener>
org.apache.struts2.dispatcher.ng.listener.StrutsListener
WebApplication工程的目录结构如图2所示:
图2.WebApplication工程的目录结构
将WebApplication部署到Tomcat上并启动Tomcat,然后在浏览器中输入http:
//localhost:
8080/webapp/osgi/admin/bundles.action,(webapp是项目部署到Tomcat中的名字)如果看到了类似于图5的bundles列表,说明OSGi环境配置成功。
开发获取时间消息接口服务bundle
消息接口服务bundle是提供消息服务的接口,该接口将被Webbundle所使用,其他bundle可以不同的形式实现该接口。
在这里利用eclipse新建插件工程的功能来创建OSGibundle。
需要特别设置anOSGIframework为standard方式,这种方式允许部署项目到标准的OSGI容器中。
新建OSGi工程的向导如图3所示。
图3.新建OSGi工程向导图
在该项目中开发一个用于获取时间信息的接口,通过该接口可以获取字符串形式的时间信息。
清单2.获取时间服务接口代码
packagecom.example.time.service;
publicinterfaceTimeService{
publicStringgetTime();
}
需要将该bundle中的服务包的类和接口就暴露给了其他的bundle,其他的bundle可以通过import这个包来使用其中的类和接口。
开发获取本地时间消息实现服务bundle
获取本地时间消息服务bundle实现了时间消息接口服务。
在该bundle种返回的时间消息是当前时区的时间信息。
因为用到了接口服务包,所以需要在Import-Package中加入接口服务包。
清单3.获取本地时间实现代码
packagecom.example.time.local.service;
importjava.text.SimpleDateFormat;
importjava.util.Calendar;
importjava.util.Date;
importcom.example.time.service.TimeService;
publicclassLocalTimeServiceimplementsTimeService{
@Override
publicStringgetTime(){
Calendarcalendar=Calendar.getInstance();
Datedate=calendar.getTime();
SimpleDateFormatformatter=newSimpleDateFormat("
yyyy-MM-ddHH:
mm:
ss"
);
return"
Thelocaltime:
"
+formatter.format(date);
OSGibundle中的服务要能够被其他bundle使用,使用将服务发布出来。
在该bundle的Activator的start()方法中注册该服务,可以发布这个服务。
当这个bundle启动时,将获取本地时间发布为一个服务。
服务发布的代码如清单4所示。
清单4.服务发布
publicvoidstart(BundleContextcontext)throwsException{
context.registerService(TimeService.class.getName(),newLocalTimeService(),null);
开发获取UTC时间消息实现服务bundle
获取UTC时间消息实现服务同样实现了时间消息接口服务,该bundle主要是用于和上一个bundle即获取本地时间消息服务进行动态的替换,用于表现OSGi的动态部署的能力。
清单5.获取UTC时间服务实现
publicclassUTCTimeServiceimplementsTimeService{
publicStringgetTime(){
intzoneOffset=calendar.get(Calendar.ZONE_OFFSET);
intdstOffset=calendar.get(Calendar.DST_OFFSET);
calendar.add(Calendar.MILLISECOND,-(zoneOffset+dstOffset));
mms"
TheUTCtime:
开发Webbundle
Webbundle是系统Web交互的入口。
在该bundle中需要使用时间消息接口服务bundle中的接口,所有需要在MANIFEST.MF的Import-Package加入时间消息接口服务包,另外,为了能够识别出该bundle是一个Strutsbundle,需要将该bundle设置为可被Struts2支持,即在MANIFEST.MF中加入Struts2-Enabled:
true,这样该bundle中的struts.xml就会被加载。
最终的MANIFEST.MF的配置如清单6。
清单6.WebBundle的MANIFEST.MF配置
Manifest-Version:
1.0
Bundle-ManifestVersion:
2
Bundle-Name:
com-example-time-web
Bundle-SymbolicName:
com.example.time.web
Bundle-Version:
1.0.0.qualifier
Bundle-Vendor:
keki
Bundle-RequiredExecutionEnvironment:
JavaSE-1.6
Struts2-Enabled:
true
Import-Package:
com.example.time.service,
com.opensymphony.xwork2,
org.apache.struts2.osgi.interceptor,
org.osgi.framework;
version="
1.3.0"
为了实现用户交互,还需要创建一个获取时间消息响应的action。
该Action的execute()方法代码如清单7所示。
清单7.Action实现方法
publicStringexecute(){
ServiceReferenceref=bundleContext.getServiceReference(
TimeService.class.getName());
TimeServicetimeService=(TimeService)bundleContext.getService(ref);
timeMessage=timeService.getTime();
returnSUCCESS;
这个Webbundle中独立的建立一个struts.xml,这个struts.xml将会为单独加载,需要注意的是Struts的pacakge继承osgi-default这个包,osgi-default已在struts2-osgi-plugin这个jar包里面定义。
清单8.WebBundlestruts.xml的action定义
struts>
packagename="
time-example"
namespace="
/time"
extends="
osgi-default"
>
actionname="
time"
class="
com.example.time.web.action.TimeAction"
resulttype="
freemarker"
time.ftl<
/result>
/action>
/package>
/struts>
打包部署
将开发好的四个bundle导出成plugin的包,并将它们放在WebApp工程中,bundles的目录结构如图4所示。
图4.WebApplication中的bundles目录结构
运行演示
启动Tomcat,在浏览器地址栏输入http:
8080/webapp/osgi/admin/bundles.do,可以看到所系统中所有的bundle的列表。
图5.部署的bundles列表
在浏览器地址栏输入http:
8080/webapp/time/time.do,可以获得时间信息,此时的时间信息为本地时间信息,当前TimeService这个服务有localtimeservice和UTCtimeservice两个实现,调用的是localtimeservice这个实现。
图6.获取本地时间页面显示
此时,在浏览器地址栏输入http:
8080/webapp/osgi/admin/shell.do,然后输入命令stop1,将Localtimeservice这个bundle停止掉,输入命令ps,可以看到localtimeservice这个bundle的state已经变为Resolved.
图7.OSGiShell管理页面
在浏览器地址栏再次输入http:
8080/webapp/time/time.do得到的结果如图7所示。
图8.获取UTC时间显示页面
通过上面的演示,我们可以看到OSGibundle的动态部署能力。
回页首
bundle的管理
通过Felix可以方便的管理项目中的bundle,并且实现bundle的热部署,即插即用,即删即无的特性,特别适用于可持续运行的系统。
添加bundle
输入命令install<
bundle-url>
,然后输入start<
bundle-id>
即可。
如$installfile:
/k:
/plugins/com.example.time.local_1.0.0.qualifier.jar,$start7
更新bundle
输入命令update<
如
$update1file:
/plugins/com.example.time.local_1.0.0.qualifier.jar
启动和停止bundle
输入命令start<
启动bundle;
输入命令stop<
停止bundle。
$start2,$stop1
卸载bundle
若bundle处于Installed或Resolve状态,则直接输入命令uninstall<
。
若bundle处于Actived状态,则先输入命令stop<
停止bundle,再输入命令uninstall<
如$uninstall1
常见问题
如何修改bundle的最大启动级别
在上面的示例中,bundle中最大的启动级别只能为3。
如果在bundles下面增加一个目录4,即bundles/4,则目录4中的bundle是无法启动的,而在很多时候,特别是在大型的项目中,最大启动级别为3是不能满足要求,此时可以web.xml中添加启动级别的参数。
如下面把最大启动级别设置为5。
清单9.启动级别配置
context-param>
param-name>
struts.osgi.runLevel<
/param-name>
param-value>
5<
/param-value>
/context-param>
解决Bundle中的struts.xml的StrutsConfigurationDTD无法定位的问题
Struts.xml的头部有StrutsConfigurationDTD的引用定义,一般DTD文档的URL为http:
//struts.apache.org/dtds/XXX.dtd,示例如下所示:
清单10.struts.xml头部dtd
!
DOCTYPEstrutsPUBLIC"
-//ApacheSoftwareFoundation//DTDStruts
Configuration2.0//EN"
//struts.apache.org/dtds/struts-2.0.dtd"
如果无法连接上http:
//struts.apache.org/,那么在加载Struts的bundle时也将会出错,因为bundle与WebApplication的lib的加载路径不一致,无法从WebApplication的lib下面找到XXX.dtd文件。
此时可以通过修改dtd文件的URL来解决,可以改成一个本地文件系统的URI,如file:
/c:
/webapp/dtds/struts-2.0.dtd,也可以改为本地的Web服务器或一个可以连接上的服务器的URL,如http:
//localhost/dtds/struts-2.0.dtd。
如何使用Spring进行对象管理
SpringDM使得Spring和OSGi成为可能,在本文的开发环境中,也可以加入SpringDM来管理系统中的对象。
首先加入SpringDM必要的jar包,如
清单11.Sp
 升级会员
升级会员 