Spring boot基础文档Word格式文档下载.docx
《Spring boot基础文档Word格式文档下载.docx》由会员分享,可在线阅读,更多相关《Spring boot基础文档Word格式文档下载.docx(21页珍藏版)》请在冰豆网上搜索。
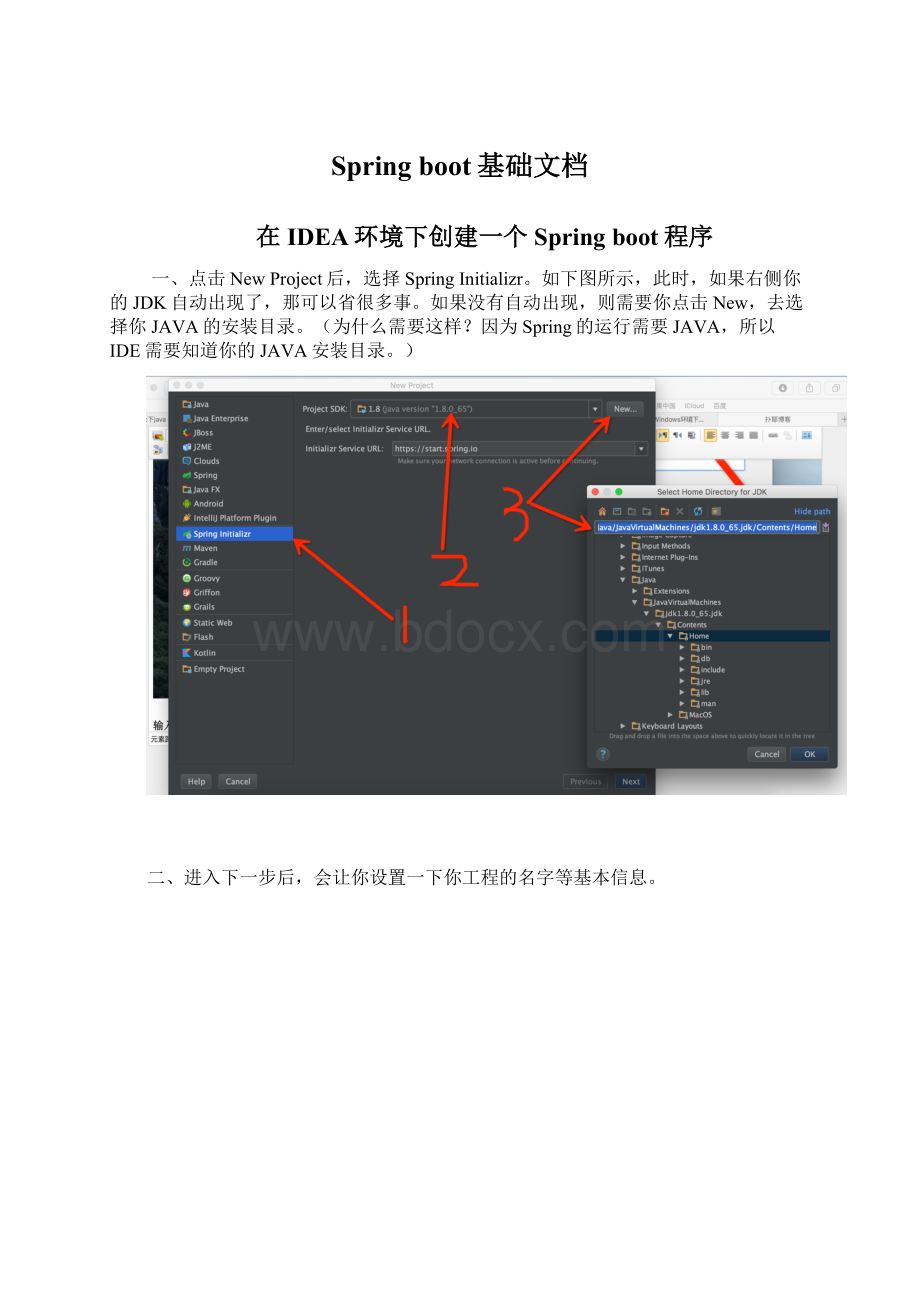
下面,让我们来建立这四个包吧~在com.example这个包上右键,然后new一个包出来。
如图所示:
我这里创建好包名后,目录结构是这样的:
好了,到这一步,我们终于可以开始写代码啦~~~在本文里,我们将不会用到service、model、repository,只会用到controller来写一个简单的HelloWorld。
让我们开始写吧:
首先,在controller这个包上点击右键,新建一个class,名字就叫nana,如下图所示:
建立好文件后,我们在这个文件里输入以下的代码:
【注意,如果没有严格按照前面的教程来,你的包名可能和我的不一样,所以这个代码复制过去后,请自己检查一遍!
】
package
com.example.controller;
import
org.springframework.boot.autoconfigure.EnableAutoConfiguration;
org.springframework.web.bind.annotation.RequestMapping;
org.springframework.web.bind.annotation.RequestMethod;
org.springframework.web.bind.annotation.RestController;
/**
*
Created
by
longge93
on
16/4/14.
*/
@RestController
@EnableAutoConfiguration
public
class
nana
{
@RequestMapping(value="
/"
method
=
RequestMethod.GET)
String
index(){
return
"
Hello
World~"
;
}
然后我们来运行以下我们的工程,运行方法如下图所示:
如上图所示,点击那个三角形,就可以运行我们的工程了。
不过,所有写代码的过程都是不顺利的~~虽然我们点了运行,但是下面的控制台里却提示我们运行失败了,从上图的下面看出,是hibernate出错了。
为什么呢?
因为我们在Maven里包含了MySQL的jar包,但是却没有配置数据库连接需要的账号和密码等信息。
所以hibernate会报错~~因为我们这篇文章里,只是为了输出helloworld,用不着数据库。
所以我们先去pom文件里注释掉数据库相关的jar包应该就OK了。
我注释完后,我的pom文件是这样的,请仔细检查:
<
?
xml
version="
1.0"
encoding="
UTF-8"
>
project
xmlns="
http:
//maven.apache.org/POM/4.0.0"
xmlns:
xsi="
//www.w3.org/2001/XMLSchema-instance"
xsi:
schemaLocation="
//maven.apache.org/POM/4.0.0
//maven.apache.org/xsd/maven-4.0.0.xsd"
modelVersion>
4.0.0<
/modelVersion>
groupId>
com.example<
/groupId>
artifactId>
demo<
/artifactId>
version>
0.0.1-SNAPSHOT<
/version>
packaging>
jar<
/packaging>
name>
/name>
description>
Demo
for
Spring
Boot<
/description>
parent>
org.springframework.boot<
spring-boot-starter-parent<
1.3.3.RELEASE<
relativePath/>
!
--
lookup
parent
from
repository
-->
/parent>
properties>
project.build.sourceEncoding>
UTF-8<
/project.build.sourceEncoding>
java.version>
1.8<
/java.version>
/properties>
dependencies>
dependency>
spring-boot-starter-aop<
/dependency>
--<
spring-boot-starter-data-jpa<
spring-boot-starter-jdbc<
spring-boot-starter-redis<
org.springframework.session<
spring-session<
spring-boot-starter-thymeleaf<
spring-boot-starter-web<
mysql<
mysql-connector-java<
scope>
runtime<
/scope>
spring-boot-starter-test<
test<
/dependencies>
build>
plugins>
plugin>
spring-boot-maven-plugin<
/plugin>
/plugins>
/build>
/project>
此时,依然报错:
CannotdetermineembeddeddatabasedriverclassfordatabasetypeNONE
解决办法:
注释掉pom文件中jap和session,在完成以后,pom配置如下
<
project.reporting.outputEncoding>
/project.reporting.outputEncoding>
<
<
<
然后我们再点击那个三角形运行,你会发现运行成功啦~~如下图所示:
因为Springboot其实已经自带Tomcat了,所以当我们把这个工程跑起来后,其实就相当于跑起来一个网站。
现在让我们去网页里看看我们的HelloWorld有没有正常工作吧~
在浏览器里,打开http:
//localhost:
8080,你会发现输出了HelloWorld~~
来源:
Springboot在Springmvc下接入微信
在我们搭建好Springboot环境后,可以很容易的使用Springmvc,不需要复杂的配置,只需要做一些基本的注解就行了。
这一章讲述如何在Springmvc下去接入微信。
一、接入微信需要一个公网IP,这里我们使用的是ngrock内网穿透工具。
运行--》cmd,进入ngrock解压目录,输入命令ngrok-subdomain
yxpeng
-config=ngrok.cfg
8080
其中yxpeng是可以自己配置的子域名,8080端口通常设置为你的项目运行的端口,因为我这边默认的是8080,所以我设置成了8080.
二、与用servlet接入微信一样的,我们需要接受到微信后台通过get请求传过来的几个参数。
首先,写了一个model,其中封装了这四个参数。
com.example.model;
*微信接入校验信息model
*CreatedbyAdministratoron2016/11/80008.
*/
publicclassCheckModel{
privateStringsignature;
privateLongtimestamp;
privateLongnonce;
privateStringechostr;
publicStringgetSignature(){
returnsignature;
publicvoidsetSignature(Stringsignature){
this.signature=signature;
publicLonggetTimestamp(){
returntimestamp;
publicvoidsetTimestamp(Longtimestamp){
this.timestamp=timestamp;
publicLonggetNonce(){
returnnonce;
publicvoidsetNonce(Longnonce){
this.nonce=nonce;
publicStringgetEchostr(){
returnechostr;
publicvoidsetEchostr(Stringechostr){
this.echostr=echostr;
创建一个controller类,其中添加一个validate方法,用来接收这个model并进行处理
packagecom.example.controller;
importcom.example.model.webModel.User;
importcom.example.service.UserService;
importorg.springframework.beans.factory.annotation.Autowired;
importorg.springframework.boot.autoconfigure.EnableAutoConfiguration;
importorg.springframework.web.bind.annotation.PathVariable;
importorg.springframework.web.bind.annotation.RequestMapping;
importorg.springframework.web.bind.annotation.ResponseBody;
importorg.springframework.web.bind.annotation.RestController;
*CreatedbyAdministratoron2016/11/90009.
@RequestMapping("
/user"
publicclassUserController{
@Autowired
privateUserServiceuserService;
/check/{name}"
public@ResponseBodyStringaddUser(@PathVariable("
name"
)Stringname){
Useruser=newUser();
user.setUserName(name);
user.setPassword("
123"
);
user.setRealName("
喻学鹏"
userService.saveUser(user);
returnuser.getUserName();
/find/{name}"
public@ResponseBodyStringfindUserByName(@PathVariable("
Useru=null;
u=userService.findByUserName(name);
if(u!
=null){
returnu.getRealName();
}else{
return"
未找到"
}
在tokenService中,分离出这四个参数,然后对token,timestamp和nonce这三个参数进行字典排序,然后进行SHA1加密,将密文与signature对比,如果相同就返回echostr.
packagecom.example.service;
importcom.example.model.CheckModel;
importcom.example.util.EncoderHandler;
importorg.springframework.stereotype.Service;
importorg.springframework.transaction.annotation.Transactional;
importjava.util.Arrays;
@Service
publicclassTokenService{
*微信接入数据验证
*@paramwxToken
*@paramtokenModel
*@return
@Transactional
publicStringvalidate(StringwxToken,CheckModeltokenModel){
Stringsignature=tokenModel.getSignature();
Longtimestamp=tokenModel.getTimestamp();
Longnonce=tokenModel.getNonce();
Stringechostr=tokenModel.getEchostr(
 升级会员
升级会员 