ros多线路叠加策略pcc超详细教程图文Word格式文档下载.docx
《ros多线路叠加策略pcc超详细教程图文Word格式文档下载.docx》由会员分享,可在线阅读,更多相关《ros多线路叠加策略pcc超详细教程图文Word格式文档下载.docx(11页珍藏版)》请在冰豆网上搜索。
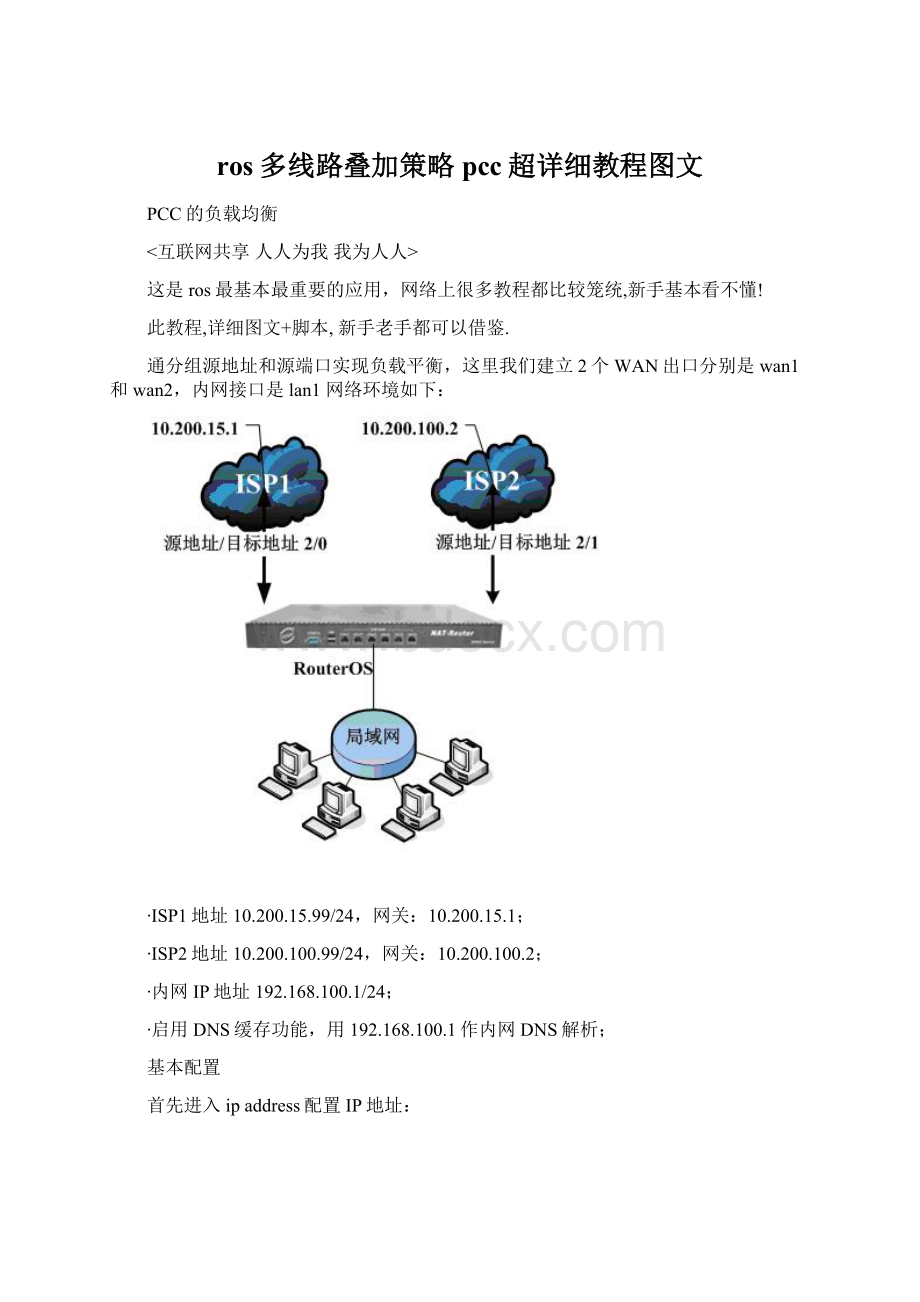
基本配置
首先进入ipaddress配置IP地址:
在ipdnssetting中配置好DNS缓存,DNS为:
61.139.2.69
Mangle标记配置
接下来我们进入ipfirewallmangle标记连接和路由,我们使用per-connection-classifier双向地址进行分类做连接分类标记。
首先我们需要将进入路由的的链接进行标记
如下图,我们进入一条mangle规则,中的advanced标签内容可以看到per-connection-classifier分类器,选择both-addresses的分类:
然后选择dst-address-type=!
local,即除了目标地址是本地以前的地址:
注:
2条线的分类代码定义是第一条线为2/0,第二条为2/1
同样选择一下地址类型:
下面命令是提取走第一条线路的连接标记取名位1st_conn,并从连接里提取路由标记名位1st_route,设置:
per-connection-classifier=both-addresses:
2/0,设置in-interface=lan
/ipfirewallmangle
addaction=mark-connectionchain=preroutingcomment="
"
disabled=no\
in-interface=lannew-connection-mark=1st_connpassthrough=yes\
per-connection-classifier=both-addresses:
2/0
addaction=mark-routingchain=preroutingcomment="
connection-mark=1st_conn\
disabled=noin-interface=lannew-routing-mark=1st_routepassthrough=yes
提取走第二条线路的连接标记取名位2nd_conn,并从连接里提取路由标记名位2nd_route,设置:
2/1,设置in-interface=lan:
in-interface=lannew-connection-mark=2nd_connpassthrough=yes\
2/1
connection-mark=2nd_conn\
disabled=noin-interface=lannew-routing-mark=2nd_routepassthrough=yes
在winbox在mangle中设置完成后如下:
回程路由设置
我们需要将从那个口进入就从相应的口回去,即保证每个外网口的数据能得到正确的路由
addchain=inputin-interface=wan1action=mark-connectionnew-connection-mark=1st_conn
addchain=inputin-interface=wan2action=mark-connectionnew-connection-mark=2nd_conn
winbox设置
标记完进入接口的链接后,将这些链接指定到相应的路由标记上:
addchain=outputconnection-mark=1st_connaction=mark-routingnew-routing-mark=1st_route
addchain=outputconnection-mark=2nd_connaction=mark-routingnew-routing-mark=2nd_route
路由配置
配置完标记后路由后,我们进入iproute配置路由,首先设置负载均衡的标记路由,首先设置第一条线路的路由标记,设置routing-mark=1st_route:
设置第二条线路的路由标记,设置routing-mark=2nd_route:
配置默认网关和备份网关,默认网关的distance设置为1,并设置check-gateway=ping,通过ping监测网关状态:
备份网关的distance设置为2,并设置check-gateway=ping,通过ping监测网关状态:
配置完成后的路由标如下图:
配置nat
最后配置nat转换规则,进入ipfirewallnat中配置action=masquerade,分别对2条线路做伪装:
/ipfirewallnat
addaction=masqueradechain=srcnatout-interface=wan1
addaction=masqueradechain=srcnatout-interface=wan2
命令代码如下:
#添加ADSL1的pppoe-out帐户密码并取取消自动添加网关及DNS
/interfacepppoe-clientaddname="
pppoe-out1"
interface="
wan1"
user="
adsl1name"
password="
adsl1pass"
add-default-route=nodisabled=no
pppoe-out2"
wan2"
adsl2name"
adsl2pass"
#激活pppoe-out拨号
/interfacepppoe-clientenablepppoe-out1
/interfacepppoe-clientenablepppoe-out2
#添加本地连接配置
/ipaddressaddaddress=192.168.1.254/255.255.255.0interface=lan1comment="
LAN1"
#设置DNS缓存
/ipdnssetprimary-dns="
202.103.224.68"
secondary-dns="
202.103.225.68"
allow-remote-requests=yes
#设置MSS值为1440
/ipfirewallmangleaddaction="
change-mss"
chain="
forward"
comment="
disabled=nonew-mss="
1440"
protocol="
tcp"
tcp-flags="
syn"
#设置input
mark-connection"
input"
disabled=noin-interface="
new-connection-mark="
pppoe-out1_conn"
passthrough=yes
pppoe-out2_conn"
#设置output
mark-routing"
output"
connection-mark="
disabled=nonew-routing-mark="
to_pppoe-out1"
to_pppoe-out2"
#PCC设置
prerouting"
disabled=nodst-address-type="
!
local"
in-interface="
lan1"
passthrough=yesper-connection-classifier="
both-addresses:
2/0"
src-address="
192.168.1.0/24"
2/1"
chain=preroutingcomment="
new-routing-mark="
passthrough=yessrc-address="
/iprouteaddcomment=1disabled=nodistance=1dst-address="
0.0.0.0/0"
gateway="
routing-mark="
check-gateway="
ping"
/iprouteaddcomment=2disabled=nodistance=1dst-address="
/iprouteaddcheck-gateway="
disabled=nodistance="
10"
dst-address="
#配置pppoe-out数据转发共享及标记
/ipfirewallnataddaction="
masquerade"
srcnat"
1"
disabled=noout-interface="
2"
 升级会员
升级会员 