delphi 表格数据导出到excelWord格式.docx
《delphi 表格数据导出到excelWord格式.docx》由会员分享,可在线阅读,更多相关《delphi 表格数据导出到excelWord格式.docx(14页珍藏版)》请在冰豆网上搜索。

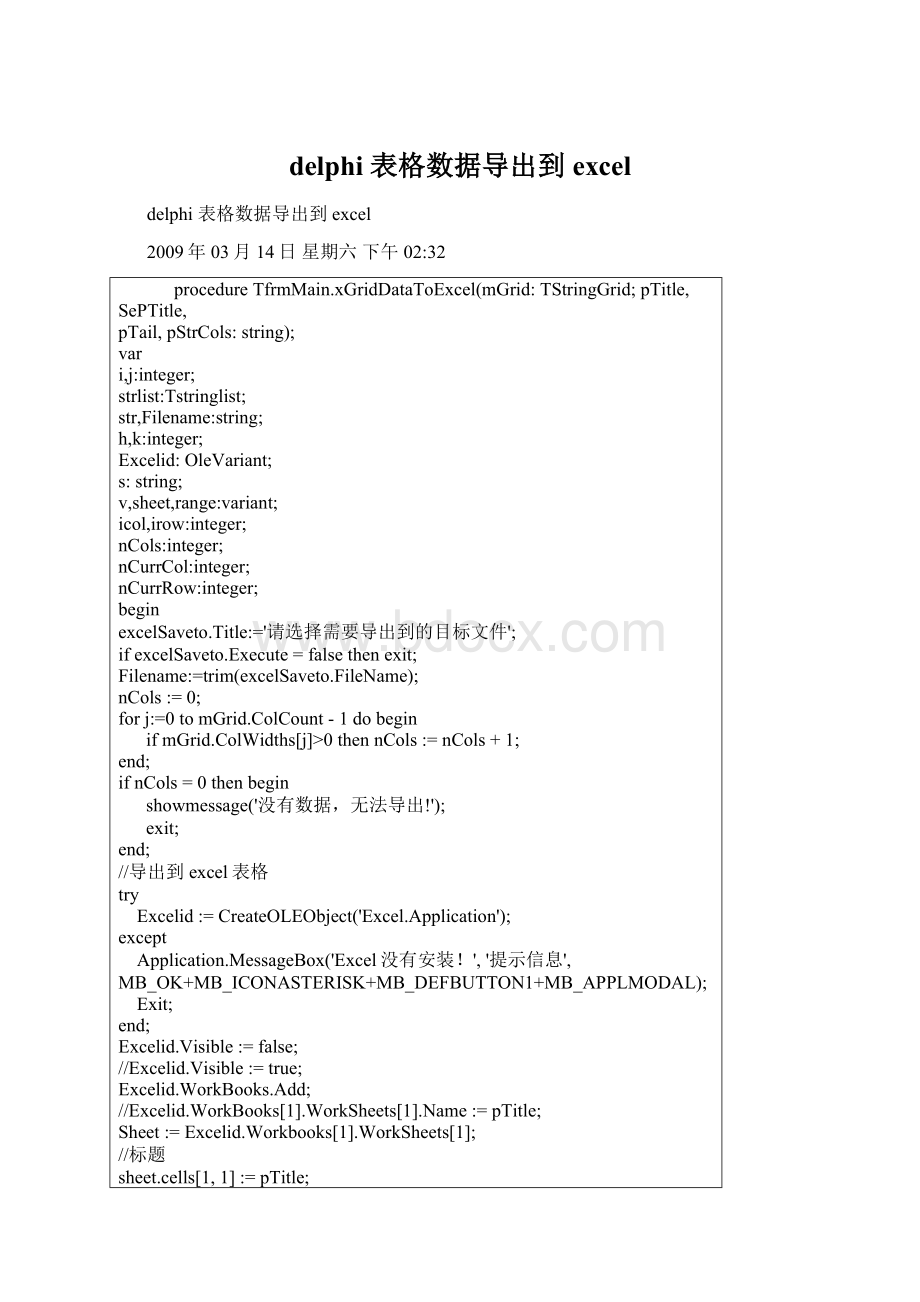
end;
ifnCols=0thenbegin
showmessage('
没有数据,无法导出!
'
);
exit;
//导出到excel表格
try
Excelid:
=CreateOLEObject('
Excel.Application'
except
Application.MessageBox('
Excel没有安装!
'
提示信息'
MB_OK+MB_ICONASTERISK+MB_DEFBUTTON1+MB_APPLMODAL);
Exit;
Excelid.Visible:
=false;
//Excelid.Visible:
=true;
Excelid.WorkBooks.Add;
//Excelid.WorkBooks[1].WorkSheets[1].Name:
=pTitle;
Sheet:
=Excelid.Workbooks[1].WorkSheets[1];
//标题
sheet.cells[1,1]:
sheet.range[sheet.cells[1,1],sheet.cells[1,nCols]].Select;
//选择该列
Excelid.selection.HorizontalAlignment:
=$FFFFEFF4;
//居中
Excelid.selection.MergeCells:
=True;
//小标题
nCurrRow:
=2;
ifSePTitle<
>
'
thenbegin
Sheet.Cells[2,1]:
=SePTitle;
sheet.range[sheet.cells[2,1],sheet.cells[2,nCols]].Select;
//Excelid.selection.HorizontalAlignment:
Excelid.selection.MergeCells:
//表体(包括表头)
nCurrRow:
=3;
fori:
=0tomGrid.RowCount-1dobegin
nCurrCol:
=1;
forj:
=0tomGrid.ColCount-1dobegin
0thenbegin
ifpos('
'
+inttostr(j)+'
+pStrCols+'
)<
0thenbegin//导出为字符串格式
Sheet.Cells[nCurrRow,nCurrCol].NumberFormatLocal:
='
@'
Sheet.Cells[nCurrRow,nCurrCol]:
=mGrid.Cells[j,i];
endelsebegin
end;
=nCurrCol+1;
=nCurrRow+1;
//表尾文字
Sheet.Cells[nCurrRow,1]:
=pTail;
sheet.range[sheet.cells[nCurrRow,1],sheet.cells[nCurrRow,nCols]].Select;
sheet.cells[1,1].Select;
Excelid.Workbooks[1].SaveAs(FileName);
Excelid.Workbooks[1].close;
Excelid.Quit;
//有时写完后立即退出,但写进程还占用着该文件,不允许退出,所以这里再退出一次
//实际上就是设一点点延迟,
Excelid:
=Unassigned;
如何把数据库表导出为Excel表格?
(用Delphi)
我将演示程序的所有代码贴上,请参考,
一个主窗体From1,一个Table1,一个DataSource1
两个BitBtn
,一个DBGrid1.
unit
Unit1;
interface
uses
Windows,
Messages,
SysUtils,
Variants,
Classes,
Graphics,
Controls,
Forms,
Dialogs,
StdCtrls,
Buttons,
Grids,
DBGrids,
DB,
DBTables;
type
TForm1
=
class(TForm)
Table1:
TTable;
DataSource1:
TDataSource;
DBGrid1:
TDBGrid;
BitBtn1:
TBitBtn;
BitBtn2:
procedure
BitBtn2Click(Sender:
TObject);
FormClose(Sender:
TObject;
var
Action:
TCloseAction);
BitBtn1Click(Sender:
ToExcel(DbGrid:
Tab:
ExcelApp:
variant);
//过程声明
private
{
Private
declarations
}
public
Public
var
Form1:
TForm1;
implementation
uses
ComObj;
//加上comobj
.
{$R
*.dfm}
TForm1.BitBtn2Click(Sender:
begin
close;
TForm1.FormClose(Sender:
Application.Terminate;
Release;
TForm1.BitBtn1Click(Sender:
if
Table1.RecordCount=0
then
Application.MessageBox('
没有数据可导出。
提示'
MB_OK
+
MB_ICONINFORMATION
+
MB_DEFBUTTON2);
Exit;
application.ProcessMessages;
try
=createoleobject('
Excel.application'
except
messageDlg('
请先安装MicroSoft
Excel'
mtError,[mbok],0);
exit;
ExcelApp.Visible
:
True;
ExcelApp.Caption
标题:
ExcelApp.WorkBooks.Add;
ExcelApp.WorkSheets[1].Activate;
ExcelApp.WorkSheets[1].name:
表名'
ExcelApp.ActiveSheet.Rows[1].Font.Bold:
ExcelApp.Columns[1].NumberFormatLocal:
ToExcel(DbGrid1,Table1,ExcelApp);
//调用输出过程
。
恭喜!
#13#10#13#10
数据成功导出,请注意数据备份。
TForm1.ToExcel(DbGrid:
i,j,FieldNum:
with
Tab
do
DisableControls;
fieldNum
dbgrid.fieldCount;
for
i:
=1
to
//写表头
ExcelApp.Cells[1,i]:
=Form1.DBGrid1.Columns[i-1].Title.caption;
first;
=2;
while
not
eof
begin
j:
ExcelApp.Cells[i,j]:
=fields[j-1].AsString;
inc(i);
(i
mod
20)=0
then
ExcelApp.Cells[i+10,1].Activate;
next;
EnableControls;
end.
//加上
TMain_Frm.actTO_SaveExecute(Sender:
ADOQuery1.RecordCount=0
ExportToExcel(DbGrid1,ADOQuery1,ExcelApp);
TMain_Frm.ExportToExcel(DbGrid:
Query:
TAdoQuery;
Query
=Main_Frm.DBGrid1.Columns[i-1].Title.caption;
如果有兴趣交流,QQ:
34348161
利用ComObj控制Excel的相关函数
2009-08-2709:
47
利用ComObj控制Excel的相关函数收藏
(一)使用动态创建的方法
首先创建Excel对象,使用ComObj:
varExcelApp:
Variant;
ExcelApp:
=CreateOleObject('
);
1)显示当前窗口:
ExcelApp.Visible:
2)更改Excel标题栏:
ExcelApp.Caption:
应用程序调用MicrosoftExcel'
3)添加新工作簿:
4)打开已存在的工作簿:
ExcelApp.WorkBooks.Open('
C:
\Excel\Demo.xls'
5)设置第2个工作表为活动工作表:
ExcelApp.WorkSheets[2].Activate;
或
ExcelApp.WorksSheets['
Sheet2'
].Activate;
6)给单元格赋值:
ExcelApp.Cells[1,4].Value:
第一行第四列'
7)设置指定列的宽度(单位:
字符个数),以第一列为例:
ExcelApp.ActiveSheet.Columns[1].ColumnsWidth:
=5;
8)设置指定行的高度(单位:
磅)(1磅=0.035厘米),以第二行为例:
ExcelApp.ActiveSheet.Rows[2].RowHeight:
=1/0.035;
//1厘米
9)在第8行之前插入分页符:
ExcelApp.WorkSheets[1].Rows.PageBreak:
10)在第8列之前删除分页符:
ExcelApp.ActiveSheet.Columns[4].PageBreak:
11)指定边框线宽度:
ExcelApp.ActiveSheet.Range['
B3:
D4'
].Borders[2].Weight:
1-左
2-右
3-顶
4-底
5-斜(\)
6-斜(/)
12)清除第一行第四列单元格公式:
ExcelApp.ActiveSheet.Cells[1,4].ClearContents;
13)设置第一行字体属性:
ExcelApp.ActiveSheet.Rows[1].Font.Name:
隶书'
ExcelApp.ActiveSheet.Rows[1].Font.Color
:
=clBlue;
ExcelApp.ActiveSheet.Rows[1].Font.Bold
ExcelApp.ActiveSheet.Rows[1].Font.UnderLine:
14)进行页面设置:
a.页眉:
ExcelApp.ActiveSheet.PageSetup.CenterHeader:
报表演示'
b.页脚:
ExcelApp.ActiveSheet.PageSetup.CenterFooter:
第&
P页'
c.页眉到顶端边距2cm:
ExcelApp.ActiveSheet.PageSetup.HeaderMargin:
=2/0.035;
d.页脚到底端边距3cm:
=3/0.035;
e.顶边距2cm:
ExcelApp.ActiveSheet.PageSetup.TopMargin:
f.底边距2cm:
ExcelApp.ActiveSheet.PageSetup.BottomMargin:
g.左边距2cm:
ExcelApp.ActiveSheet.PageSetup.LeftMargin:
h.右边距2cm:
ExcelApp.ActiveSheet.PageSetup.RightMargin:
i.页面水平居中:
ExcelApp.ActiveSheet.PageSetup.CenterHorizontally:
j.页面垂直居中:
ExcelApp.ActiveSheet.PageSetup.CenterVertically:
k.打印单元格网线:
ExcelApp.ActiveSheet.PageSetup.PrintGridLines:
15)拷贝操作:
a.拷贝整个工作表:
ExcelApp.ActiveSheet.Used.Range.Copy;
b.拷贝指定区域:
A1:
E2'
].Copy;
c.从A1位置开始粘贴:
ExcelApp.ActiveSheet.Range.['
A1'
].PasteSpecial;
d.从文件尾部开始粘贴:
ExcelApp.ActiveSheet.Range.PasteSpecial;
16)插入一行或一列:
a.ExcelApp.ActiveSheet.Rows[2].Insert;
b.ExcelApp.ActiveSheet.Columns[1].Insert;
17)删除一行或一列:
a.ExcelApp.ActiveSheet.Rows[2].Delete;
b.ExcelApp.ActiveSheet.Columns[1].Delete;
18)打印预览工作表:
ExcelApp.ActiveSheet.PrintPreview;
19)打印输出工作表:
ExcelApp.ActiveSheet.PrintOut;
20)工作表保存:
ifnotExcelApp.ActiveWorkBook.Savedthen
21)工作表另存为:
ExcelApp.SaveAs('
\Excel\Demo1.xls'
22)放弃存盘:
ExcelApp.ActiveWorkBook.Saved:
23)关闭工作簿:
ExcelApp.WorkBooks.Close;
24)退出Excel:
ExcelApp.Quit;
25)删除工作表
ExcelApp.WorkSheets[2].delete;
26)自动适应列
ExcelApp.ActiveSheet.Columns.AutoFit;
27)颜色设置
V:
=ExcelApp.ActiveSheet;
a.V.Rows[2].interior.color:
=clRed;
b.V.Columns[3].interior.color:
=clSkyBlue;