第9章3D动画1Word文档下载推荐.docx
《第9章3D动画1Word文档下载推荐.docx》由会员分享,可在线阅读,更多相关《第9章3D动画1Word文档下载推荐.docx(21页珍藏版)》请在冰豆网上搜索。
1)触发器
2)动作
教材实例:
3D文本动画实例
a)文件菜单选新建→影片。
b)使用绘图窗口创建以下图像演员
从上到下在演员表中依次命名为
3dtogglebutton、bevelTypebutton、bevelDepthbutton、tunnelDepthbutton
smoothnessbutton、displayFacebutton
c)打开文本窗口,创建2d文本:
字体Arial,大小18,行距57对文本演员命名为textSample
d)在演员表中选中textSample,打开属性检查器,在文本标签显示下拉列表中选“3D模式”。
选3D挤压,按下图进行设置
e)使用文本窗口创建如下的2D文本演员:
演员命名为comment。
f)创建以下的文本演员:
userprompt
以下每个精灵都占15帧
3)拖动textSample到分镜表1,设置注册点坐标为(33,39)、墨水效果:
BackgroundTransparent。
4)拖动comment到分镜表通道3,设置注册点坐标为(277,202)、墨水效果:
copy。
5)拖动3dtogglebutton演员到通道5,设置注册点坐标为(75,141)、墨水效果:
BackgroundTransparent。
6)拖动bevelTypebutton演员到通道6,设置注册点坐标为(75,179)、墨水效果:
7)拖动beveDepthbutton演员到通道7,设置注册点坐标为(75,216)、墨水效果:
8)拖动TunnelDepthbutton演员到通道8,设置注册点坐标为(75,141)、墨水效果:
9)拖动Smoothnessbutton演员到通道9,设置注册点坐标为(75,291)、墨水效果:
10)拖动DisplayFacebutton演员到铜道10,设置注册点坐标为(75,329)、墨水效果:
11)拖动userPrompt演员到注册点坐标为(-2,341)、墨水效果:
Copyt。
12)窗口菜单→脚本,输入以下电影演本
onstartMovie
--sothe3dtextwillappearintherightplace
ifmember("
textSample"
).displayMode=#mode3dthen
member("
).model[1].transform.position=vector(-190,-5,0)
).camera("
DefaultView"
).transform.position=vector(81,21,90)
).transform.rotation=vector(-3,0,0)
endif
end
onsetComment
--displaysthecurrent3dtextpropertiesinthecommenttextmember
comment"
).text="
3dText"
&
RETURN&
\
"
bevelType="
&
).bevelType&
bevelDepth="
).bevelDepth&
tunnelDepth="
).tunnelDepth&
smoothness="
).smoothness&
displayFace="
).displayFace
--------------------------------------------------------------------------------
--Allofthehandlersbelowarecalledbyclickingthebuttonsonthestage.
ontoggle3d
--switchesbetween2dand3ddisplaymodes
).displayMode=#modeNormalthen
).displayMode=#mode3d
).transform.rotation=vector(-3,0,0)
setComment
else
).displaymode=#modeNormal
2dText"
onsetBevelType
--setsthebeveleffecton3dtext
).bevelType=#nonethen
).bevelType=#miter
elseifmember("
).bevelType=#miterthen
).bevelType=#round
).bevelType=#roundthen
).bevelType=#none
endif
onsetBevelDepth
--setsthedegreeofthebeveleffect
).bevelDepth<
15then
).bevelDepth=member("
).bevelDepth+1
).bevelDepth=1
onsetTunnelDepth
--setsthedepthofthe3dtext
).tunnelDepth<
100then
).tunnelDepth=member("
).tunnelDepth+10
).tunnelDepth=10
onsetSmoothness
--setsthesmoothnessofcurvesandangledlinesin3dtext
).smoothness<
10then
).smoothness=member("
).smoothness+1
).smoothness=1
onsetDisplayFace
--controlswhichelementsofthe3dtextaredisplayed
--scrollsthroughthepossiblecombinations
).displayFace=[#front]then
).displayFace=[#tunnel]
).displayFace=[#tunnel]then
).displayFace=[#back]
).displayFace=[#back]then
).displayFace=[#back,#tunnel]
).displayFace=[#back,#tunnel]then
).displayFace=[#front,#tunnel]
).displayFace=[#front,#tunnel]then
).displayFace=[#front,#back,#tunnel]
).displayFace=[#front,#back,#tunnel]then
).displayFace=[#front]
13)在分镜表中,右击通道5中3dtoggle精灵,在快捷菜单中选脚本,输入以下脚本
onmouseEnter
cursor280
onmouseLeave
cursor-1
onmouseUp
toggle3d
14)为通道6中的bevelType精灵编写脚本
setBevelType
15)通道7中的bevelDepth精灵编写的bevelDepth脚本
setBevelDepth
16)通道8中的tunneDepth精灵编写的tunneDepth脚本
setTunnelDepth
17)通道9中的Smoothness精灵编写的Smoothness脚本
setSmoothness
18)为通道10中的DisplyFace精灵编写的diaplayface脚本
setDisplayFace
19)在脚本通道15帧编写以下脚本:
onexitFrameme
gotheframe
9-23D克隆动画实例
1、文件菜单→新建→影片。
2、在属性检查器的电影属性中设置舞台大小为512X342舞台颜色为#DDDDDD
3、编辑菜单→属性→精灵,设置精灵的长度为10帧。
4、窗口菜单→shockwave3D,打开shockwave3D窗口,在文本框输入:
internal3D,由此创建了一个3D演员。
5、打开文本窗口,创建名称为title的文本演员,如下图:
6、使用文本窗口,创建名为Clicktocreate的演员,如图
7、文件菜单→导入,以链接方式导入如下图所示的Shockwave3D演员,并命名为linkedW3d
8、使用工具面板创建3个按钮,在演员表中分别命名为cylinder_buttonsphere_buttonbox_button。
(按钮蓝的底色,白字)
9、使分镜表的播放头移动到第1帧。
10、拖动演员Internal3D到分镜表的通道1,设置其注册点的坐标为(163,173)、墨水效果为copy。
11、拖动演员title到分镜表的通道3,设置其注册点的坐标为(117,12)、墨水效果为BackgroundTrandsparent。
12、拖动演员Clicktocreate到分镜表的通道5,设置其注册点的坐标为(344,49)、墨水效果为BackgroundTrandsparent。
13、拖动演员Cylind_button到分镜表的通道7,设置其注册点的坐标为(392,117)、墨水效果为copy。
14、拖动演员sphere_button到分镜表的通道8,设置其注册点的坐标为(392,160)、墨水效果为copy。
15、拖动演员Box_button到分镜表的通道8,设置其注册点的坐标为(392,202)、墨水效果为copy。
16、在分镜表中,选中通道1中的Internal3D精灵,打开属性检查器中的3D模型,
设置照相机位置为(5,168,118)和选转角度为(-69,0,0)。
16、创建电影脚本
onstartMovieme
--Clearthe3dworldwhenthemoviestarts.
internal3D"
).resetWorld()
--BeginpreloadingthelinkedW3D.
linkedW3D"
).preLoad()
endstartMovie
onstopMovieme
--Clearthe3dworldwhenthemoviestops.
endstopMovie
17、在分镜表中选中Cylinder_Button精灵,右击在快捷菜单中选脚本,编写cloneCylinder
onmouseUpme
--Testtomakesurethemodelhasnotalreadybeenclonedintotheinternal3Dmember.
).model("
myCylinder"
)=VOIDthen
--Ifthemodeldoesnotexist,thencallthecustomerhandlercalledcheckMemberState.
checkMemberStateCylinder()
oncheckMemberStateCylinderme
--Firsttestifthestateofthememberisequalto4
).state=4then
--Makeacopyofthe"
aCylinder01"
modelfromthelinkedw3dfileandtheninsertitintotheinternal
--3Dmemberandnamethenewmodel"
.
).cloneModelFromCastmember("
"
\
))
--Leavethehandlerwithoutcontinuing
exit
--Iftheprogramgetshere,thismeansthatthestateisnotequalto4andthehandlerneedstocheckifa
--timeoutobjectexistalready.Ifitdoesthenthehandlerwillcreateanewtimeoutobject.Otherwise,
--thehandlerwilldonothing
iftimeout("
isLoaded"
).timeouthandler=#timeoutthen
--Atimeoutobjectneedstobecreated.Thetimeoutobjectwillcontinuetocallthishandler
--every.5secondstoseeifthelinkedmemberisloadedandhasastateof4.
--Atimeoutobjecthastwoarguments.Thefirstishowoftentheobjectwillcallahandlerin
--milliseconds.InthiscasewewantittocallcheckMemeberStateeverhalfsecond,sothiswould
--bethesameas500milliseconds.Thesecondargumentiswhichhandlertocall.
timeout("
).new(500,#checkMemberStateCylinder)
18、在分镜表中选中Sphere_Button精灵,右击在快捷菜单中选脚本,
编写名为clonesphere的行为脚本
mySphere"
checkMemberStateSphere()
oncheckMemberStateSphereme
aSphere01"
\
timout("
19、在分镜表中选中Box_Button精灵,右击在快捷菜单中选脚本,
编写名为clonebox的行为脚本
myBox"
checkMemberStateBox()
oncheckMemberStateBoxme
aBox01"
19)在脚本窗口的第10帧编写如下帧脚本:
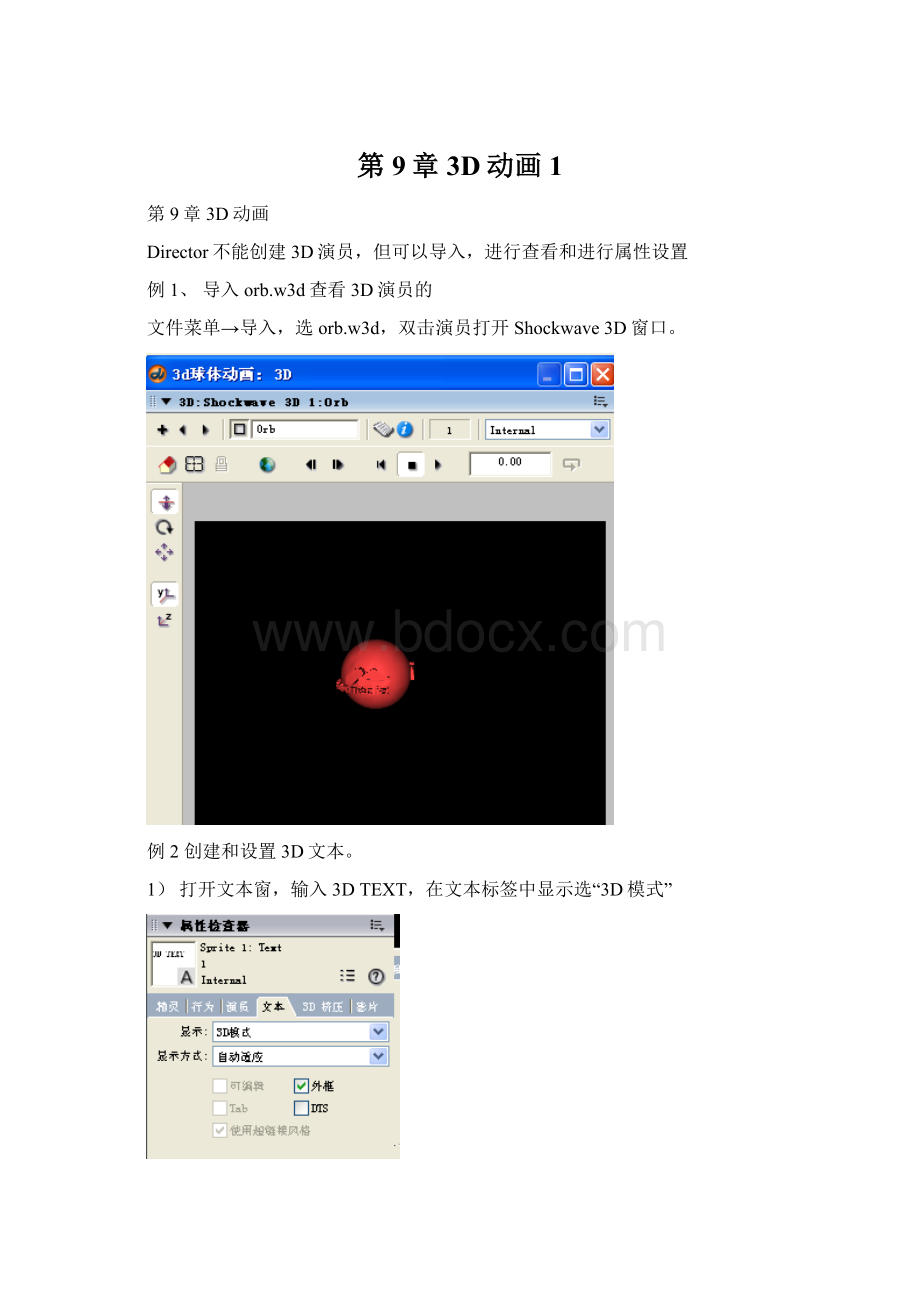
例3D球体动画
2、在属性检查
 升级会员
升级会员 