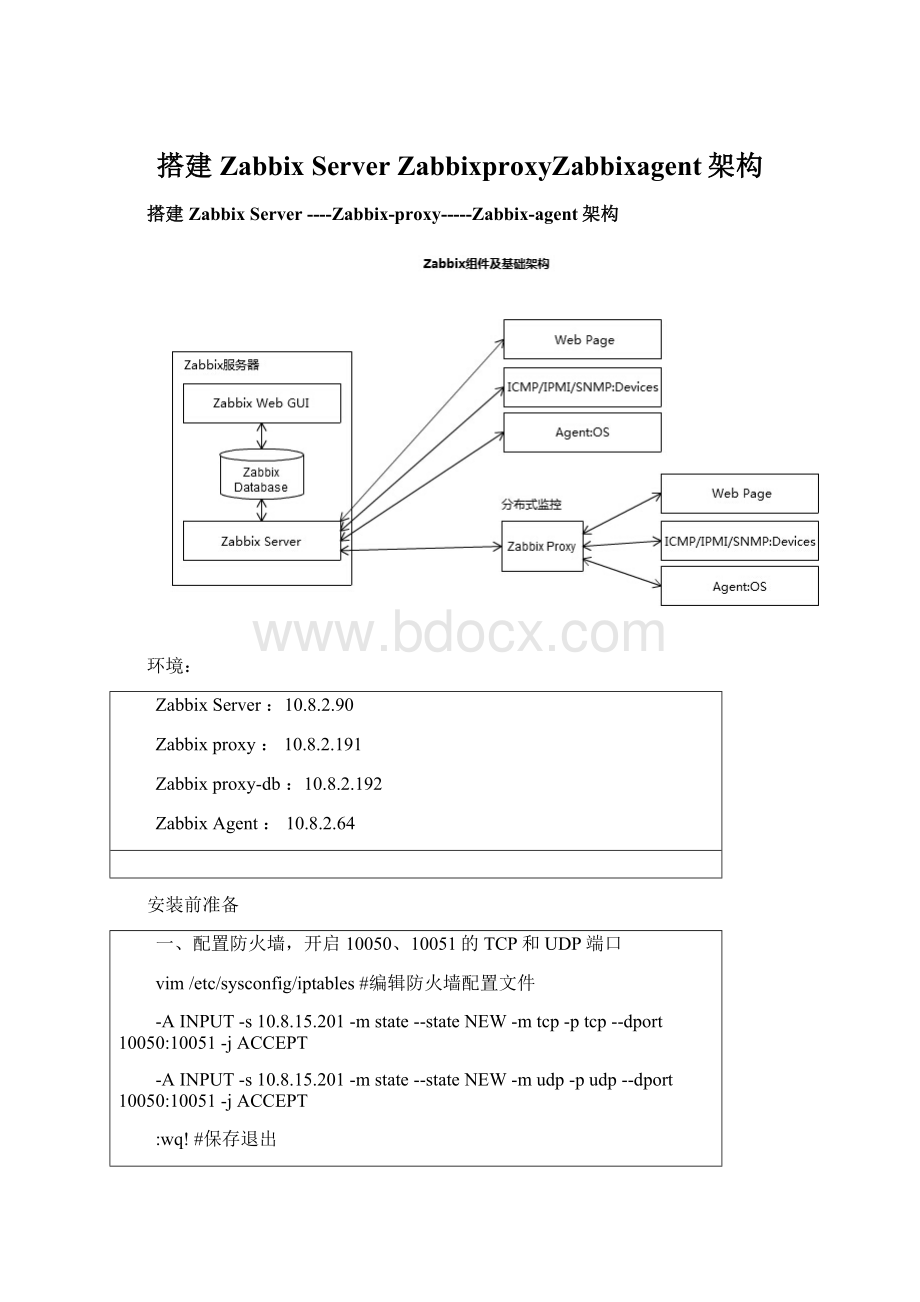
搭建Zabbix Server ZabbixproxyZabbixagent架构Word文档格式.docx
《搭建Zabbix Server ZabbixproxyZabbixagent架构Word文档格式.docx》由会员分享,可在线阅读,更多相关《搭建Zabbix Server ZabbixproxyZabbixagent架构Word文档格式.docx(19页珍藏版)》请在冰豆网上搜索。

SELINUX=disabled#增加
setenforce0#使配置立即生效
ZabbixServer安装
配置安装源
[root@zabbix-servercreate]#rpm-ivh
Retrieving
Preparing...###########################################[100%]
1:
zabbix-release###########################################[100%]
Yum安装
[root@zabbix-servercreate]#yuminstallzabbix-server-mysqlzabbix-web-mysql-y
[root@zabbix-servercreate]#yuminstallzabbix-agent-y
检查安装包
[root@zabbix-servercreate]#rpm-qa|grepzabbix
zabbix-server-2.4.6-1.el6.x86_64
zabbix-web-2.4.6-1.el6.noarch
zabbix-2.4.6-1.el6.x86_64
zabbix-web-mysql-2.4.6-1.el6.noarch
zabbix-agent-2.4.6-1.el6.x86_64
zabbix-release-2.4-1.el6.noarch
zabbix-server-mysql-2.4.6-1.el6.x86_64
安装和启用mysql
[root@zabbix-server~]#yuminstallmysqlmysql-server–y
[root@zabbix-server~]#servicemysqldrestart
Stoppingmysqld:
[OK]
Startingmysqld:
配置mysql
[root@zabbix-server~]#mysql
WelcometotheMySQLmonitor.Commandsendwith;
or\g.
YourMySQLconnectionidis11
Serverversion:
5.1.73Sourcedistribution
Copyright(c)2000,2013,Oracleand/oritsaffiliates.Allrightsreserved.
OracleisaregisteredtrademarkofOracleCorporationand/orits
affiliates.Othernamesmaybetrademarksoftheirrespective
owners.
Type'
help;
'
or'
\h'
forhelp.Type'
\c'
toclearthecurrentinputstatement.
mysql>
create
database
zabbix
character
set
utf8
collate
utf8_bin;
grantallprivilegesonzabbix.*tozabbix@localhostidentifiedby'
zabbix'
;
QueryOK,0rowsaffected(0.00sec)
quit;
[root@zabbix-server~]#cd/usr/share/doc/zabbix-server-mysql-2.4.6/create
[root@zabbix-servercreate]#
[root@zabbix-servercreate]#mysql-urootzabbix<
schema.sql
images.sql
data.sql
同步时间
[root@zabbix-servercreate]#ntpdate10.8.15.109
10Nov14:
06:
30ntpdate[61649]:
adjusttimeserver10.8.15.109offset-0.032635sec
配置zabbix
[root@zabbix-servercreate]#sed-i'
s/^.*DBPassword=.*$/DBPassword=zabbix/'
/etc/zabbix/zabbix_server.conf
[root@zabbix-servercreate]#servicezabbix-serverstart
StartingZabbixserver:
[root@zabbix-servercreate]#servicezabbix-agentstart
StartingZabbixagent:
配置/etc/php.ini
s/^.*date.timezone=.*$/date.timezone=Asia\/Shanghai/g'
/etc/php.ini
s/^.*post_max_size=.*$/post_max_size=16M/g'
s/^.*max_execution_time=.*$/max_execution_time=300/g'
s/^.*max_input_time=.*$/max_input_time=300/g'
[root@zabbix-servercreate]#servicehttpdrestart
[root@zabbix-servercreate]#chkconfigmysqldon
[root@zabbix-servercreate]#chkconfigzabbix-serveron
[root@zabbix-servercreate]#chkconfigzabbix-agenton
[root@zabbix-servercreate]#chkconfighttpdon
通过Web设置zabbix
浏览器中输入地址:
http:
//ip/zabbix,则可看到如下初始化欢迎界面。
PS:
其中ip代表本地服务器对外开放的ip地址
点击Next按钮后如下:
检测zabbix各类需求通过之后即可点击Next按钮,如下:
根据所要填写的需求填写,输入zabbix的密码,这里使用的密码是zabbix,然后点击Testconnection测试连接,显示绿色的“OK”代表数据库连接测试成功,即可点击Next,如下:
预览配置信息,确认无误点击Next按钮,如下:
查看日志,确认zabbix启动没问题
[root@zabbix-servercreate]#tail-20/var/log/zabbix/zabbix_server.log
12985:
20151111:
110853.253server#11started[trapper#3]
12976:
110853.253server#2started[dbwatchdog#1]
12982:
110853.254server#8started[unreachablepoller#1]
12987:
110853.256server#13started[trapper#5]
12989:
110853.256server#15started[alerter#1]
12991:
110853.256server#17started[timer#1]
12984:
110853.258server#10started[trapper#2]
12986:
110853.258server#12started[trapper#4]
12988:
110853.258server#14started[icmppinger#1]
12990:
110853.258server#16started[housekeeper#1]
12980:
110853.259server#6started[poller#4]
12995:
110853.262server#18started[httppoller#1]
12997:
110853.265server#20started[historysyncer#1]
12998:
110853.265server#21started[historysyncer#2]
12999:
110853.266server#22started[historysyncer#3]
13001:
110853.266server#24started[escalator#1]
13000:
110853.266server#23started[historysyncer#4]
13008:
110853.272server#25started[proxypoller#1]
13009:
110853.272server#26started[self-monitoring#1]
12996:
110853.330server#19started[discoverer#1]
Zabbix中文乱码解决方法
zabbix使用DejaVuSan.ttf字体,不支持中文,导致中文出现乱码。
解决方法很简单,把我们电脑里面字体文件传到zabbix服务器上。
1.乱码如下图
zabbix乱码
2.解决zabbix乱码方法
2.1上传文件到zabbix中
找到本地C:
\Windows\Fonts\simkai.ttf(楷体)上传到服务器zabbix网站目录fonts目录下。
zabbix中文字体
zabbix楷体
2.2修改zabbix
php配置文件
1
2
#cd/data/site/#我zabbix安装目录
#sed-i'
s/DejaVuSans/simkai/g'
./include/defines.inc.php
3.
查看zabbix乱码处理结果
zabbix中文乱处理结果
4.常见问题
依旧乱码:
通过以上的操作,大部分同学的乱码问题解决了,但是依旧有一些同学还是乱码?
细心的群友提供另外一种情况:
初始化数据库的时候未使用utf8编码所致.初始化数据库使用命令
createdatabasezabbixdefaultcharsetutf8;
或者f增加如下配置
default-character-set=utf8
5.总结
乱码处理方法很简单,实际上就是替换字体。
配置zabbi-proxy代理server的
[root@zabbix-proxy~]#yuminstallzabbixzabbix-proxyzabbix-proxy-mysql-y
[root@zabbix-proxy~]#cd/etc/zabbix/
[root@zabbix-proxyzabbix]#cpzabbix_proxy.confzabbix_proxy.conf.bak
[root@zabbix-proxyzabbix]#>
zabbix_proxy.conf
[root@zabbix-proxyzabbix]#egrep-v"
(^#|^$)"
zabbix_proxy.conf.bak>
修改配置
[root@zabbix-proxyzabbix]#vimzabbix_proxy.conf
Server=10.8.2.90
Hostname=zabbix-proxy
LogFile=/var/log/zabbix/zabbix_proxy.log
LogFileSize=0
PidFile=/var/run/zabbix/zabbix_proxy.pid
ProxyMode=0
DBHost=10.8.2.192
DBName=zabbix
DBUser=zbuser
DBPassword=zbpass
DBPort=3306
ConfigFrequency=5
DataSenderFrequency=5
ExternalScripts=/usr/lib/zabbix/externalscripts
启动zabbix-proxy
[root@zabbix-proxyzabbix]#servicezabbix-proxyrestart
ShuttingdownZabbixproxy:
StartingZabbixproxy:
查看启动状态
[root@zabbix-proxymysql]#tail-20/var/log/zabbix/zabbix_proxy.log
51157:
115454.459proxy#9started[unreachablepoller#1]
51155:
115454.459proxy#7started[poller#4]
51154:
115454.461proxy#6started[poller#3]
51161:
115454.463proxy#13started[trapper#4]
51163:
115454.464proxy#15started[icmppinger#1]
51165:
115454.464proxy#17started[httppoller#1]
51149:
115454.464receivedconfigurationdatafromserver,datalen5672
51167:
115454.464proxy#19started[historysyncer#1]
51160:
115454.467proxy#12started[trapper#3]
51162:
115454.467proxy#14started[trapper#5]
51164:
115454.467proxy#16started[housekeeper#1]
51169:
115454.481proxy#21started[historysyncer#3]
51168:
115454.481proxy#20started[historysyncer#2]
51171:
115454.481proxy#23started[self-monitoring#1]
51170:
115454.483proxy#22started[historysyncer#4]
51166:
115454.536proxy#18started[discoverer#1]
51149:
115459.548receivedconfigurationdatafromserver,datalen5672已经连zabbixserver
115504.613receivedconfigurationdatafromserver,datalen5672
115509.654receivedconfigurationdatafromserver,datalen5672
115514.730receivedconfigurationdatafromserver,datalen5672
测试(已配置windowsagentIP10.8.2.64)
z添加主机
abbixproxy的配置总结:
#1.代理服务器只是起到一个数据收集器的作用,它把收集到的数据按一定的频率传送给zabbix服务器
2.有主动模式和被动模式两种,主动与被动是针对zabbixproxy而言的,我在这用的是主动模式,只需配置zabbixproxy的配置文件即可,在zabbixserver端不做任何配置,
3.关键是在zabbixserver的前端创建代理节点的名字时,该名字应和zabbix代理配置文件中指定的Hostname值相同
部署zabbixagent
[root@python2yum.repos.d]#rpm-ivh
warning:
/var/tmp/rpm-tmp.9Y9Io1:
HeaderV4DSA/SHA1Signature,keyID79ea5ed4:
NOKEY
[root@python2yum.repos.d]#yuminstallzabbix-agent
[root@python2yum.repos.d]#rpm-qa|grepzabbix
zabbix-2.4.7-1.el6.x86_64
zabbix-agent-2.4.7-1.el6.x86_64
[root@python2yum.repos.d]#servicezabbix-agentrestart
ShuttingdownZabbixagent:
编辑zabbix_agent配置文件
[root@mysql2zabbix_agentd.d]#sed-i-e"
/ServerActive=/s/127.0.0.1/10.8.15.89/"
/etc/zabbix/zabbix_agentd.conf
测试
[root@zabbixinit.d]#zabbix_get-s10.8.15.201-p10050-kmysql.Table_locks_immedi