Sencha Ext JS 国际化和本地化Word格式文档下载.docx
《Sencha Ext JS 国际化和本地化Word格式文档下载.docx》由会员分享,可在线阅读,更多相关《Sencha Ext JS 国际化和本地化Word格式文档下载.docx(18页珍藏版)》请在冰豆网上搜索。
Myenglishtitle'
});
这样,应用程序的任何地方都能访问译文了,怎样访问呢?
就像打字一样简单:
Jnesis.Labels.button或Jnesis.Labels.title
这样做比”重写”类的方法优点在于本地化的值在一个文件里且容易使用,因为像上面看到的那样,每个元素是一个变量.
一旦做到这一点,我们选择其他语言后只需要”重写”覆盖这个语言文件.有两个步骤:
1.从web服务加载数据,服务器响应回的JSON看起来像这样:
{
"
button"
:
MonBouton"
title"
Montitre"
}
我们需要解析数据并用解析到的值覆盖我们默认的本地化单例类:
Ext.define('
Jnesis.Application'
launch:
function(){
Ext.Ajax.request({
url:
get-localization'
params:
{locale:
'
fr'
},
callback:
function(options,success,response){
vardata=Ext.decode(response.responseText,true);
Ext.override(Jnesis.Labels,data);
Ext.create('
Jnesis.view.main.Main'
);
}
});
加载重写的ExtJS类:
Jnesis.locale.fr.Labels'
override:
MonBouton'
Montitre'
然后用Ext.Loader.loadscript方法处理它,当它完成后加载我们的主视图:
varlang='
url='
resources/locale/'
+lang+'
/Labels.js'
;
Ext.Loader.loadScript({
url,
onLoad:
function(options){
然后,我们希望通过在component基类里定义一个新的属性(例如:
”localized”),使用我们擅长的原生继承机制获取到翻译类属性.这个属性可以是由键,值组成的简单JavaScript对象(记住上面的Jnesis.Labels.button和Jnesis.Labels.title).
用定义键的字符串,就可以获取到对象的值:
extend:
Ext.panel.Panel'
localized:
{
Jnesis.Labels.title'
},
buttons:
[{
text:
Jnesis.Labels.button'
handler:
onClickButton'
}]
一旦做到这一点,我们只需要重写”initComponent”的基类方法并将键的字符串转换为对象的值,那么我们就可以在任意ExtJS组件里使用了:
overrides.localized.Component'
Ext.Component'
initComponent:
function(){
varme=this,
localized=me.localized,
value;
if(Ext.isObject(localized)){
for(varpropinlocalized){
value=localized[prop];
if(value){
me[prop]=eval(value);
me.callParent(arguments);
此解决方案以透明的方式在任何层级的组件声明(Container配置或item配置)正常运行.
我的解决方案
综合官方方案、Saki博客和Sencha论坛网友提供的方法,再根据自身项目的修改,形成自己的解决方案.
项目介绍
前端全部采用ExtJs开发的单页面Desktop应用程序,也就是使用了ExtJs里的Desktop组件加以修改.使用SenchaCmd进行构建.
后端采用JavaspringMVC
修改需求:
现需要将中文版加入英文版功能,并且可以随浏览器语言来识别显示中文版还是英文版,并且可以由用户自行修改语言,并记住语言.
需求分析:
其实就是要做国际化和本地化,但后端和前端都有需要做国际化地方,所以统一由server端管理
获取语言:
当打开应用时浏览器通过js查询本地cookie并获取,
设置语言:
当用户点击指定语言,发送请求到server修改cookies里的语言并响应回由浏览器接收显示
server端国际化由springmvc完成
前端国际化分为两部分
A.为项目内容的国际化,如产品,客户,用户登录等.
B.为ExtJS自身组件的国际化,例如必填字段提示文字,grid列头选择标题字等.
实现A的方案
要想实现A,参考官方的方案即可,且可以做到无刷新更换语言.因为官方的方案是只写了一个类,另一种语言需要从后端请求JSON覆盖JS类的方法来实现,不够统一,我将其修改为以下方法:
定义一个单例的翻译类Locale,加入了多语言属性:
VSMS.Locale'
lang:
zh_CN'
username:
zh_CN:
用户名'
en:
Username'
inputusername:
输入用户名'
Inputusername'
login:
登录'
Login'
forgotpassword:
忘记密码'
Forgotpassword'
logout:
注销'
Logout'
Dywexit:
确定要退出吗?
Exit?
password:
密码'
Password'
inputpassword:
输入密码'
Inputpassword'
checkcode:
验证码'
Checkcode'
changeone:
换一张'
Change'
autologin:
自动登录'
Autologin'
})
Application初始化时初始化VSMS.Locale.lang:
VSMS.Application'
Ext.app.Application'
name:
VSMS'
stores:
[
//TODO:
addglobal/sharedstoreshere
],
//获取cookie本地化语言
varlang=Ext.util.Cookies.get('
lang'
if(!
lang){
lang='
VSMS.Locale.lang=lang;
在SenchaCmd项目里的overrides新建目录localized,并重写Component的initComponent方法:
me[prop]=eval(value)[VSMS.Locale.lang];
//根据不同语言来获取不同属性的值
在view上使用localized属性包住需要翻译的属性,完整的view太长,下面显示了一个片段:
items:
xtype:
textfield'
username'
fieldLabel:
VSMS.Locale.username'
//用户名
emptyText:
VSMS.Locale.inputusername'
//输入用户名
fieldCls:
logininput'
beforeBodyEl:
<
iid=\'
iconuser\'
class=\'
fafa-userloginicontloginiconuloginicon\'
>
/i>
enableKeyEvents:
true
那么在viewController里如何使用翻译属性呢?
参照下面的写法:
VSMS.Locale.changeone[VSMS.Locale.lang]
到现在,所有A部分的国际化完成了.
实现B的方案
我们知道,在用SenchaCmd构建不同语言应用程序时需要在项目根目录的app.json指定:
requires"
ext-locale"
]
locales"
zh_CN"
注意:
locales不要写成locale了,我因为写错了导致找了很久_
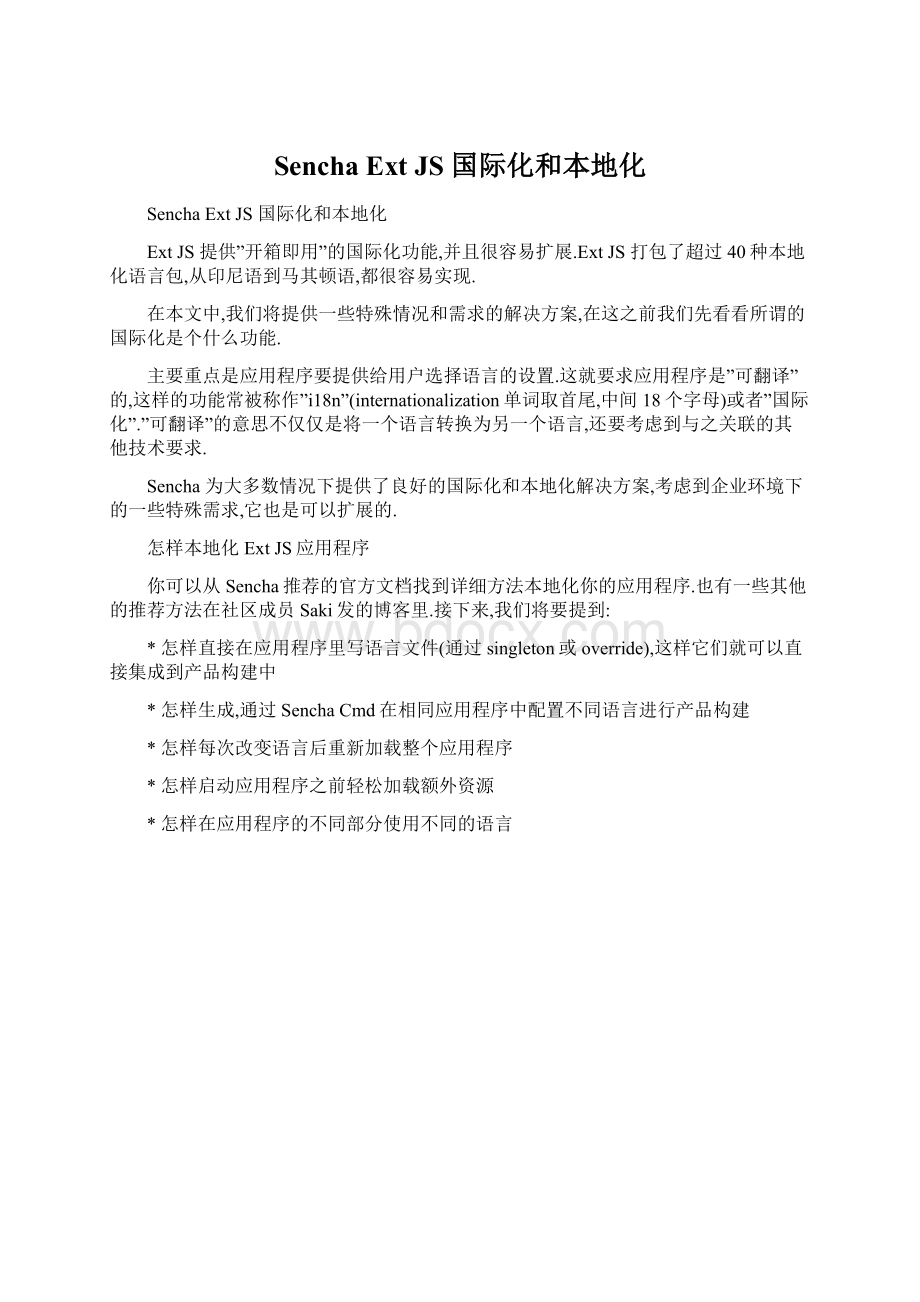
可是在构建时locales只能构建一个语言.如果能构建多个语言,并通过一个”index.html”进行选择加载就能实现B的国际化了.思路如下图:
下面是实现方法
修改SenchaCmd项目根目录下app.json的以下属性:
en"
builds"
crisp"
theme"
ext-theme-crisp"
bootstrap"
base"
${app.dir}"
manifest"
${build.id}.json"
microloader"
bootstrap.js"
css"
bootstrap.css"
output"
${workspace.build.dir}/${build.environment}/${app.name}/${build.id}"
page"
../index.html"
../${build.id}.json"
deltas"
enable"
false
cache"
js"
optimize"
callParent"
cssPrefix"
defines"
修改build.xml文件如下:
?
xmlversion="
1.0"
encoding="
utf-8"
projectname="
${app.name}"
default="
.help"
<
!
--
Thebuild-impl.xmlfileimportedherecontainsthegutsofthebuildprocess.Itis
agreatideatoreadthatfiletounderstandhowtheprocessworks,butitisbestto
limityourchangestothisfile.
-->
importfile="
${basedir}/.sencha/app/build-impl.xml"
/>
Thefollowingtargetscanbeprovidedtoinjectlogicbeforeand/orafterkeysteps
ofthebuildprocess:
The"
init-local"
targetisusedtoinitializepropertiesthatmaybepersonalized
forthelocalmachine.
targetname="
-before-init-local"
-after-init-local"
clean"
targetisusedtocleanbuildoutputfromthebuild.dir.
-before-clean"
-after-clean"
Thegeneral"
init"
targetisusedtoinitializeallotherproperties,including
thoseprovidedbySenchaCmd.
-before-init"
-after-init"
targetperformsthecalltoSenchaCmdtobuildthe'
all-classes.js'
file.
-before-page"
-after-page"
build"
targetperformsthecalltoSenchaCmdtobuildtheapplication.
-before-build"
-after-build"
macrodefname="
x-run-build"
attributename="
target"
locale"
buildName"
@{theme}"
buildId"
@{theme}-@{locale}"
sequential>
if>
equalsarg1="
@{locale}"
arg2="
"
then>
antdir="
${basedir}"
inheritall="
false"
inheritrefs="
true"
target="
@{target}"
propertyname="
compiler.ref.id"
value="
${compiler.ref.id}-@{theme}"
app.theme"
ext-theme-@{theme}"
app.build.dir.suffix"
cmd.dir"
${cmd.dir}"
build.environment"
${build.environment}"
pression.yui"
${pression.yui}"
build.id"
@{buildId}"
build.name"
@{buildName}"
/ant>
/then>
else>
${compiler.ref.id}-@{theme}-@{locale}"
app.locale"
ext-theme-@{theme}-@{locale}"
/else>
/if>
/sequential>
/macrodef>
build-all"
depends="
build-crisp,build-crisp-touch"
--<
init,clean-all"
-->
init,build-all"
--Build-->
build-crisp"
echo>
Build${app.name}-CrispTheme<
/echo>
x-run-buildtheme="
app-build-impl.build"
/target>
target
 升级会员
升级会员 