简单制作U盘版BT4+附带工具Word格式.docx
《简单制作U盘版BT4+附带工具Word格式.docx》由会员分享,可在线阅读,更多相关《简单制作U盘版BT4+附带工具Word格式.docx(13页珍藏版)》请在冰豆网上搜索。
现在发出来和大家共享下吧
记得顶下
谢谢“[url=
要吧U盘格式化成FAT32格式的
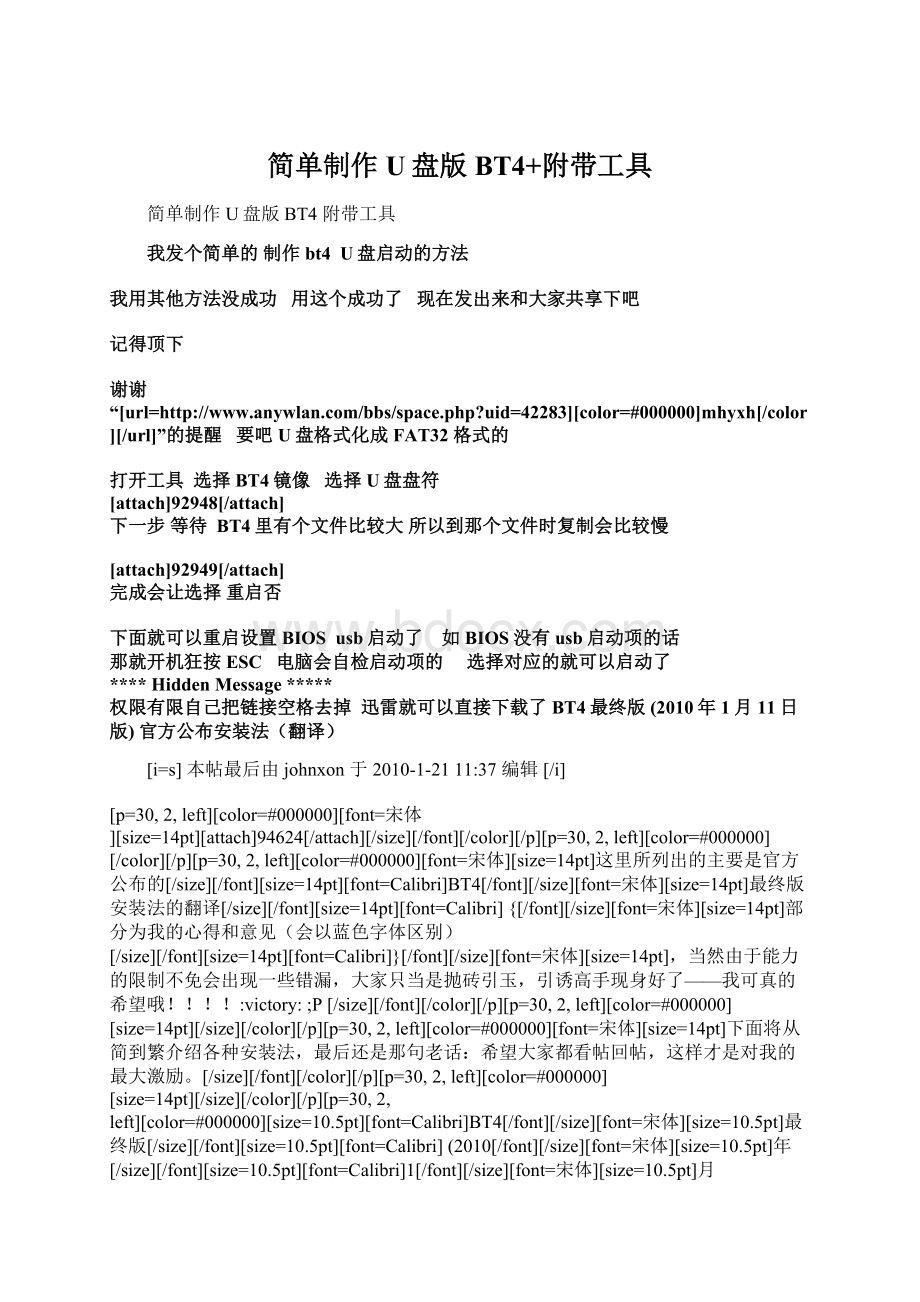
打开工具
选择BT4镜像
选择U盘盘符
[attach]92948[/attach]
下一步等待
BT4里有个文件比较大所以到那个文件时复制会比较慢
[attach]92949[/attach]
完成会让选择重启否
下面就可以重启设置BIOS
usb启动了
如BIOS没有usb启动项的话
那就开机狂按ESC
电脑会自检启动项的
选择对应的就可以启动了
****HiddenMessage*****
权限有限自己把链接空格去掉
迅雷就可以直接下载了BT4最终版(2010年1月11日版)官方公布安装法(翻译)
[i=s]本帖最后由johnxon于2010-1-2111:
37编辑[/i]
[p=30,2,left][color=#000000][font=宋体][size=14pt][attach]94624[/attach][/size][/font][/color][/p][p=30,2,left][color=#000000]
[/color][/p][p=30,2,left][color=#000000][font=宋体][size=14pt]这里所列出的主要是官方公布的[/size][/font][size=14pt][font=Calibri]BT4[/font][/size][font=宋体][size=14pt]最终版安装法的翻译[/size][/font][size=14pt][font=Calibri]{[/font][/size][font=宋体][size=14pt]部分为我的心得和意见(会以蓝色字体区别)[/size][/font][size=14pt][font=Calibri]}[/font][/size][font=宋体][size=14pt],当然由于能力的限制不免会出现一些错漏,大家只当是抛砖引玉,引诱高手现身好了——我可真的希望哦!
!
:
victory:
;
P[/size][/font][/color][/p][p=30,2,left][color=#000000]
[size=14pt][/size][/color][/p][p=30,2,left][color=#000000][font=宋体][size=14pt]下面将从简到繁介绍各种安装法,最后还是那句老话:
希望大家都看帖回帖,这样才是对我的最大激励。
[/size][/font][/color][/p][p=30,2,left][color=#000000]
[size=14pt][/size][/color][/p][p=30,2,left][color=#000000][size=10.5pt][font=Calibri]BT4[/font][/size][font=宋体][size=10.5pt]最终版[/size][/font][size=10.5pt][font=Calibri](2010[/font][/size][font=宋体][size=10.5pt]年[/size][/font][size=10.5pt][font=Calibri]1[/font][/size][font=宋体][size=10.5pt]月[/size][/font][size=10.5pt][font=Calibri]11[/font][/size][font=宋体][size=10.5pt]日版[/size][/font][size=10.5pt][font=Calibri])[/font][/size][font=宋体][size=10.5pt]下载可到本人的帖子[/size][/font][size=10.5pt][font=Calibri]”BackTrack4(BT4)[/font][/size][font=宋体][size=10.5pt]最终版[/size][/font][size=10.5pt][font=Calibri](2010[/font][/size][font=宋体][size=10.5pt]年[/size][/font][size=10.5pt][font=Calibri]1[/font][/size][font=宋体][size=10.5pt]月[/size][/font][size=10.5pt][font=Calibri]11[/font][/size][font=宋体][size=10.5pt]日版[/size][/font][size=10.5pt][font=Calibri])[/font][/size][font=宋体][size=10.5pt]改新下载地址了!
(再加[/size][/font][size=10.5pt][font=Calibri]U[/font][/size][font=宋体][size=10.5pt]盘[/size][/font][font=宋体][size=10.5pt]安装方法。
)[/size][/font][size=10.5pt][font=Calibri]”[/font][/size][font=宋体][size=10.5pt]处下载:
[/size][/font][/color][size=10.5pt]
[url=2,left]
[size=14pt][/size][/p][p=30,2,left][size=14pt][/size][/p][p=30,2,left][color=#000000][font=宋体][size=14pt]首先介绍最基础的安装方法([/size][/font][size=14pt][font=Calibri]LiveCD[/font][/size][font=宋体][size=14pt]在官网没有提及就不说了),同时也是其它安装方法的基础和必需(仅为我的理解。
不知道有没有其它办法。
)[/size][/font][/color][/p][p=30,2,left][font=宋体][color=#000000][/color][/font][/p][p=30,2,left][color=#000000][size=14pt][/size][/color][/p][p=30,2,left][size=14pt][font=Calibri][color=#000000][/color][/font][/size][/p][p=30,2,left][size=14pt][font=Calibri][color=#000000]BackTrackLiveUSBInstall[/color][/font][/size][/p][p=30,2,left][color=#000000][size=14pt][font=Calibri]LiveU[/font][/size][font=宋体][size=14pt]盘安装方法[/size][/font][/color][/p][p=30,2,left][color=#000000]
[/color][/p][color=#000000]
[/color][p=30,2,left][size=14pt][attach]94625[/attach][/size][/p][p=30,2,left][size=14pt][/size][/p][size=14pt][p=30,2,left][color=#000000][font=宋体][size=14pt]这是使用[/size][/font][size=14pt][font=Calibri]Unetbootin[/font][/size][font=宋体][size=14pt]进行最简单的[/size][/font][size=14pt][font=Calibri]U[/font][/size][font=宋体][size=14pt]盘安装方法。
注意:
我们将对[/size][/font][size=14pt][font=Calibri]U[/font][/size][font=宋体][size=14pt]盘进行格式化,并擦除里面所有的内容。
[/size][/font][size=14pt][/size][/color][/p][p=30,2,left][color=#000000][size=14pt][font=Calibri]1.[/font][/size][font=宋体][size=14pt]插入你的[/size][/font][size=14pt][font=Calibri]U[/font][/size][font=宋体][size=14pt]盘(最少[/size][/font][size=14pt][font=Calibri]2G[/font][/size][font=宋体][size=14pt]空间)[/size][/font][size=14pt][/size][/color][/p][p=30,2,left]
[color=#000000][size=14pt][font=Calibri]
2.[/font][/size][font=宋体][size=14pt]格式化成[/size][/font][size=14pt][font=Calibri]FAT32[/font][/size][font=宋体][size=14pt]格式[/size][/font][/color][size=14pt]
[/size][/p][p=30,2,left][color=#000000][size=14pt][font=Calibri]3.[/font][/size][font=宋体][size=14pt]从[url=
[color=#000000][font=宋体][size=14pt]
下载地址:
[url=2,left][font=宋体][color=#000000][/color][/font][color=#000000][font=Calibri]
[/p][size=14pt][/size][/font][/color][p=30,2,left][color=#000000][font=Calibri][size=14pt]4.[/size][/font][font=宋体][size=14pt]打开[/size][/font][size=14pt][font=Calibri]Unetbootin[/font][/size][font=宋体][size=14pt]并选择[/size][/font][size=14pt][font=Calibri]‘diskimage'
[/font][/size][font=宋体][size=14pt](使用[/size][/font][size=14pt][font=Calibri]BackTrack4[/font][/size][font=宋体][size=14pt]最终版的光盘版)。
[/size][/font][/color][/p][p=30,2,left][font=宋体][color=#000000][/color][/font]
[/p][color=#000000][size=14pt][font=Calibri][/font][/size][/color][p=30,2,left][color=#000000][size=14pt][font=Calibri][/font][/size][/color][/p][p=30,2,left][color=#000000][size=14pt][font=Calibri]5.[/font][/size][font=宋体][size=14pt]选择你的[/size][/font][size=14pt][font=Calibri]U[/font][/size][font=宋体][size=14pt]盘,点击[/size][/font][size=14pt][font=Calibri]'
OK'
[/font][/size][font=宋体][size=14pt]即可创建[/size][/font][size=14pt][font=Calibri]BackTrack4[/font][/size][font=宋体][size=14pt]最终版的启动[/size][/font][size=14pt][font=Calibri]U[/font][/size][font=宋体][size=14pt]盘。
[/size][/font][/color][/p]
[color=#000000][size=14pt][font=Calibri][/font][/size][/color][p=30,2,left][color=#000000][size=14pt][font=Calibri]6.[/font][/size][font=宋体][size=14pt]使用默认用户名[/size][/font][size=14pt][font=Calibri]root[/font][/size][font=宋体][size=14pt]和密码[/size][/font][size=14pt][font=Calibri]toor[/font][/size][font=宋体][size=14pt]登录[/size][/font][size=14pt][font=Calibri]BackTrack4[/font][/size][/color][font=宋体][size=14pt][color=#000000]。
[/color][color=#4f81bd](其实光输入“[/color][/size][/font][color=#4f81bd][size=14pt][font=Calibri]startx[/font][/size][/color][font=宋体][size=14pt]”就行了。
)[/size][/font][/p]
[p=30,2,left]
[size=14pt][color=red]未完,请勿插楼。
[/color][/size][/p][p=30,2,left][/size][/p]
johnxon发表于2010-1-2111:
29
39编辑[/i]
[p=30,2,left][color=#000000][size=14pt][font=Calibri]LiveU[/font][/size][font=宋体][size=14pt]盘是不能保存设置的,所以现在到了介绍其它可保存设置的安装方法:
[/size][/font][size=14pt][/size][/color][/p][p=30,2,left][size=14pt][font=Calibri][color=#000000][/color][/font][/size][/p][p=30,2,left][color=#000000][font=Calibri][size=14pt][font=Calibri]1.[/font][/size][/font][size=14pt][font=Calibri]BackTrackCleanHardDriveInstall[/font][/size][/color][/p][p=30,2,left][font=宋体][size=14pt][color=#000000]
全硬盘安装法[/color][/size][/font][/p][p=30,2,left][font=宋体][size=14pt][color=#000000][/color][/size][/font][/p]
[p=30,2,left][b][font=宋体][size=18pt][attach]94626[/attach][/size][/font][/b][/p][p=30,2,left][b][font=宋体][size=18pt][/size][/font][/b][/p][p=30,2,left][b][font=宋体][size=18pt][/size][/font][/b][/p][font=宋体][size=18pt][p=30,2,left][color=#000000][font=宋体][size=14pt][/size][/font][/color][/p][p=30,2,left][color=#000000][font=宋体][size=14pt]如果在硬盘中只使用[/size][/font][size=14pt][font=Calibri]BackTrack[/font][/size][font=宋体][size=14pt],那这种方法是最简单易行的。
[/size][/font][/color][/p][p=30,2,left][color=#000000][size=14pt][/size][/color][/p][p=30,2,left][size=14pt][font=Calibri][color=#000000]1.[/color][/font][/size][font=宋体][size=14pt](用[/size][/font][color=#4f81bd][size=14pt][font=Calibri]LiveU[/font][/size][/color][font=宋体][size=14pt]盘)[/size][/font][color=#000000][font=宋体][size=14pt]启动电脑进行安装。
启动一完成,就键入[/size][/font][size=14pt][font=Calibri][/font][/size][font=宋体][size=14pt]“[/size][/font][size=14pt][font=Calibri]statx[/font][/size][font=宋体][size=14pt]”[/size][/font][size=14pt][font=Calibri][/font][/size][font=宋体][size=14pt]进入[/size][/font][size=14pt][font=Calibri]KDE[/font][/size][font=宋体][size=14pt]界面。
[/size][/font][/color][/p][p=30,2,left][color=#000000][/color][/p][p=30,2,left][font=宋体][size=12pt][color=#000000][/color][/size][/font][/p][p=30,2,left][color=#000000][size=14pt][font=Calibri]2.[/font][/size][font=宋体][size=14pt]双击桌面的[/size][/font][size=14pt][font=Calibri][/font][/size][font=宋体][size=14pt]“[/size][/font][size=14pt][font=Calibri]install.sh[/font][/size][font=宋体][size=14pt]”[/size][/font][size=14pt][font=Calibri][/font][/size][font=宋体][size=14pt]图标,或在指令窗中输入命令[/size][/font][size=14pt][font=Calibri][/font][/size][font=宋体][size=14pt]“[/size][/font][size=14pt][font=Calibri]ubiquity[/font][/size][font=宋体][size=14pt]”。
[/size][/font][/color][/p][p=30,2,left][color=#000000][font=宋体][size=12pt][/size][/font][/color][/p][p=30,2,left][font=宋体][size=12pt][color=#000000][/color][/size][/font][/p][p=30,2,left][color=#000000][size=14pt][font=Calibri]3.[/font][/size][font=宋体][size=14pt]选择你的地理位置,点击“[/size][/font][size=14pt][font=Calibri]forward[/font][/size][font=宋体][size=14pt]”。
选择“[/size][/font][size=14pt][font=Calibri]Keyboardlayout[/font][/size][font=宋体][size=14pt]”(键盘类型)时也一样。
[/size][/font][size=14pt][/size][/color][/p][p=30,2,left][font=宋体][size=12pt][color=#000000][/color][/size][/font][/p][p=30,2,left][color=#000000][size=14pt][font=Calibri][/font][/size][/color][/p][p=30,2,left][color=#000000][size=14pt][font=Calibri]4.[/font][/size][font=宋体][size=14pt]下一个窗口允许你对硬盘分区进行设置。
现在我们删空了整个硬盘,并将[/size][/font]
 升级会员
升级会员 