实验1Linux下的C语言编程.docx
《实验1Linux下的C语言编程.docx》由会员分享,可在线阅读,更多相关《实验1Linux下的C语言编程.docx(44页珍藏版)》请在冰豆网上搜索。

实验1Linux下的C语言编程
实验一Linux下的C语言编程
1、实验内容
(1)编一个C程序,其内容为实现文件拷贝的功能;
(2)编一个C程序,其内容为分窗口同时显示三个并发进程的运行结果。
要求用到Linux下的图形库。
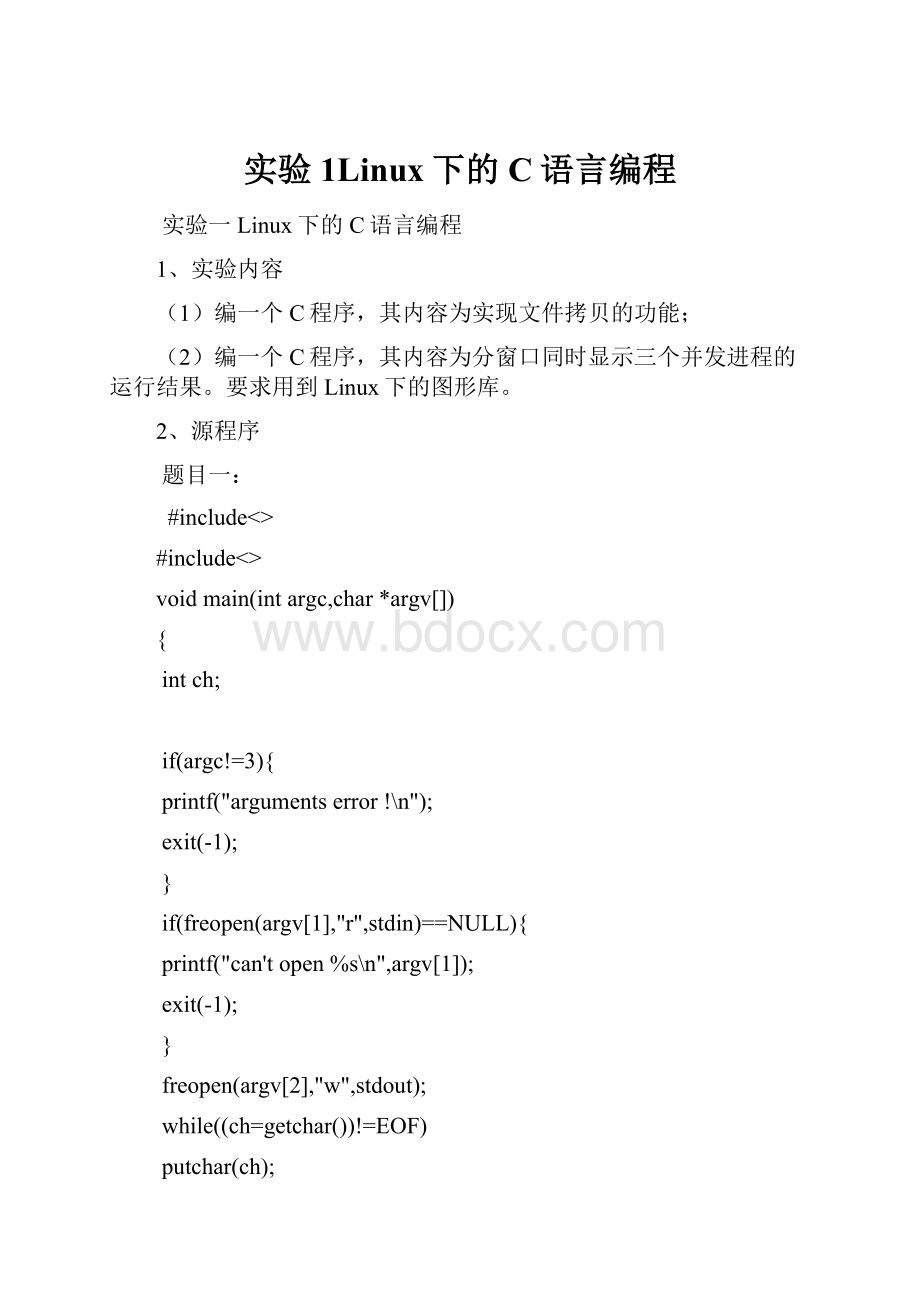
2、源程序
题目一:
#include<>
#include<>
voidmain(intargc,char*argv[])
{
intch;
if(argc!
=3){
printf("argumentserror!
\n");
exit(-1);
}
if(freopen(argv[1],"r",stdin)==NULL){
printf("can'topen%s\n",argv[1]);
exit(-1);
}
freopen(argv[2],"w",stdout);
while((ch=getchar())!
=EOF)
putchar(ch);
fclose(stdin);
fclose(stdout);
}
题目二:
主程序:
#include<>
#include<>
#include
#include
intmain(intargc,char*argv[]){
pid_tp1,p2,p3;
pid_tt1,t2,t3;
intstatus;
if((p1=fork())==0){
execv("./hua",argv);
}
elseif((p2=fork())==0){
execv("./shao",argv);
}
elseif((p3=fork())==0){
execv("./tan",argv);
}
else{
t1=waitpid(p1,&status,0);
t2=waitpid(p2,&status,0);
t3=waitpid(p3,&status,0);
}
}
进程:
#include
/*一般能够在/usr/include/下找到上边的头文件
*上边的头文件的作用是包括进行GTK编程所有可能用到的头
*文件,包括等
*/
void
cb_button(GtkWidget*widget,gpointerdata)
{
copytanshao,将名为tan的文件复制到shao中。
如此第一个程序就完成了。
题目二:
那个程序利用到了GTK编程,所在在编译时要用一以GTK的编译命令,第一别离把三个子程序编译成可执行文件,与上面的调试一样,先是进入文件目录,稍有不同的是编译命令,gcc-Wall-g-otan`pkg-config--cflags--libsgtk+`,利用该命令就可以把子程序编译成可执行文件。
一样依次将另外两个编译好后,编译主程序,gcc-omain,最后执行main就可以取得要的三个窗口。
实验二系统挪用的实现
一、实验内容
通过编译内核方式,增加一个新的系统挪用。
另编写一个应用程序,挪用新增加的系统挪用。
实现的功能是:
文件拷贝。
二、源程序:
写入到新内核kernel/中的程序:
asmlinkageintsys_filecopy(char*sourceFile,char*distFile)
{
intf1,f2,n;
charbuf[512];
mm_segment_tfs;
if((f1=sys_open(sourceFile,O_RDONLY,0))==-1){
printk("Can'topen%s\n",sourceFile);
sys_exit(-1);
}
if((f2=sys_open(distFile,O_CREAT|O_WRONLY|O_TRUNC,0666))==-1){
printk("Can'tcreat%s,mode%o\n",distFile,0666);
sys_exit(-1);
}
fs=get_fs();
set_fs(get_ds());
while((n=sys_read(f1,buf,512))>0)
{if(sys_write(f2,buf,n)!
=n){
printk("writeerroronfile%s",distFile);
sys_exit(-1);
}
}
set_fs(fs);
sys_close(f1);
sys_close(f2);
return0;
}
测试用的程序:
#include
#include<>
#include
#define__NR_filecopy320
intmain(intargc,char*argv[])
{
inti;
if(argc!
=3)
printf("error!
");
else
{
i=syscall(320,argv[1],argv[2]);
printf("ok!
");
}
return0;
}
三、调试进程:
第一,在中添加系统挪用代码,即上面源程序中的第一个程序.
然后在中,给你的系统挪用分派一个唯一的号码.
#define__NR_filecopy320
最后在中,添加用来对sys_call_table[]数组进行的初始化.添加:
.longsys_filecopy/*320*/
如此,文件的修改就完毕了。
接下来是编译内核。
第一是配置内核,拷贝已存的配置文件.config到新内核中,然后运行makemenuconfig,进入内核配置菜单,移动绿色光标到LoadanAlternateConfigurationFile行后选择.config文件(包括了当前工作内核的配置)做为配置文件:
然后阅读内核配置菜单,选择你需要的功能.完成配置后,选择Exit.
执行下面命令来构建内核:
make-kpkgclean
fakerootmake-kpkg--initrd--append-to-version=-customkernel_imagekernel_headers
等待内核编译完后,安装新内核,在/meida/disk目录下会有两个./deb软件包,安装这两个软件包,安装完后就可以够重启系统了,再次进入系统就可以够进入新内核中运作。
最后编译测试程序,gcc-otest,然后运行测试程序就完成了任务。
实验三增加设备驱动程序
一、实验内容
通过模块方式,增加一个新的设备驱动程序,其功能以简单,实现字符设备的驱动。
二、源程序
编写代码:
#include
#include
#include
#include
#include
#include
inttsh_major=0;/*用来保留申请到的主设备号*/
MODULE_LICENSE("GPL");
char*buffer="tsh";
staticinttsh_open(structinode*inode,structfile*file)
{printk("openfile\n");
return0;
}
staticssize_ttsh_read(structfile*file,char__user*buf,size_tcount,loff_t*pos)
{inttsh;
tsh=copy_to_user(buf,buffer,count);
return1;
}
staticssize_ttsh_write(structfile*file,constchar*buf,size_tcount,loff_t*pos){
inttsh;
tsh=copy_from_user(buffer,buf,count);
return1;
}
staticinttsh_release(structinode*inode,structfile*file)
{
printk("closefile\n");
return0;
}
structfile_operationstsh_fops={/*申请主设备号时用的结构*/
.open=tsh_open,
.read=tsh_read,
.write=tsh_write,
.release=tsh_release,
};
inttsh_init(void)
{
tsh_major=register_chrdev(0,"tanshaohua",&tsh_fops);
if(tsh_major<0)returntsh_major;
printk(KERN_ALERT"mymajornumberis:
%d\n",tsh_major);
return0;
}
voidtsh_cleanup(void)
{
unregister_chrdev(tsh_major,"tanshaohua");
printk(KERN_ALERT"mydevicefilehasbeenremoved\n");
}
module_init(tsh_init);
module_exit(tsh_cleanup);
makefile文件内容:
obj-m:
=
KERNELBUILD:
=/lib/modules/`uname-r`/build
default:
make-C$(KERNELBUILD)M=$(shellpwd)modules
测试程序:
:
#include<>
#include<>
intmain(void){
charbuf[32];
intfd;
printf("pleaseinput:
\n");
scanf("%s",buf);
fd=open("/dev/tanshaohua",O_RDWR);
read(fd,buf,32);
printf("thecontentreadedfromtshis:
%s\n",buf);
return1;
}
:
#include<>
#include<>
intmain(void){
charbuf[32];
intfd;
printf("pleaseinput:
\n");
scanf("%s",buf);
fd=open("/dev/tanshaohua",O_RDWR);
write(fd,buf,32);
read(fd,buf,32);
printf("thecontentreadedfromtshis:
%s\n",buf);
return1;
}
三、调试进程:
第一编写代码,然后编写makefile文件,与放在同一个目录里,接着编译模块sudomake.这时,在所在文件夹里就会有。
插入模块,insmod./,用dmesg查看内核信息,创建设备文件,mknod/dev/tanshaohuac2530
,然后就可以执行测试程序.
任务完成,最后删除模块,rmmod./tanshaohua
实验四图形界面实现系统监控
一、实验内容
了解和掌握/proc文件系统的特点和利用方式,用图形界面实现系统监控状态,显示系统中若干部件利用情形。
二、源程序
#include
#include
#include
#include<>
#include<>
#include<>
#include<>
#include<>
#include<>
#include<>
#include
#include
#include<>
staticGtkWidget*clocker;/*寄存时刻*/
staticGdkPixmap*pixmap=NULL;/*寄存CPU利用曲线图*/
GdkGC*my_gc_red;
GdkColorcolor;
longuser2=0,system2=0,nice2=0,idle2=0,iowait2=0,irq2=0,softirq2=0;/*全局变量,用来寄存获取的CPU利用信息*/
enum{/*进程树表信息*/
col_name=0,
col_stat,
col_pid,
col_ppid,
col_nice,
col_mem,
n_cols1
};
void
on_new_item_activate(GtkMenuItem*menuitem,
gpointeruser_data)
{
}
void
on_open_item_activate(GtkMenuItem*menuitem,
gpointeruser_data)
{
}
void
on_t_1_activate(GtkMenuItem*menuitem,
gpointeruser_data)
{
}
void
on_c_1_activate(GtkMenuItem*menuitem,
gpointeruser_data)
{
}
void
on_p_1_activate(GtkMenuItem*menuitem,
gpointeruser_data)
{
}
void
on_d_1_activate(GtkMenuItem*menuitem,
gpointeruser_data)
{
}
void
on_about1_activate(GtkMenuItem*menuitem,
gpointeruser_data)
{
}
voidon_reboot_item_activate(GtkMenuItem*menuitem,gpointeruser_data)/*重启*/
{
system("reboot");
}
voidon_shutdown_item_activate(GtkMenuItem*menuitem,gpointeruser_data)/*关机*/
{
system("halt");
}
structProcess{/*寄存进程信息*/
charpid[5];
charcomm[20];
charstate[20];
charmem[20];
charppid[20];;
charnice[20];
}pro[200];
floatmm=0,shao=0;
floatutil=0;
voidmodel_data_new1(GtkTreeModel*store1,
constgchar*name,constgchar*stat,constgchar*pid,constgchar*ppid,constgchar*nice,constgchar*mem){/*成立树表数据*/
GtkTreeIteriter;
gtk_list_store_append(GTK_LIST_STORE(store1),&iter);
gtk_list_store_set(GTK_LIST_STORE(store1),&iter,
col_name,name,
col_stat,stat,
col_pid,pid,
col_ppid,ppid,
col_nice,nice,
col_mem,mem,
-1);
}
GtkTreeModel*create_model1(){/*创建树表*/
GtkListStore*store1;
store1=gtk_list_store_new(n_cols1,G_TYPE_STRING,G_TYPE_STRING,G_TYPE_STRING,G_TYPE_STRING,G_TYPE_STRING,G_TYPE_STRING,G_TYPE_STRING);
returnGTK_TREE_MODEL(store1);
}
voidarrange_tree_view1(GtkWidget*view){
GtkCellRenderer*renderer;
renderer=gtk_cell_renderer_text_new();
gtk_tree_view_insert_column_with_attributes(
GTK_TREE_VIEW(view),-1,"进程名\t",renderer,"text",col_name,NULL);
gtk_tree_view_insert_column_with_attributes(
GTK_TREE_VIEW(view),-1,"状态\t",renderer,"text",col_stat,NULL);
gtk_tree_view_insert_column_with_attributes(
GTK_TREE_VIEW(view),-1,"pid\t",renderer,"text",col_pid,NULL);
gtk_tree_view_insert_column_with_attributes(
GTK_TREE_VIEW(view),-1,"ppid\t",renderer,"text",col_ppid,NULL);
gtk_tree_view_insert_column_with_attributes(
GTK_TREE_VIEW(view),-1,"nice\t",renderer,"text",col_nice,NULL);
gtk_tree_view_insert_column_with_attributes(
GTK_TREE_VIEW(view),-1,"内存\t",renderer,"text",col_mem,NULL);
}
intselect_name(charname[])/*查找文件名*/
{inti;
for(i=0;name[i]!
=0;i++)
if(isalpha(name[i])||name[i]=='.')
return0;
return1;
}
intshow_pro_info(void){/*显示进程信息函数*/
DIR*dir;
structdirent*ptr;
intfd,tt;
inti=0;
intj;
inttotal=0;
charpath_statm[50];
charpath_status[50];
charpath_stat[50];
charbuffer[100];
charbuf[100];
dir=opendir("/proc");
while((ptr=readdir(dir))!
=NULL){
if(select_name(ptr->d_name)){
strcpy(pro[i].pid,ptr->d_name);
i++;
total++;
}
}
closedir(dir);
for(i=0;istrcpy(path_statm,"/proc/");
strcpy(path_status,"/proc/");
strcat(path_statm,pro[i].pid);
strcat(path_statm,"/statm");
strcat(path_status,pro[i].pid);
strcat(path_status,"/status");
strcpy(path_stat,"/proc/");
strcat(path_stat,pro[i].pid);
strcat(path_stat,"/stat");
fd=open(path_status,O_RDONLY);
tt=read(fd,buffer,100);
strtok(buffer,":
");
strcpy(pro[i]m,strtok(NULL,"\n"));
strtok(NULL,":
");
strcpy(pro[i].state,strtok(NULL,"\n"));
strtok(NULL,":
");
strtok(NULL,"\n");
strtok(NULL,":
");
strtok(NULL,"\n");
strtok(NULL,":
");
strtok(NULL,"\n");
strtok(NULL,":
");
strcpy(pro[i].ppid,strtok(NULL,"\n"));
close(fd);
fd=open(path_statm,O_RDONLY);
tt=read(fd,buf,100);
strcpy(pro[i].mem,strtok(buf,""));
strcat(pro[i].mem,"kb");
close(fd);
fd=open(path_stat,O_RDONLY);
tt=read(fd,buf,100);
strtok(buf,"");
for(j=0;j<17;j++){
strtok(NULL,"");
}
strcpy(pro[i].nice,strtok(NULL,""));
close(fd);
}
returntotal;
}
gintshow_proc(GtkWidget*treeview1){/*将进程信息插入树表中*/
inti,num;
GtkTreeModel*store=create_model1();
gtk_tree_view_set_model(GTK_TREE_VIEW(treeview1),store);
num=show_pro_info();
/*if(num)gtk_list_store_clear(GTK_LIST_STORE(store));*/
for(i=0;imodel_data_new1(store,pro[i]m,pro[i].state,pro[i].pid,pro[i].ppid,pro[i].nice,pro[i].mem);